Avatar Fingernails in Blender
Table of Contents
Due to being recorded live be aware there are audio issues in the above video.
Description
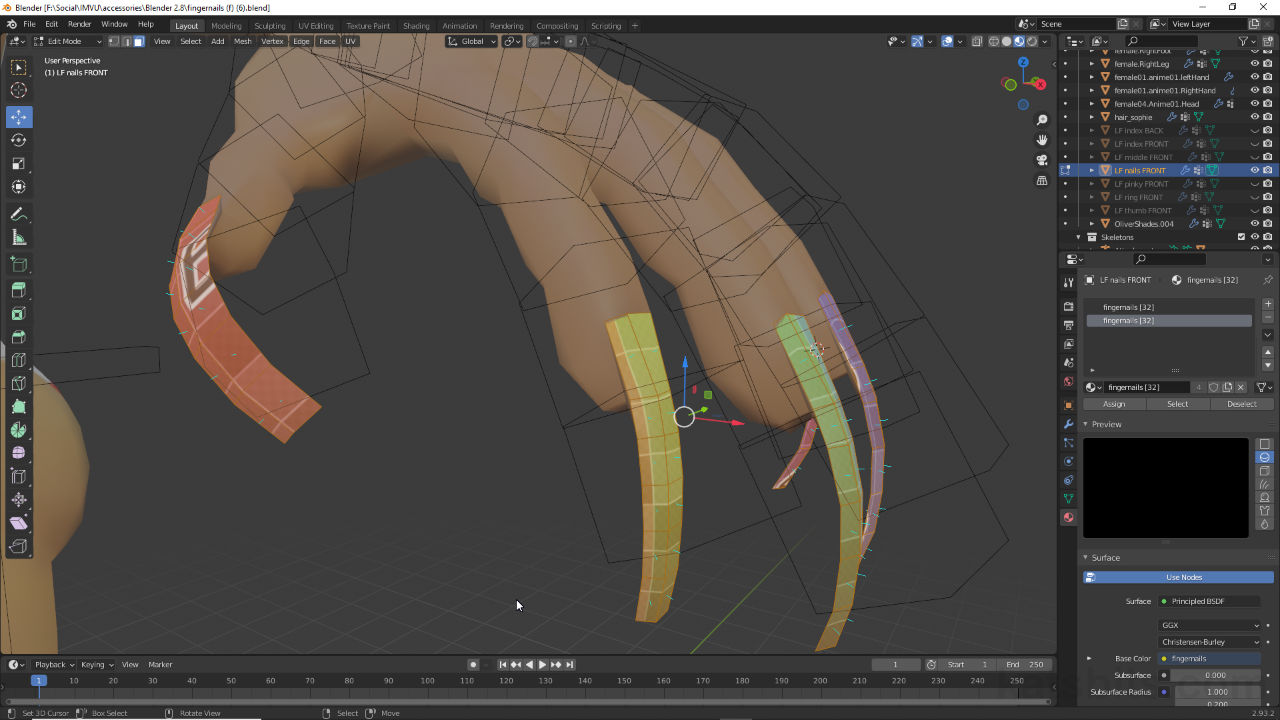
In this exercise we take a look at making avatar fingernails (recorded live so may include off-topic chat). Although fingernails are accessory items, to make them the Clothing Starter File has to be used, which gives full access to the avatar skeleton, so each nail can be properly manipulated by the corresponding finger bone, e.g. lfFingerIndex03. The nails are initially created by duplicating the existing nails, including their weight values, Shift + D, which are detached as objects using Separate, P, and then modified using Extrude, E, to add more structure for shaping. Once the nails are shaped they can be UV unwrapped and UV mapped in the UV Editing Workspace based on their being single or double-sided, or whether they include ‘feature elements’.
In the follow-up video (duration 35 mins | 220 MB), the principles outlined in video #1 are used to complete the set of fingernails for the avatars left hand, i.e. making double or two-sided nails that utilise a single material and image. This requires updating the nails initial UV Unwrapping and UV mapping so both sides, for all nails, have their own dedicated area of the image and sit side-by-side for ease of derivation – it’s important to ensure both front and back UV’s are the exact same size to avoid discrepancies when using opacity maps to change length or design. Once this is done, nails are exported to FBX and imported in IMVU Studio using the Empty Clothing item. They can also be given a Shininess map, a grey-scale image loaded into the Shininess texture slot.
In the final follow-up video, with the left-hand fingernails complete and available they can then be mirrored across to the other side of the avatar using Mirror. Once this is done adjustments are made to accommodate the avatar not being identical on each side before a unique material is assigned so the nails can be set up with different images in IMVU Studio on each hand. Adjustments are also made to ensure the correct bone controls each fingernail before both hands are exported to FBX as separate meshes that are imported and assembled in Studio.
Duration: total c. 2 hr 20 mins (02:20:00).
Info: 720p, 1080p | I – n/a, II – 220 MB, III – 270 MB.
Source: KatsBits – Fingernails (zip c. 1.5 MB – *.blend, *.png).
Product ID: 56240836.
Design note: fingernails, although classed as ‘accessory’ items, cannot be made using the Accessory Start File because each nail has to articulate independently. This makes them a ‘body part’. To make nails then the Clothing Starter File should be used as it provides full skeletal access.
The Clothing Starter File provide full access to the underlying skeleton, hand and finger bones, which is needed so each nails articulation can be properly checked and assessed, something that can’t be done using the Accessory File.Using the Clothing Starter File also means each nail is duplicated from sections of the avatar mesh that are already correctly weight painted and parented to the avatar skeleton, so will articulate fully for testing and once published. If nails are created without doing this (duplicating existing mesh sections) they will need to be weight painted with respect to each controlling finger bone, and parented by assigning an Armature modifier [2], before export else they won’t work correctly in IMVU. For more on weight painting see here.
Using the Clothing Starter File means being able to utilise the avatars existing weight paint values [1] and associated skeletal parenting [2].When initially unwrapping the fingernail Blender will attempt a ‘best fit’ layout, forcing the nail will occupy the full height of the mapped image. This can then be edited and tidied up, a nail island for example, can be straightened and any detail layers [3] organised to make better use of space available [4] – for a full set of nails this may mean overlaying UV islands to optimise texture/UV use and cut down how many textures are used, especially import for IMVU Studio made product that utilise Normal and Shininess maps.
UV layout depends a great deal on the size and design of each nail [3] and how Blender then maintains relative texture density across a set [4]. Once the initial layout is generated it can be edited to straighten sections, reposition or overlay UV’s to optimise the product for use.To UV unwrap and map multiple objects use Blenders multi-object editing capability, or Join the objects together to form a single instance – Mesh » Join or Alt + J [5]. Once joined, selecting the entire mesh in Edit Mode reveals each fingernails UV’s as part of the same overall layout, in other words, each finger can be edited as part of the larger group or collection [6] – note that a single unified mesh, which includes both left and right hands as necessary, is required to produce a functioning product for IMVU.
Meshes, and UV’s, can be more easily edited [6] when the individual nails are joined together to form a single unified mesh [5].Because fingernails are a body-part and not an accessory, when importing the FBX file into IMVU Studio make sure to select the appropriate Empty Clothing derivable as the base product and set Scale to 0.01 [7] (when using the Clothing Starter File), Female03MasterRoot-[n] (87 bones, [n] mesh(s)) [8] as the skeleton and most important, set an arbitrary Mesh ID of 10 or above [9] – do not use the defaults (0 – 9) as this causes the incoming mesh to override the respective body-part.
When importing the fingernails FBX make sure to select the Empty [M/F] Clothing product as the base derivable and change the items Scale [7], select the correct skeleton [8] and most important, set a Mesh ID [9] that doesn’t override the default body parts.When generating a shininess map for IMVU Studio preference should be given to using mid-tone grey-scale values, i.e. avoid overt black or white extremes so a darker/lighter tolerance is available where necessary. Once such images are loaded in to Studio, use the Reflectivity slider to adjust how ‘bright’ or ‘reflective’ the effect is, 0 for no effect (flat shininess) to 100 for full effect (highlight reflective).
When making Shininess maps for IMVU Studio it’s best to use mid-range grey-scale values for the effect, relying then on the Reflectivity value to determine how strong the effect is, 0 for no effect, 100 for full effect.When mirroring the fingernails across the opposite side of the avatar be aware that they will be initially misaligned and offset because neither character is not exactly symmetrical. This means some adjustment is always going to be needed to ensure meshes match up and subsequently work as expected in IMVU – so long as mesh align correctly in Blender, upon import into IMVU they will appear where they should.
The avatars are not symmetrical so mirroring fingernails will result in a misalignment that needs to be fixed editing the mesh.An alternative way to mirror the fingernails once duplicated is to us the Mirror modifier, this duplicates a selection and mirrors it across one or more axes. To do this, select the fingernails and in Modifier Properties [10] click the drop-down and select Mirror from the list. In the modifiers properties set X [11] as the Axis across which mirroring occurs. When using Mirror the duplicate that’s created will need to be detached or made a Singer User so it can be edited independently from the original. To do this click ˅ button (Blender 2.9+) then Apply – ˅ » Apply (this applies the modifier so the mesh can be edited but does not separate left from right side).
Fingernails can be mirrored using the Mirror Modifier as an alternative to manually flipping the mesh. When doing this an additional step is required so the duplicate can be edited separately from the source.Duplicating and mirroring meshes includes materials and UV maps. In other words, the original material, image and UV assignments associated with the original set of nails will be duplicated to the other side. To make them unique so different images can be used, the original copied data needs to be made unique. To do this, select one set of nails and in Material Properties click the numbered button [12]. This duplicates the source [13] and makes a unique instance (appended *.001 etc.), which can then be renamed appropriately ready for editing [14]. For UV maps, care should be taken to address the UV’s being flipped as this can invert text. To address this, in UV Editing Workspace select the UV Islands [15] and from the UV menu select Mirror then X or Y depending the their orientation before and after – UV » Mirror » [option].
When mirrored materials, images and UV maps will be included. If left and right side are to be different the material assignments will need to be made unique (Single User).


Timestamps
Times are approximate.
Video I : Make Fingernails in Blender – c. 1 hr 30 mins (1:30:00).
– 00:00 : Overview.
– 09:00 : Meshing a Nail.
– 20:00 : Material Assignment.
– 30:00 : UV Editing & Maps.
Video II : Fingernails Follow-up #1 – c. 35 mins (35:00).
– 00:00 : Time-lapse.
– 06:30 : Double-sided meshes/materials/UV’s.
– 15:00 : FBX Export #1 & Assembly (Studio).
– 20:00 : Adjustments & FBX Export #2.
– 28:00 : Textures & Shininess.
Video III : Fingernails Follow-up #2 – c. 40 mins (40:00).
– 00:00 : Mirroring & Adjustments.
– 24:00 : Materials.
– 34:00 : FBX Export & Assembly.
