Blender Basics
Table of Contents
At first glance a lot has seemingly changed between Blender 2.79 and newer versions, Blender 2.8+ through 4.0+, most of which is not immediately visible to the User. With that said, aside from the obvious differences in appearance, Blender has been consistent in presenting a familiar and perhaps more refined version of the application with each iteration, suitable for the next generation of content creation and development. Discover the best way to learn Blender with the basics below.
Important: the following is a BASIC OVERVIEW of Blenders interface geared towards real-time or game content production.
Start up
Comparing newer versions of Blender, 2.8x and above, with it’s predecessor, 2.79, little has changed when the application is first opened/started, the Splash Screen still appears (with a different design), displaying a number of shortcuts to important resources and the ‘last opened’ (Recent Files) list.
Design note: when starting Blender for the very first time (clean install, no previous versions present) the Splash Screen initially displays options to set the dominant mouse button for selections/actions, left or right, to accommodate traditionalist Blender users (right-click) or those wanting functionality more consistent with other applications (left-click).
When Blender 2.8+ opens for the first time it displays a dialogue where the selection default can be set, either left or right click, which is then saved to a userpref.blend as the default Start Up File.


Blender 2.80 on starting showing the Splash Screen and options.

Blender 2.79 on start up showing the Splash Screen and options.
Initial Layout
The initial Layout presented by Blender for 2.8+, or workspaces (Workspace) as they are now known, is not that dissimilar to previous versions, at face value being generally organised much the same way – a main 3D area, various properties to the right, tools to the left. What is different is its look, the overall theme design or appearance; the Tool Shelf to the left of the 3D View [1], now referred to as the Toolbar (T) [2], is still present but functions in a slightly different way – it appears as a series of button/icons. So too is (View) Properties (not shown by default), itself now called the Sidebar (N) [3] . To the right-side the Outliner Editor [5] (upper half) and Properties [4] panel (lower half) are still present with their respective buttons, settings and options.
Design note: the Properties panel icons are displayed vertically and colour-coded based on their general purpose or function – broadly speaking, white (light-grey) for Scene, Rendering etc., fuchsia for materials, blue for modifications etc.
The Info Editor [6] header still runs along the top of the application but has undergone a facelift; Layout (formerly Choose Screen layout) options are now fully featured as a series of clickable (customisable) Workspace [7] tabs that change the interface to match the task represented, making this under utilised feature more accessible and prominent.
Design note: Workspace effectively replaces Choose Screen Layout for newer versions of Blender.

The initial layout presented by Blender, many areas and editors are still in the same place but shown as a set of vertical icons instead of a button strip and sidebar.

The initial layout presented by Blender 2.79.
Layout options are now presented as tabs for more immediate access.
3D Viewport Navigation
The main change to Blender is the dominance of the 3D Viewport (3D View) which now occupies a majority of the interface. Here too, the button strip has been broken up and distributed within the area [1] – largely along the top. One significant change is the Viewpoint Navigator [2] (or view navigator) upper-right, an interactive version of the axis orientation widget that appeared bottom-left corner in Blender 2.79. This is can be clicked to use fixed presets, (left) click-dragged for manual manipulation of the view, and usable generally to rotate around/re-orientate the scene making it easier to use Blender on touch-screen devices. In addition to the rotation navigator dedicated interactive icons have been included that accommodate Pan [3] (hand) and Zoom [4] (magnifier).
Design note: mouse/keyboard navigation still works as standard – middle-mouse, Shift + or Ctrl + for Rotate, Strafe or Zoom respectively. No change has been made to the way the 3D View rotates and orientates itself generally.

Navigating the scene is now aided by the addition of dedicated tools or widgets to Rotate [2], Pan [3] and Zoom [4], each activated/used by click-dragging the respective icon (button position may change from version to version but they should generally be located in the same region of the 3D View, upper-right).
Using the new Viewpoint Navigation widget top-right corner of the 3D View.
Using the 3D View navigation icons – although invisible when used, strafe and zoom do affect the mouse cursors position, which is moving in relation to the 3D View, so may end up on the other side of the screen rather than where an action may have been initialised/activated (upper-right).
Interaction Mode selection
Breaking up and dispersing the 3D Viewport Header buttons and options from Blender 2.79 means a change to the Sets the object interaction mode selections, moved to the top-left corner of the view, retaining the same options i.e., Object Mode, Edit Mode, Sculpt Mode, Vertex Paint, Weight Paint and Texture Paint. As with previous versions of Blender each mode change swaps the array of buttons, settings and options in the Toolbar area (the panel formally occupied by the Tool Shelf in Blender 2.79 et al), simply left-click an option from the drop-down menu to switch between modes.
Design note: Ctrl + Tab displays the Mode wheel (pie) menu replacing the selection pop-up.
Switching between Interaction Mode can also be done using a pie-menu accessible to all contexts using Ctrl + Tab. Right-click or press Esc to cancel.


The Interaction Mode selector top-left switches between different editing contexts, the default being Object Mode.
Changing the ‘interaction mode’ using the same options, now in the top-left corner of the view.
Viewport Display/Shading
The Method to display/shade objects in the the 3D Viewport (Viewport or 3D View Shading) Header button options of Blender 2.79 i.e., Solid, Texture, Rendered and so on, are now top-right corner of the 3D View. Here four* options are currently shown; Wireframe, Solid (default as for 2.79), Material Preview (environment map/HDRI) (formally Look Dev) and Rendered (real-time, full effects).
Design note: as of Blender 2.81+ LookDev is now Material Preview.
Options previously available in 2.79, Material and BoundBox in particular have been de-prioritised or combined with the Shading and Overlays selection options where more variables can be chosen to fit the general rendering overhaul of Blender 2.8+.
Design note: aside from the Viewport Shading buttons top-right the options are also available from the Shading pie-menu, accessible press the Z key.
The Viewport Shading options are also accessible from a pie-menu pressing the Z key.


The Viewport Shading buttons top-right change the way the 3D view is rendered between the different modes.
The ‘viewport shading’ buttons are now in the top-right accompanied with a more detailed Shading options pop-up.
3D Widget & Transform Orientation
As with other elements of the 3D View Header buttons, Transform Orientation (,), Pivot Point (.), Proportional Editing (o) and Snap (Shift + Tab) have been moved and are located top-centre of the main area.
Design note: the options for Transform Orientation and Pivot Point can also be access from their respective pie-menus pressing , (comma) and . (period/full stop).
Transform Orientation and Pivot Point can be accessed from their respective pie-menus.


Transform Orientation, Snap and other global settings can be found centre-top of the 3D Viewport.
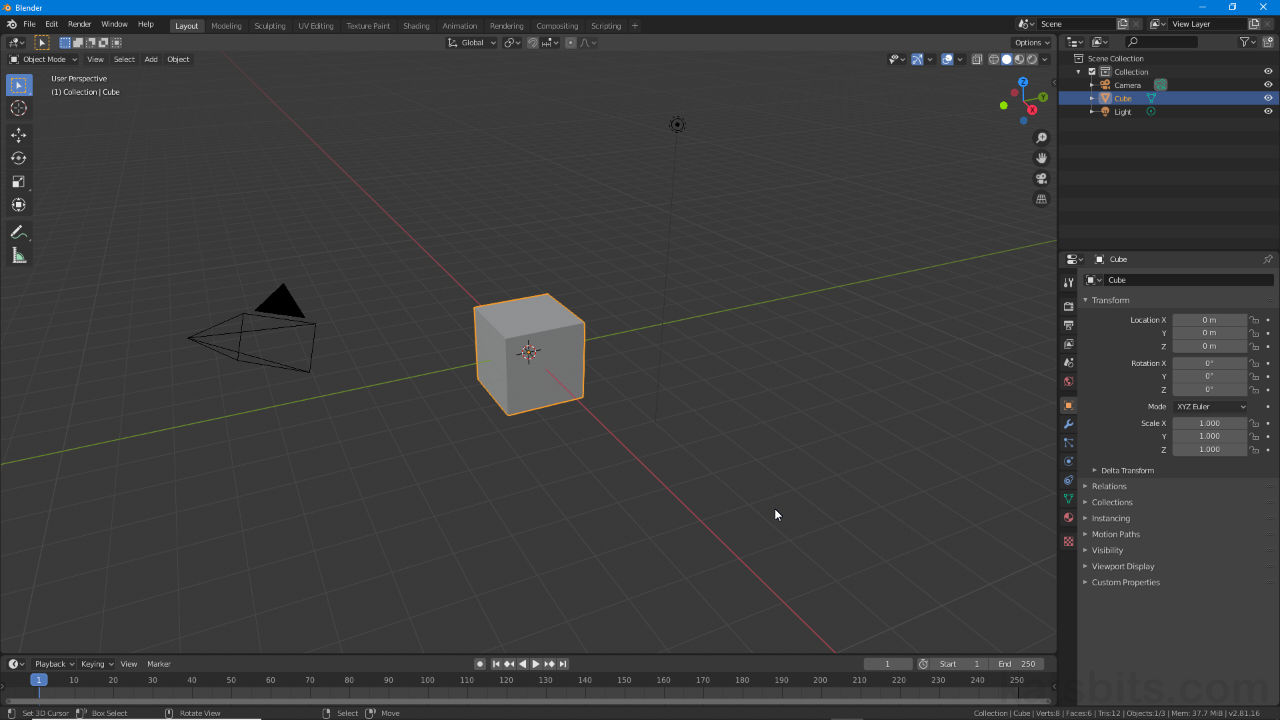
The 3D Widget and Transform Manipulators buttons previously grouped alongside the Transform Orientation buttons have been rearranged to accommodate a Select Box mode that provides different selection options, a Cursor mode that allows the 3D Cursor to be positioned without interfering with other modes, functions or objects on-screen, and a set of Transform manipulators, Move (G), Rotate (R), Scale (S) and Transform (Shift + Spacebar + T) widgets, each now being separate buttons in the Toolbar to the left when Object Mode or Edit Mode is active.
Design note: using the shortcut keys to Move (G), Rotate (R) and Scale (S) does not activate the corresponding Toolbar button.

The Transform manipulators, Move, Rotate and Scale, have dedicated buttons in the Toolbar (formally Tool Shelf).
Behaviour and usage of the 3D Widget and Transform settings now include dedicated Cursor and Transform modes.
