Edit Mode Basics
Table of Contents
For the most part Edit Mode in newer versions of Blender 2.8+/2.9+ and beyond, behaves largely the same in terms of what it can be used for (meshing, editing etc.). Changes to selection and manipulation behaviours however, now mean each operation having its own distinct manipulation or transform mode that won’t interfere with other operations, left-clicking to place the 3D Cursor for example, no longer risks inadvertently moving something with Cursor mode active.
Design note: if for some reason the default cube appears triangulated when switching to Edit Mode, it can be reverted or converted to quads by selecting everything and using Face » Tris to Quads (Alt + J).
Important: Blenders development is dynamic and ever evolving, as such it is prone to buttons and/or features being moved, replaced, relegated or hidden without notice, and for no particular rhyme or reason.
As Blender develops changes can be implemented that move, hide or replace various buttons and features, shown above for example the navigation aids and Header bar for the 3D View have to tweaked.

Edit Mode
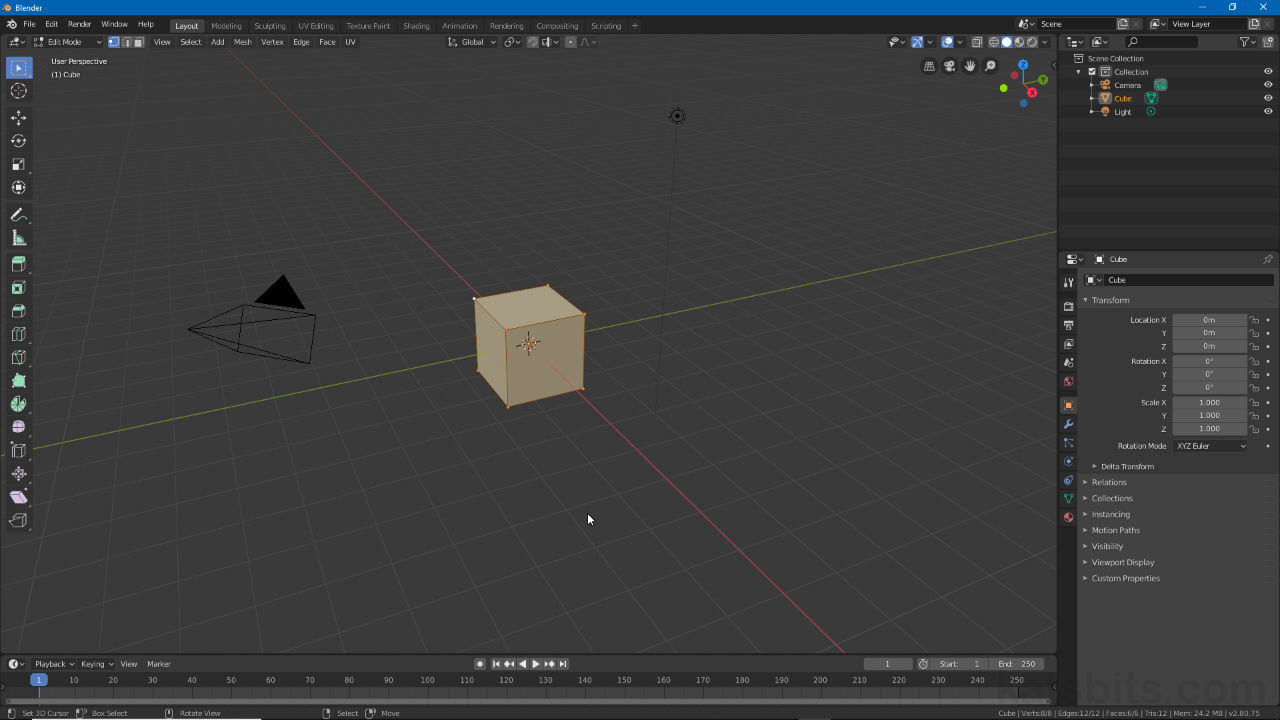
As noted in Blender Basics the Sets the object interaction mode selector that switches between different interaction modes (editing contexts) has moved to the top-left corner of the 3D Viewport. It still functions the same way so to toggle in/out of Edit Mode click the menu and select the Edit Mode option from the list. To exit Edit Mode select another mode option, e.g. Object Mode to return to the Scenes default interaction mode.
Design note: the number of modes or editing contexts has not changed from previous versions of Blender.
In addition to the standard selection menu top-left, different modes can also be switched between using Ctrl + Tab. Here using this shortcut combination displays a context-sensitive quick-access wheel/pie menu where each interaction mode can be chosen, keeping the menu near the mouse cursor.
Design note: in Edit Mode Ctrl + Tab accesses the Interaction Mode selection pie menu (Object Mode, Weight Paint, Pose Mode etc.), it no longer displays the element selection options (Vertex, Edge, Face Select). To cancel the pie menu right-click or press Esc.

The Sets the object interaction mode selector is top-left of the 3D View.

Using Ctrl+Tab as an alternative, Edit Mode can be toggled from the Mode wheel menu (pie-menu).
Switch to/from (toggle) Edit Mode using the mode selector top-left.
Cursor Transform
For newer versions of Blender the 3D Cursor has a dedicated Cursor transform mode that once enabled/active, allows the 3D cursor (red and white checkered loop) to be click-positioned or dragged around the Scene/screen without interfering with other objects in the 3D View, much like the 3D Transform Widget. To activate, left-click the Cursor button in the Toolbar (left-side) and left-click to reposition, or left-click drag to move the cursor around the screen without interruption.
Design note: positioning the 3D cursor may be possible when other tools are active/being used depending on whether left or right-click is set as the default selection action.

Cursor Transform mode now allows the 3D Cursor to be moved independently of object selection/manipulation.
The 3D Cursor has its own transform mode and can be moved/positioned in Cursor mode or other modes (but may still be positionable depending on left/right-click selection default).
Transform, Move, Rotate, Scale
The default behaviour of the 3D Widget, how its used to highlight and manipulate selections has been improved in newer versions of Blender. For Move (G) and Scale (S) the widget also includes handles that accommodate transformation along two planar axes in addition to the standard cardinal axes (Rotate (R) remains untouched). To accompany the changes a new global Transform widget (Shift + Spacebar + T) has been added that includes control handles for each Move, Scale and Rotate action so each former manipulator type has their own mode of interaction and mechanics within a single tool. To engage, left-click the Transform, Move, Rotate and Scale transform manipulation buttons in the Toolbar area to the left of the main 3D View when Edit Mode is active (also available in Object Mode).
Design note: the manipulator shortcut keys, i.e. G, R and S do not switch between corresponding Toolbar buttons – pressing G when Rotate is active for example, does not highlight/activate the Move/Transform buttons (they don’t highlight), it simply activates the operation whilst the primary tool is enabled.
In Transform mode (formally free-translate, G) Move, Rotate and Scale are available in a single operation (can be toggled on/off separately in the main views Header).
Move translates (strafe) objects along individual XYZ axes, two planar axes simultaneously or perpendicular to the view when clicking the (white) inner control loop.
Rotate manipulates selections around individual XYZ axes, free-rotates around all three or perpendicular to the view using the (white) outer control loop.
Scale manipulates objects along each XYZ axis independently, two planar axes at the same time or all three when clicking the (white) central control loop.
Mesh Tools
When Edit Mode is active a series of editing tool buttons appears to the right of the 3D View, the Toolbar (T), some expand to reveal additional options using left-click-hold. The buttons are (currently) collated into three groups corresponding to Manipulation (cf. above), Add and Deform tool-sets (similar to previous versions of Blender); additive tools (green icons – adds geometry) include Extrude (E), Inset Faces (I), Loop Cut (Ctrl + R) etc.; ‘deformative‘ tools (pink icons – manipulates or alters existing geometry) include Smooth (Shift + 6), Sheer (Shift + Ctrl + Alt + S), Edge Slide (Shift + 8 or double-tap G) etc.
Important: button/tool labels are hidden by default but can be exposed by left-click dragging the Toolbar border outwards to expand and/or reorganise the area – labels are ordinarily viewable hovering the mouse cursor over a given button.
Toolbar button text/labels can be shown by reorganising the area – move the mouse cursor over the border and when the double-headed arrow appears click-drag to change the areas appearance.
Design note: some tool behaviour has changed so operation only requires different mouse clicks to enable, for example Loop Cut automatically places a centred cut (centre-line) when an edge is clicked, or manually left-click-dragging to slide the tool prior to placement on release (previously several additional clicks would be needed to achieve the same result).

The (pale-green highlighted) Add and Deform tools in the Toolbar area to the left of the 3D View (formally the Tool Shelf) – Extrude Region is shown above on an individually selected face.
Extrude can add geometry without affecting other modes of manipulation.
Loop Cut, once active, simply needs left-click to auto-set and left-click-drag for manual placement.
Mesh Select Mode
For newer versions of Blender the mesh/element Select Mode buttons have been moved to the right of the Sets the object interaction mode selector, top-left corner of the 3D Viewport. Here the Vertex, Edge and Face select buttons can be found, now accessed using the numbers 1, 2 and 3 (main keyboard), for Vertex, Edge and Face respectively once Edit Mode is active (use Shift + [option] to select multiple selection options e.g. Vertex and Face). The Limit selection to visible button is now called X-Ray and can be found in the upper-right corner of the 3D View grouped with the Viewport Shading buttons (to their immediate left).
Design note: Ctrl + Tab no longer displays the quick-access Mesh Select Mode selection menu, the shortcut is used instead to access the global ‘interaction mode’ selector wheel/pie menu (see above).

Mesh Select Mode buttons top-left, switch between Vertex, Edge and Face selection types.
In Edit Mode the Mesh Select Mode buttons are top-left, alternatively accessed using numbers 1, 2 and 3 (main keyboard).
Edit Mode menus
To better manage certain aspects of mesh editing, the Vertices, Edges, Faces and UVs menu options are now independent menu lists, Vertex (Ctrl + V), Edge (Ctrl + E), Face (Ctrl + F) and UV (U); instead of hunting down options in the Mesh menu i.e., Mesh » Faces » Tris to Quads, the option can be selected more directly from the Face menu available upper-left of the main area, e.g. Face » Tris to Quads.
Design note: ordinarily Ctrl + V pastes content after being copied (Ctrl + C) but in Edit Mode this brings up the Vertex menu. In this context use Shift + D to Duplicate selections rather than copy/paste.

Edit Mode menus, Vertex, Edge, Face and UV are now separate menus upper-left of the main area.
To make working with different mesh elements easier the Vertex, Edge, Face and UV options are now available as independent menus on upper-left of the main work area – many of the options formally available per selection type can be found in each menu list, everything associated with face editing and manipulation being in the Face menu etc., e.g. converting triangles to quadratic faces.
