Blender Basics for MacOS
Table of Contents
Generally speaking using Blender on a MacBook Pro/Air or other MacOS device is more-or-less the same as it is for Windows based computers. The user interface, layout options, how Users interact with the application, are all similar with the exception of what the various ‘command’ keys do; for MacOS that’s Shift (⇧), fn, Control (⌃), Option (⌥) and Command (⌘). With this in mind, below are some of the basics of Blender on MacOS.
Important: the following is a BASIC OVERVIEW of Blender as initially presented on starting up/launching the application.
Start Up
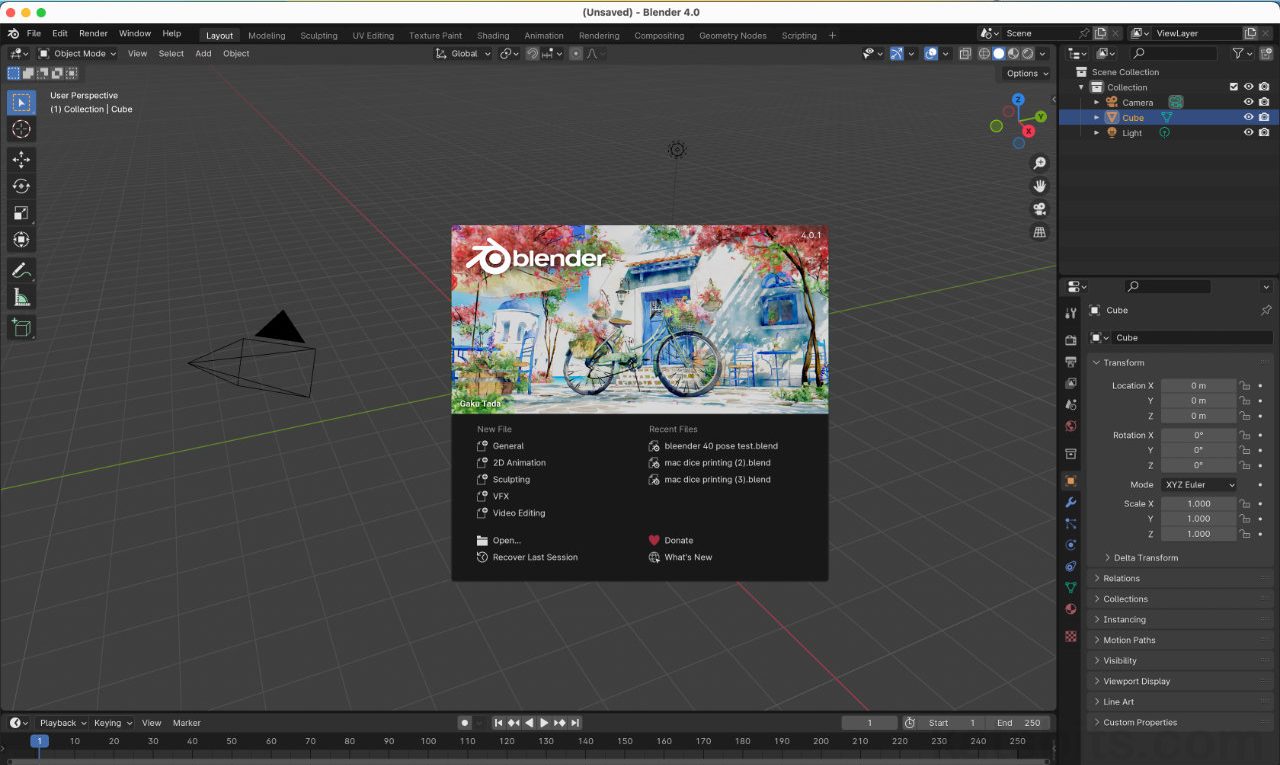
When starting Blender for the first time the Settings screen is shown. Here, a number of global options can be adjusted, namely the application’s Language, the keyboard Shortcuts emulation to use (3DS Max, Maya etc.), and the Select With [1] mouse-click selection preference – Left or Right. Once these initial options are set by clicking Save New Settings, the default Start-up Splash Screen, which subsequently appears each time Blender starts, will appear. Similarly here, a number of New File types is shown alongside a Recent Files list and useful resource links. To continue to Blender, click anywhere on-screen.
Design note: for all intents and purposes Select With assumes use of the 3-button mouse, which is recommended for Blender, with Left, Middle (scroll) and Right buttons. See below for single-button mouse usage (emulation).

Starting Blender for the very first time present the Settings splash where a number of basic system-wide settings can be configured, namely Select With [1] mouse selection preference.

After the initial settings have been configured, Blender will load the standard splash screen whenever it loads that displays a number of useful data.
Initial Layout/Interface
Blenders interface comprises a collection of task-based areas. Running along the top are non-context sensitive ‘global’ menus, File, Edit, Render etc., and a set of Workspace tabs that change the general appearance and layout to match the task each represents; Layout (default), Modeling, Animation, Geometry Nodes and so on. When clicked, each reorganises the interface to use different areas and various context sensitive tools, menus and functionality based on the Workspace and task at hand.
Design note: the number of Workspace tabs available may vary depending on the version of Blender or screen real estate, and can also be customised to suit personal preference.
Depending on the Workspace, layouts may differ, Geometry Nodes workspace for example, uses the 3D Viewport, Geometry Node Editor and Spreadsheet along side Properties and Outliner.

Below this the layout comprises the main 3D Viewport, which occupies much of the interface, and down the right-hand side, the Outliner, which provides information on the contents of a given project, and Properties, where various properties, options and settings are accessible based on the task at hand.


Image-top: Blenders initial layout is geared towards meshing, modelling and general 3D editing. Image-bottom: the large section is the 3D Viewport (orange). Immediately below this is the Timeline (blue). Running down the right is the Outliner (pale blue) and Properties (green) panels. Along the bottom is the Status Bar (fuchsia) and the top, the Header (red).
Areas
By default the 3D Viewport is the primary area of the application. It, like most other areas and editors, has its own Header that runs along the top of the view from which various context sensitive menus, options and functions are available. Down the left side of the area is the main ToolBar, a context sensitive strip of tools and features used to manipulate various aspects of a scene. Down the right side are the scene Navigation Tools widgets and aids that allow the view itself to be manipulated.
Design note: depending on the Workspace layout and/or area being used, the tools and menus available will differ depending on the area/layout itself, and/or the context of the task being performed.
The tools, menus and options of a given area within a broader Workspace layout change depending on context or task, in Sculpting Workspace far more tools appear in the Toolbar to the left with additional settings above, whereas the navigation tools remain the same on the right.


Each area within an overall Workspace layout includes its own tools, menus and options, the 3D Viewport (orange) for example, typically has a Toolbar on the left (blue), navigation aids on the right (green), and a Header (red) running along the top.
Basic Navigation
Generally speaking, all views and areas use the same core navigation and/or manipulation mechanics. Where a 3-button mouse is used – Left Mouse Button (LMB), Middle Mouse Button (MMB) and Right Mouse Button (RMB) – these are;
- LMB* = selects or activates menus, properties, objects and items.
- Shift (⇧) + LMB = multi-selects.
- MMB or Shift (⇧) + MMB = translates or moves (grabs).
- Control (⌃) or Command (⌘) + MMB = Zooms in/out.
- RMB* = selects objects.
- Shift (⇧) + RMB = multi-selects objects.
Important: * left or right mouse button actions depend on the Select With option set when Blender is open for the first time; some operations or behaviours may be cancelled out as a result, especially when used in combination with Shift (⇧), fn, Control (⌃), Option (⌥) or Command (⌘).
In the Outliner for example, MMB-click-drag will ‘grab’ and move or translate the area or its content up/down, left/right, largely complimenting middle-mouse-scrolling up/down, whereas in the 3D Viewport the same action rotates the scene.
3D Viewport Navigation
Although the same shortcut keys and mouse button combinations are used throughout Blender, for the 3D Viewport specifically, the primary mode of navigation is through use of the Middle Mouse Button (MMB). Here the three buttons will;
- LMB = selects or actives menus, options or tools.
- Shift (⇧) + LMB = multi-select.
- MMB = free-rotates the 3D view.
- Shift (⇧) + MMB = translates the 3D view up/down, left/right.
- Control (⌃) or Command (⌘) + MMB = zooms the 3D view in/out (or alternatively Control (⌃) or Command (⌘) + +/–).
Important: in similar fashion to general key/mouse navigation, depending on the Select With option set when Blender is first opened, there may be conflicts with other operations or behaviours, especially when used in combination with Shift (⇧), fn, Control (⌃), Option (⌥) or Command (⌘).
3D Viewport & Trackpad Navigation
Although Blender assumes a 3-button mouse, the availability of the 3D Viewport navigation or View Tools in its upper-right corner mean Blender can be used with a trackpad, with or without mouse, or without a 3-button mouse, by clicking or click-dragging any one or more of the navigational aids to manipulate the scene by;
- Orientation/Axis Widget [2] = click-drag within the sphere to free rotates (freeform) the viewport, or on an X, Y or Z axis marker to switch to a specific, Viewpoint (see below), orientation.
- Magnifying Glass [3] = zooms the 3D Viewport in/out.
- Hand = translates the 3D Viewport left/right, up/down.
- Camera = toggles between the scene Camera and default point of view.
- Grid = toggles between Orthogonal (flat) and Perspective viewpoints.
Design note Blender provides an option to ’emulate’ a 3-button mouse in Preferences [ii]. Once active, Emulate Numpad [iii] and/or Emulate 3-Button Mouse [iv] will result in Option (⌥) + LBM rotating the 3D viewport, useful for trackpad or mouse with limited buttons.
Blender provides a few ways to ’emulate’ the full keyboard and mouse experience [ii] where this is not available; enable Emulate Numpad [iii] – full keyboard, and Emulate 3-Button Mouse [iv] (full mouse).The views orientation can also be set from the View menu [v]; click View, Viewpoint [vi] then an orientation option from those available, Front, Top, Left etc., e.g. View ≫ Viewpoint ≫ Front
The 3D viewports point of view can also be changed from the View menu; a number of orientations are available under Viewpoint [vi] – Front, Back, etc.


The Navigation widget [2] and manipulation tools [3] that run down the 3D Viewports right-hand side aid scene manipulation without mouse or using a trackpad.
Interaction Mode
As mentioned above, the main 3D Viewport has its own Header where various context sensitive menus and options appear. To the left of this area is the Sets the object interaction mode drop-down which allows for the area can be changed in a way that’s orientated towards the task, editing or manipulation context at hand, that is, each mode changes the tools, menus and options available, thus they are context sensitive, and limits the way objects and data can be edited, manipulated or managed within the scene and/or overall project. To change mode, click the Sets the object interaction mode drop-down immediate-left and select from Object Mode (default), Edit Mode, Sculpt Mode, Vertex Paint, Weight Paint and Texture Paint.
Design note: modes can be switched using Control (⌃) + Tab to access the Mode pie menu. To quickly toggle back and forth between Object Mode and Edit Mode use fn + Tab (⇥).
Some functions, actions or operations can be actioned using a quick-access pie menu, for example fn + Tab opens the Mode menu.


Rather than the 3D Viewport being fixed to a particular context it can be changed to suit the task at hand using the Sets the object interaction mode selector [4] to, for example, switch back and forth between Object Mode (default) and Sculpt Mode (note the toolbar change).
Viewport Shading (Display)
To the immediate right of the 3D Viewport’s Header are the Viewport Shading options. Each item changes the way objects, materials and other data is displayed or rendered in the viewport. For example, Wireframe displays the scenes contents as wire outlines, whereas Rendered will show the same contents fully rendered with materials, textures and effects. To toggle or switch display rendering, simply left click the spherical icon representing the respective view; Wireframe, Solid, Material Preview or Rendered.
Design note: for the 3D Viewport and Object Mode, Solid, a grey-scale ‘clay’ render, is the default display mode. The 3D Viewport shading mode can also be switched using the fn + Z shortcut to access the Shading [iix] pie-menu. A number of shortcut combinations can be used to switch between different shading modes;
- Option (⌥) + Z = toggles Xray
- Shift (⇧) + Z = toggles Wireframe
Depending on the ‘editing context’ set (Object Mode, Edit Mode, Weight Paint etc.), the available options may differ from the default selection.
Pressing fn + Z opens the Shading quick-access pie menu [iix] as an alternative to switch between modes.


The Viewport Shading [5] options change the way the 3D viewport renders its contents, from a simple Wireframe to fully Rendered.
Manipulation Tools/Widgets
Down the left-hand side of the 3D viewport is the ToolBar [6]. Here, a set of context sensitive tools are presented each performing a different function or operation, typically the manipulation, scale or rotation of a select. In Edit Mode for example, is Select Box, Cursor, Move, Rotate, Scale and Transform. Below this is Annotate, Measure and Add Cube, whereas in Vertex Paint mode Draw, Blur, Average, Smear and Annotate are shown.
Design note: some tools can be accessed using a shortcut; G actives Move, R for Rotate and S for Scale – when activating a manipulation widget using their respective shortcut the default behaviour is to initiate ‘free’ move/rotate/scale, that is, manipulate on all axes at once. Once activated, holding down Control (⌃) snaps manipulations to measured increments or rotational degrees; holding down Shift (⇧) + Control (⌃) to smaller increments/degrees.

The manipulation widgets/tools are used to manipulate, rotate, scale objects and selections – Move (G), Rotate (R), Scale (S) and Transform. The available tools may vary depending on the Workspace, editor or context.
