Make Single User
Table of Contents
A User in Blender 2.8+ is analogous to a person accessing or making use of something, the more person’s doing this the more users the subject of their interest can be said to have. For Blender, such Users are typically accessing underlying blocks of data, data blocks, that can be used any number of ways. Occasionally however, there is a need to reduce or manage the number of Users associated with a data block. This is done using Make Single User.
Important: the existence of data blocks is not specifically dependent on Users. However, without Users the underlying information is treated as being Orphaned, transitory, and may not be saved with the *.blend.
Make Single User
As briefly outlined above a User is a relationship between itself and an underlying block of data (data block). For single use situations, a single material applied to a single object or surface for example, this functionally this makes both data block and User association ‘unique‘ or a ‘Single User‘. However, because data blocks exist independently of Users this same ‘single user’ data might be instanced to other objects such that it then has several User relationships, e.g. several meshes referencing the same material. It’s in the latter capacity where being able to make User references ‘unique’ becomes advantageous as it then allows for object or property modification independently of other assignments or associations.
Design note: the nature of data blocks mean they can be referenced any number of ways in Blender, so whilst one level might result in a new ‘unique’ instance of something, the new creation may retain other multi-user elements – materials are a typical example of this. Similarly only certain types of data may be available, in Edit Mode for example Material data can be changed but mesh data cannot because instanced objects are selection-linked (cannot be selected independently of the original, which is why they’re Instanced and not Single User).
In Edit Mode only certain types of data can be accessed and made Single User, mesh elements cannot be selected independently of one another (else they would not be instanced or ‘linked’ duplicates requiring ‘user’ modification). This can only be done in Object Mode.

Exactly how data is made Single User depends largely on what references the data block in question, a 3D Object for example can be changed more readily than an Image referenced from within a Material. With this in mind to make a mesh Object single user, in the 3D View select the item (or items) and from the Object menu select Relations, Make Single User then from the list of options select the appropriate data ‘depth’ needing to be made unique – Object » Relations » Make Single User » [option].
Design note: the options generally shown when making something Single User represent the degree to associated data can be made unique. In each case the selected option duplicates the original properties, a new animation sequence being created for example, that can then be edited without affecting the original;
– Data: Object (mesh) only.
– Object & Data: Object and, for example, coordinate data.
– Object & Data & Materials: Object, coordinates and Material assignments.
– Materials: material assignments only.
– Object Animation: animation sequence data that might be assigned.

Making an Object-based selection Single User in the 3D View (Layout Workspace). Select an object(s) and from the Object menu click Make Single User then a ‘data’ option – different types of data (mesh, material etc.) can be made single user or unique depending on requirements.
Object Data Properties
A more readily available way to make objects Single User or unique is to use the Object Data Properties option. From here the Display number of users of this data block option can be used to make selections single user. To do this make a selection in the 3D View then in Object Data Properties [1] click the numbered button [2], the aforementioned Display number of users of this data block option, to the right of the Mesh data block defining geometric surfaces input field at the top of the panel. This creates a new instance of the underlying property that is now unique (independently editable) – selecting the original Object the User count will have decreased.
Design note: the Outliner can be used to inspect what User information is associated with each Objects [3] – select a listing and expand to see the Object Data Property referenced (e.g. mesh Name), for example object ‘4’ (Cube (4)) might reference object ‘1’ (Cube (1)) and so on.

The number of Users an item has can be managed from Object Data Properties [1] and the Display number of users of this data block button to the right of the Name input field [2] – this identifies how many objects are using the underlying raw data.
Outliner
Important: this feature, although available, is not fully functional at time of writing.
As well as displaying data associated with a Scene generally, the Outliner itself can also be used to manage User counts for objects shown using the Outliner ID data Operation option. To do this make a selection in the Outliner and expand the sub-elements where necessary to expose underlying associations. From here right-click an entry to access the Outliner ID data Operation menu popup and select Make Single User from the list.
Design note: the Outliner ID data Operations menu is context sensitive and only appears when the appropriate sub-element is highlighted or right-clicked in the editor, in other words, selecting an Object will display the Object menu where Make Single User can be found under ID Data – Object (menu) » ID Data » Make Single User » [option] – whereas selecting the ‘mesh’ sub-element the option is accessed as described above.
Managing User count in the Outliner right-clicking an ‘Object-level’ item to access the Object menu where Make Single User can be found under ID Data.


Using the Outliner to manage User count can be done by select items listed and right-clicking [3] to access the context menu where Make Single User can be selected [4].
Editor Option
Similar to Object Data Properties control over User count discussed above, different editors, properties and settings can be used to modify the User counts associated with data blocks. For example in the Action Editor animation sequences that are used several times (animated multiple objects) can be made unique clicking the numbered Display number of users of this data button to the right of the sequence Name input field (input field where sequences are given a label or reference). This duplicates the active sequence making the resulting copy unique by appending a numerical reference so it can be edited without affecting the original.
Design note: the Display number of users of this data block option is generally available wherever User count data is pertinent to an editor or areas function – this is why the option appears in some but not others because the data serves no purpose with respect to the task at hand.
The User count button (Display number of users of this data block) is generally accessible wherever image Name data is used as a reference to the underlying bitmap image. Changes to the label in any one of these places updates globally.


User count information is generally available to editor that access that information specifically, the Action Editor for example attribute ‘Users’ to animation sequences where more than one scene element uses the same action.
Single User Materials
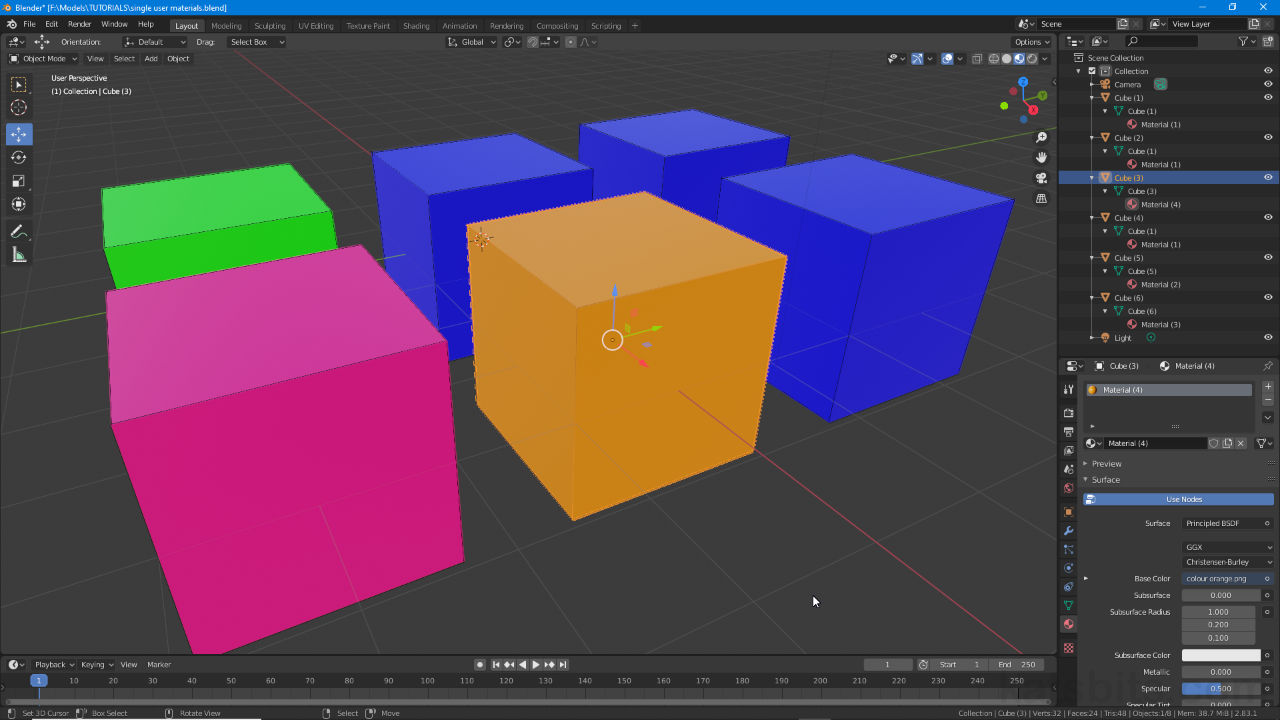
For materials, User count differs slightly due to the way they are set up, materials and images being assignable to individual or multiple object depending on requirements. With that said, to make materials single user this can be done in Material Properties clicking the Display number of users of this data block button to the right of the materials Name input field [7]. Here, as with similar User operations, this duplicates the original material, decreases the User count displayed on the button, and creates an instance assigned a unique numerical identifier that’s appended to the label shown in the Name input field which then allows the new materials properties to be modified without affecting the originals.
Design note: the way materials work makes it possible to assigned any given instance to both linked (duplicate) and unlinked (unique) objects, each type then counting towards the User number as a group (linked) or individually (unique), in other words the same material assigned to seven objects forming part of a larger linked group count as a single user (1) whereas seven separate objects referencing the same material count as seven individual Users (7), eight (8) Users overall for the material.

Managing a Materials User count in Material Properties [7] (which can also be done in the Outliner [8] – see above) – select the Material in the Material list and check the number of Users it has, the Display number of users of this data block button, click to duplicate and create a new instance.
Single User Images
Changing the User count for Materials does not change the count for any associated images. Instead these are generally managed using the Node Editor (Shading Workspace), UV Editor (UV Editing Workspace) or Image Editor (Texture Paint Workspace) where each areas respective Display number of users of this data block button is accessible.
To change the User count for images, access the Node Editor (directly or via Shading Workspace) and check the appropriate Image Texture node’s Display number of users of this data block button [10]. Here, clicking the ‘User’ button will reduce the User count appropriately and create a new unique image instance that then takes the place of the old. Any changes to this, a new image loaded in, propagate to all other materials linked to the new image reference.
Design note: in practice the above is replacing or swapping the label displayed in the Name input field, not the actual image that might be shown in the 3D View/Preview, in other words the old reference, e.g. ‘image (1)’, is being swapped out for the new, e.g. ‘image (2)’, so that changes to the latter, loading in a new bitmap e.g. ‘image (2).jpg’, propagate across to all the old materials now using the new image Name. To make the association unique the underlying material has to be first made single user (see above).
To make the update to the Image Texture node unique so only the selected object is effected, the underlying material first needs to be made unique to break any previous links to other materials [9] or objects, clicking the User count button [11] subsequently then creates a new Name instance [10] that’s swapped into place, that can then be populated with a new bitmap image exclusive to that material.


To make image assignments unique [10 & 13] any underlying Material instances [9 & 12] will first need to be made single user [11] otherwise anything loaded into the material will simply replace or swap out whatever was associated with it previously.
