Baking Texture Maps (Texture Bake Basics)
Table of Contents
There are two basic approaches to Texture Baking in that maps are rendered relative to; 1) Objects or 2) Scenes. In practice this means baking a normal map for example, renders structural data from a high resolution mesh to a textured low resolution version of the same object, the process essentially transferring or converting object specific data relative to itself. Baking a diffuse map on the other hand might take that same low resolution mesh and render its textures relative to the scenes influence on it, including the way lighting affects surfaces, shadows, shininess and so on. In either case Bake is a useful tool for rendering image assets based on object or material data that can then be saved and referenced externally.
Download: Katsbits – Bake Example (c. 200KB | *.blend) – example scene for testing Bake process; select Cube#1, then Texture Image node ‘cube’ and click Bake (ensure ‘cube’ is disconnected from Principled BSDF).
Design note: there are a number of reasons why textures might need to be baked but doing so is generally a useful and effective approach to optimisation.
Bake Prep
As briefly mentioned above, Bake can be used to generate images from mesh and/or material data. Once baked, images can be saved externally and linked back to a material in Blender, or used as a resource in a third-party application or game. To do this objects need to be properly prepped in that they should be; 1) fully UV unwrapped and UV mapped, and 2) be assigned at least one material that references an image, either generated image data or an external bitmap.
Design note: the Bake process needs both UV and image; the UV map defines the boundaries within which rendering occurs; the image associated with the material being the substrate or ‘canvas’ upon which this is done. Absent one or the other, or both, an error message is displayed and the process fails.
Important:
UV Maps
UV maps are essential for baking to work correctly so for each material rendered, an Image Texture node [i], referencing an external bitmap or procedurally generated image [ii], is necessary. The node does not need to be linked to the material tree but should carry UVs; when unwrapping objects in the UV Editor each UV section or segment needs to be associated with the corresponding material, essentially accommodating an objects UVs being split across a number of images – for mapping UVs manually in the UV Editor images will need to be selected and set as the active objects by clicking the Browse Image to be linked drop-down that lists the assets available for selection.
The cubes material has an Image Texture [i] node associated with it that in-turn references a generated image (Color Grid) [ii]. This then becomes the substrate to which the objects UVs are unwrapped and mapped (image-bottom) – the image won’t appear on the mesh when disconnected from the material tree but will be visible in the UV Editor for UV editing (when selected as the active asset).


Before baking, meshes need to be set up with a UV map that has an image assigned as both are used to guide the process, the UV map as to ‘where’, the material image being ‘what’ is rendered to.
While material assignments are relatively straightforward – they just need to be assigned to the object in question – UV maps are subject to the structure and shape of the object being baked, the amount of texture space available, and the overall layout, all with a mind to being optimised so as much space as possible is utilised. Special attention should be paid to this, especially where clarity is dependant on pixel density; the amount of space occupied by a given detail – the greater the amount of texture mapped to some feature the clearer those details will be rendered.


UV maps play an important role in Bake so should be unwrapped to use as much space as possible, especially where fine detailing is being rendered, which will blur at lower resolutions.
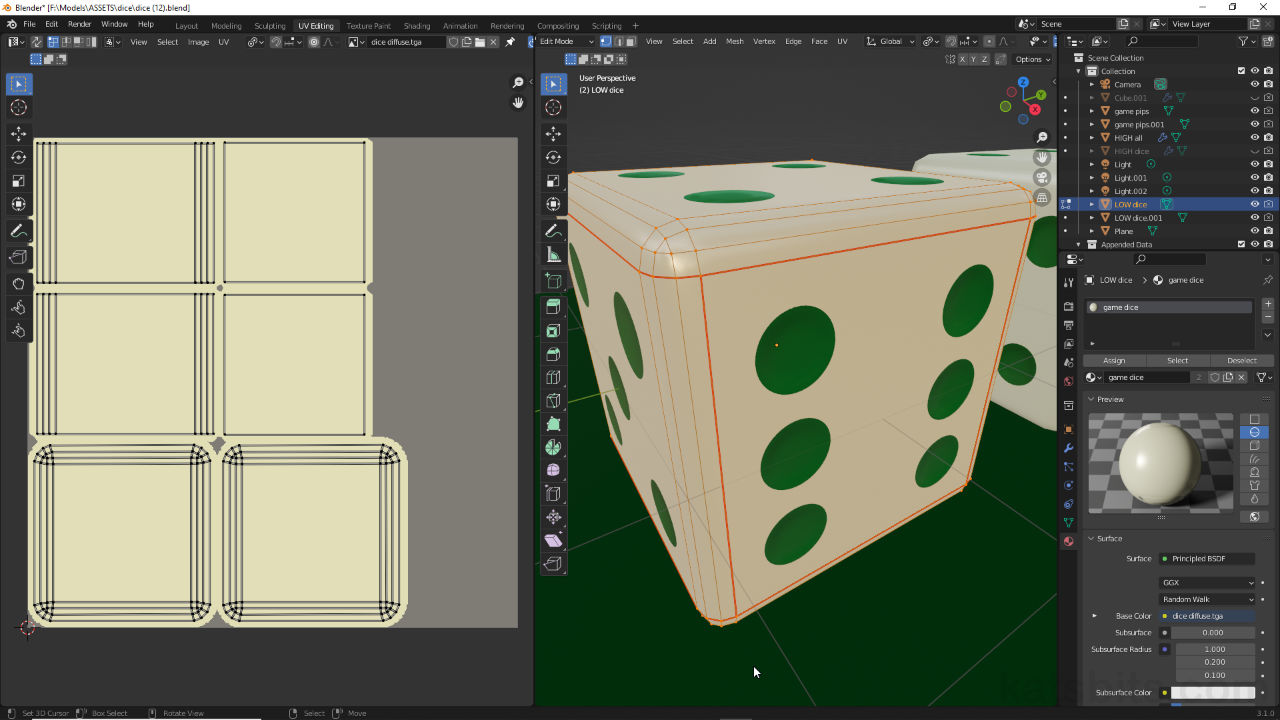
The issues associated with baking and texture density can be mitigated by judicial material and UV map usage. For example, shown below the pips of a dice are baked to a separate image that’s mapped to a decal sub-mesh that sits above the main objects surfaces. Doing this means the dice texture bakes can be lower resolution than the pips, because they contain little detail, whereas the pips can utilise higher resolution images ensuring their integrity, especially around the edges, which are prone to significant pixilation or aliasing as the resolution drops.
Design notes: there are additional advantages to separating objects in this way, for example masks can be of a higher quality, and the images being masked [iii] can be prepped to avoid colour bleed [iv] from other aspects of materials that need to be accommodated.
If textures can be baked separately [iii] images might be less likely subject to pixilation, colour bleed and aliasing issues [iv] often associated with lower resolution images, especially so for masks and transparent details.


Where possible it’s worth separating objects into sub-meshes to see if this allows for better resolution of details and features that would otherwise blur or pixelate were everything baked to the same image, for example image-top is a 2048 x 2048 single colour image that’s masked to produce the dice pips, while image-bottom is a 1024 texture dedicated solely to the dice itself.
Depending on the objects being baked, rendering textures provides an effective means through which content made for games can be optimised for use. For example, the dice below highlights how the same textures – 2048 for pips, 1024 for dice – baked from a high resolution object of some 51,000 triangles, can be used on progressively lower-resolution versions of the same dice without any noticeable detail loss.


The same baked textures applied to different versions of the same mesh – high resolution procedural on the left from which the textures are rendered, to low resolution versions second left to right.
Bake – Standard
To bake standard textures, that is render objects relative to themselves, first make sure meshes are shaped as they need to be, are fully UV unwrapped and UV mapped, and have materials appropriately set up and assigned for the desired effect.
Design note: a standard bake renders objects as they are, unaffected or influenced by other objects or the scene they might be in – this typically produces relatively flat maps depending on the type generated.
Important:
Error: Circular Dependency
when baking a standard set-up Blender may display the “Circular dependency for image “[name]” from object “[object name]”” error message [v]. This happens because the image being baked to is also the source from which bake data is being pulled resulting in a ‘circular’ looping or self-referential process. Although texture baking will generally proceed, to address this error unlink the errant Image Texture node referred to in the message from its material tree (but make sure its selected as the active object for baking).
If Image Texture node belonging to an image is linked to the overall material tree Blender will display the “circular dependency” error [v]. Although bake generally continues, to stop this happened disconnect the image node from the material.Error: Black Image Bake
Similarly, if the Image Texture node is linked to the material tree, and Blender displays the ‘circular dependency’ error message (this is not always shown), the result is often a completely black texture bake [vi], Bake renders no material data to the selected image so it appears completely black. The solution to this is to again decouple the Image Texture node from the overall material tree and re-bake (ensure image node is selected for baking).
If the ‘circular dependency’ error is displayed it’s also likely to result in a black texture bake [vi]. To fix this similarly disconnect the Image Texture node carrying the image asset from the material tree.


Next, select the object to be baked and in Render Properties switch the Render Engine to Cycles. Scroll down the updated properties panel and expand the Bake options clicking > Bake. Here, depending on the type of map needed, click the Bake Type drop-down and select an option, i.e. Diffuse [1], then check the settings, e.g. for a diffuse image, under Influence disable Direct or Indirect lighting from consideration but leave Color enabled [2] – this will bake the materials colour, pattern and/or other characteristics to the baked image. Finally click the Bake button [3] atop the sub-section. Blender will render the object and produce an image.

Depending on the type of standard bake needed [1] the settings and options may differ [2] e.g. for the inclusion of scene lighting. Once the appropriate options are set click the Bake button [3] to render.
Walkthru using Bake to render a Diffuse texture from a simple material.
Bake – High to Low
To bake high resolution (high-res) textures, that is the structure of one mesh (high resolution) onto the UV mapped image of another (low resolution), ensure the objects to be baked occupy the same position in the scene, and of the two (or more) objects to be rendered the lower resolution target object has a material assigned and is UV unwrapped and UV mapped to an image.
Design note: high resolution texture baking is identical to standard texture baking except renders are produced relative to transferring or converting the structural detail of a high resolution mesh to that of a UV mapped and texture low resolution mesh. In this situation object set up is critical to the result – both high and low versions must be closely approximate each other in shape and form, and occupy the same position relative to each other.
Once the objects to be baked are set up, select high then low resolution meshes in the 3D Viewport (selection order is important) and in Bake properties set the Bake Type e.g. Diffuse. Check and/or disable any options, e.g. for Diffuse only, disable Direct and Indirect lighting Influence options leaving only Color active. Finally click the Selected to Active checkbox [4] and adjust the (optional) Extrusion and Max Ray Distance [5] as necessary before then clicking the Bake button. Blender will bake the image relative to the options set, displaying the result once done, which can then be saved.
Design note: when baking like-for-like renders Extrusion and Max Ray Distance can be used to alleviate issues and artefacts in renders by inflating/deflating meshes, adjusting distances or altering the tracing mechanism on-the-fly as objects are analysed and processed.

Baking high resolution textures is identical to standard baking with the exception of enabling Selected to Active [4] options, required so mesh structure can be rendered down to an image.
Walking through the basic process of high to low resolution texture baking in Blender using Bake.
Bake – Scene
Baking textures relative to a scene within which an object might sit is no different from texture baking generally, except that some map types are able to account for lighting, colour and other influences that might be useful to capture. To bake scene influences then, ensure objects to be baked are suitably prepped, being; UV unwrapped and UV mapped to an image with material assignment [6]; placed within the scene with respect to other influencing objects and elements [7].
Design note: as with Bake generally, the process is tracing objects and scenes data in of themselves rather than any camera entity that might be available – bake is not conducted as though looking through a camera, i.e. a ‘view’ of the scene and objects within it.

Baking objects relative to scene influences is the same as other types of baking, with objects being positioned [6] relative to other items in the scene e.g. lights and other objects [7].
With objects and scene set up, in Bake properties set the appropriate Bake Type, e.g. Diffuse [8], and in Influence if shown, enable Direct and Indirect lighting [9] clicking the checkbox so the different aspects of the scenes illumination is included in the bake. Enable Color then click the Bake button. Blender will then bake the image which can be saved externally.
Important: when baking textures relative to the inclusion of lights, other objects and a scenes general illumination, the final textures may look odd under certain conditions that don’t reflect the characteristics baked into the images used. Under certain circumstances this can break the ‘immersion illusion‘.
Design note: the options available under Contribution vary depending on the Bake Type set for baking. For example, Diffuse has the options for Direct and Indirect lighting effects to be included in the render whereas Shadow [vii] does not, because the map takes these properties into account, scene lighting and illumination, as a fundamental aspect of that map type.
The type of map set by Bake Type determines what options become available [vii], scene lighting is implicit in Shadow maps but not Diffuse or other types.


Diffuse map [8] baked to include scene lighting – by enabling Direct and Indirect [9], the different aspects of the scenes overall illumination is traced and rendered to the mapped image ready for saving.
Walk through of the basics for Texture Baking lightings and shadows using Bake in Blender.
Bake – Save Image
Once Bake is done and images generated, they are stored temporarily in memory so will need saving. This can be done wherever image data can be accessed, i.e. the UV Editing, Texture Paint or Shading layouts. For example, to save images from within the UV Editing workspace, switch to the layout if not already active. On the left is the UV Editor where baked images appear. Here the Image menu will be appended an asterisk, *, i.e. Image*, indicating there is data to be saved. Click Image then Save, Save As… or Save a Copy… – Image* » [option] [10].
Design note: if the UV Editor is blank [viii] click the Browse Image to be linked button [ix] and select the rendered image from the list; baked images appear here and can be selected whilst in memory – data is discarded if render is not saved as an image, Blender or the project restarted or reopened.
Depending on the map type the results may not be visible in the UV Editor [viii]. If this is the case select it from the Browse Image to be linked list [ix].

In the Blender File View browser that appears, browse to and select the Directory (location) and change the File Name as needed. Finally set the File Format, preferably lossless i.e. Targa Raw, BMP or TIFF [11], then click the ‘Save’ button (label changed depending on save type).


Baked images are viewable in the UV or other image-based editor where they can be saved from the Image menu [10]. When doing so select a lossless format [11] to aid later (2D) image editing where required.
Blender 3.4+ & View From
As of Blender 3.4 and above, Bake includes a new setting, View From [12], that may affect rendering. Here, the options, Above Surface and Active Camera, determines where the bake process casts or emits rays used to collate, calculate and render surfaces – previously this was assumed based on the object rather than the point of view. To change the setting, click the drop-down and select one of the available options.

A new Bake option, View From, added to Blender 3.4 and included in all newer versions. The setting is used by most bake types.


The difference, broadly, between baking a Shadow map on a simple object/scene using Above Surface (image top) and Active Camera (image bottom), the latter captures more subtle detailing from the scene.
