Shape Key Animated Heart Accessory
Table of Contents
Description
Using the default scene a Scalable Vector Graphics file, an *.svg, is imported into Blender as an editable Bezier Curve. This is modified to give it some depth and shape before being converted into a mesh that can be UV Unwrapped and Mapped. Once the mesh is ready its brought into the Accessory Starter File using Append to be positioned and prepared for use in IMVU; only when this is done can it be finally rigged and animated in-situ to spin, using a standard Action sequence, and change shape, using a Shape Key animation, before export to FBX, import and assembly in IMVU Studio. (Recorded live, may include off-topic chat).
Duration c. 3 hrs 30 mins mins (03:30:00).
Info: 1080p.
Source: KatsBits – heart shapekeys (zip c. 1 MB – *.fbx, *.blend, *.png, *.psd, *.tga, *.ai, *,svg).
Product ID: Beating Heart Spinner
Video I
In this project we take a look at making a Heart Accessory animated using Shape Keys (also known as a Morph Animation). Starting with Blenders default scene, and rather than using the Cube or other mesh to make the heart shape, a Scalable Vector Graphics file, or *.svg, is imported – File » Import » Scalable Vector Graphics (.svg) – as a more accessible means of making relative complex shapes without having to use Blenders mesh editing tools. As the object imports as a flat plain, and being essentially a Bezier Curve, it generally needs to be modified and thickened before conversion to a mesh for UV Unwrapping and Mapping ready for the next step.
Bezier Curves
When exporting a vector graphic or line art drawing make sure the selection is being converted to ‘curves’ (how this is done will differ per application). Once imported the, what is now a Bezier Curve, can be modified in two ways; 1) in Object Data Properties [1] or 2) in Modifier Properties [2] – although both can be used at the same time preference should be for one or the other (properties and modifiers affect structure in slightly different ways, for example ‘depth’ will extrude ‘up’ or ‘down’ from surfaces using the modifiers[2], or both directions using Object Data properties [1].
With an SVG file imported into Blender it can be altered using various Object Data Properties [1] whilst remaining a Bezier Curve, for example using the Extrude and Bevel options (Geometry sub-section) to change its thickness and edge characteristics.
Similarly various Modifiers can be assigned, for example Solidify [2] to give the Bezier depth.


Video II
In this second video we take a look at cleaning up the heart mesh created after converting the imported SVG file – although a quick way to bring relatively complex shapes into Blender, being Curves, they may result in mesh objects that don’t shape well for use in IMVU, often requiring additional editing after-the-fact to correct. Once this is done the object can be properly UV Unwrapped and mapped to a standard Node-based material ready for IMVU item prep, skeletal (Armature) and Shape Key animation, by being brought into the Accessory Starter File using Append.
Types of UV Mapping
Depending on the objects intended use it can be Unwrapped using; Project from View which will map the object based on it’s position relative to the viewer; Cube Projection which generates segmented UVs as though the object were (inside) a box; normal Unwrap – UV » [option]. Of the three approaches using Unwrap may mean doing some rudimentary UV Editing and placing UV Seams around the mesh so it breaks efficiently.
Because SVG files, or Bezier Curves, are procedural in nature, mesh structure may over-generate mesh when converted causing problems for UV mapping that distort whatever is mapped to the object [3 & 4]
Once corrected converted meshes can be UV mapped properly [5 & 6] – although this may not be strictly necessary, to accommodate text display its best to correct issues with UV distribution before continuing.


Video III
Before doing any animation the heart mesh should be positioned where its to appear in IMVU, so once appended into the Accessory Starter File its moved above the avatars head. To ‘rig’ the mesh, Female03MasterRoot, the Armature at the avatars feet, is edited (Edit Mode) to include a new bone, “spinner“, that’s co-located with the heart mesh. To prep the mesh for animation it must have a corresponding Vertex Group named “spinner” and an Armature modifier assignment.
Armature vs Parent
In addition to linking mesh and skeleton using the Armature modifier, to aid production the two can also be linked using Parent – this ensures the two move as a unit in both Pose Mode and Object Mode. To do this select mesh first then Armature and from the Object menu select Parent » Object from the list of options.
To help with production it’s often useful to have an Armature Modifier assigned to control the mesh in Pose Mode, and for the mesh and skeleton to be linked using Parent so the latter moves the former where needed in Object Mode.

Once these are in place animation can be done; select the Armature object, switch to Pose Mode, select the ‘spinner’ bone, change its position then insert a Keyframe pressing the I. Repeat along the Action Editor timeline to create a sequence that can be exported to FBX and assembled in IMVU Studio to test.
Vertex Groups Setup
The vertex group assigned to the mesh object must be named exactly to match the corresponding bone that’s to control it during articulation, e.g. both being named “spinner”. Note also this is case sensitive, “Spinner” is not the same as “spinner” (upper-case ‘S’).
Although there are a number of ways to animate in Blender its best to use the Action Editor for IMVU – using the Editor Type menu [7] switch the default Timeline Editor to the Dopesheet [8], then Dope Sheet [9] to Action Editor [10]. This ensures Blender captures animation data that’s fully compatible with IMVU (data it understand on import).FBX Export Settings
When exporting FBX use the same settings as is typical for IMVU except ensure the Bake Animation option [11] is set and that both NLA Strips [12] and Force Start/End Keying [13] are disabled.
Because a skeletal animation needs to be included in the exported FBX file make sure the Bake Animation options [11] are set; NLA Strips [12] and Force Start/End Keying [13] being disabled to ensure a functional sequence IMVU can convert to the necessary files on import.


Video IV
Once the heart mesh is positioned and animated using an Armature (skeleton) its shape can also be changed or morphed using a Shape Key animation. This is done by editing the mesh in Edit Mode, those changes being stored to specific Shape Keys, themselves manipulated in the Shape Key Editor producing a sequence that’s exported to FBX and imported in IMVU Studio (or classic).
Shape Key Setup
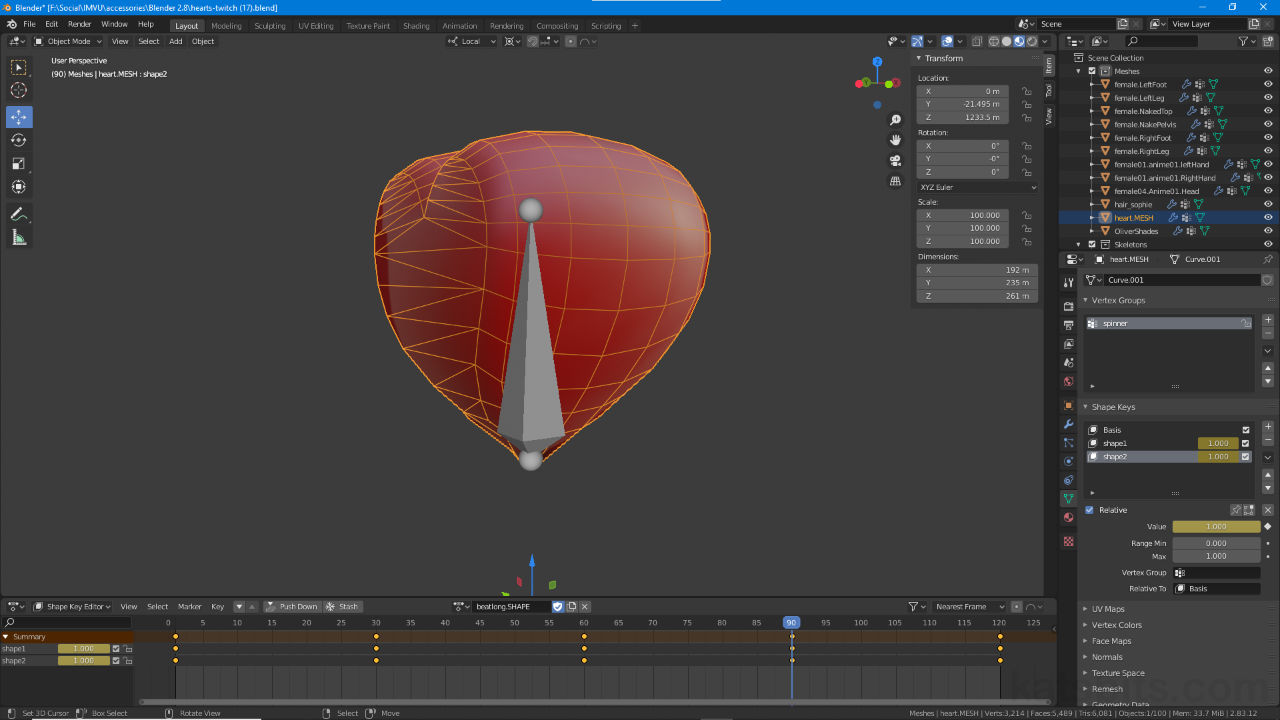
In Object Data Properties [14], a set of Keys must created, first is Basis, then additional keys to store the objects altered appearance [15]. Once the Keys are created, and shapes stored [16 & 17], in the Shape Key Editor [18] they appear as Channels [19] in the timeline, their value changed at various points to mark keyframes [20], and subsequently, create a sequence – for Shape Keys to work the first key is always Basis, this stores the objects original form as a baseline against which other shapes behave – if this is changed after the fact other keys will be affected.
When clicking the + button to create Keys the first one is always Basis, which should be left untouched – subsequent Keys can be renamed – Keys then just being the mesh modified in Edit Mode whilst the corresponding entry is selected in Shape Keys.
The only Shapes Keys that appear in the Shape Key Editor are those storing custom shapes – Basis never appears as it should not be edited or changed. A sequence can then be created altering the values to blend the shapes from ‘no shape’ to ‘fully shaped’ depending on the edited forms of the object.Shape Key Export
When exporting Shape Key animations to FBX disable, in Geometry [21] options, clear the checkbox for Apply Modifiers [22] that’s ordinarily enabled to prevent any modifiers assigned to the project destroying important vertex and structural data used to realise the action in IMVU – this does not affect the objects physical appearance only IMVU’s ability to see and use Shape Keys.
When exporting Shape Key animations to FBX [21] for IMVU the Apply Modifiers [22] option may need to be disabled to ensure the sequence data is saved to file properly – left enabled morphs are broken and do not appear.


Time Stamps
Times are approximate.
Video I : SVG Export & Import – c. 1 hrs 20 mins (01:20:00).
– 00:00 : Overview & Start.
– 04:00 : Vector & Font Export/Import.
– 16:00 : Bezier Editing.
– 36:00 : Convert to Mesh & UV Editing.
– 01:00:00 : Hints & Tips.
Video II : SVG & Mesh Editing – c 1 hr 15 mins (01:15:00)
– 00:00 : Overview & Start
– 04:00 : Modifiers vs Object Data Properties.
– 10:00 : Mesh, Materials & UV’s.
– 27:00 : Mesh Editing & UV’s (correcting SVG).
– 1:02:00 : Accessory Append & Prep.
Video III : Rigging & Armature Animation – c. 1 hrs 20 mins (01:20:00).
– 00:00 : Overview & Start.
– 11:00 : Rigging.
– 26:00 : Action Editor & Animation.
– 44:00 : FBX Export & Studio Import.
– 01:02:00 : Adjusting Timeline & Final Assembly.
Video IV : Shape Key Animation – c 1 hr 10 mins (01:10:00)
– 00:00 : Overview & Start
– 10:00 : Creating Shape Keys.
– 25:00 : Shape Key Animation.
– 37:00 : FBX Export & Studio Assembly.
