FBX Export, IMVU & Blender
Table of Contents
For newer versions of Blender, as with other versions, the way projects are saved for use in IMVU depends on the type of product being made and exactly what needs to be exported, for example some items only need meshes, others an entire Scene and its contents may need to be exported to capture and included the correct data.
With this in mind the following is a general guide to exporting FBX files from Blender 2.8 for use in IMVU.
Action: IMVU has released a dedicated Toolkit for Blender. For more information on this and how to use to Toolkit see “IMVU Studio Toolkit – Installing” and here “IMVU Studio Toolkit For Blender“.
Find out about IMVU Studio Toolkit for Blender.
Important: Cal3D is obsolete and for Blender, starting with version 2.8, not (currently) supported.

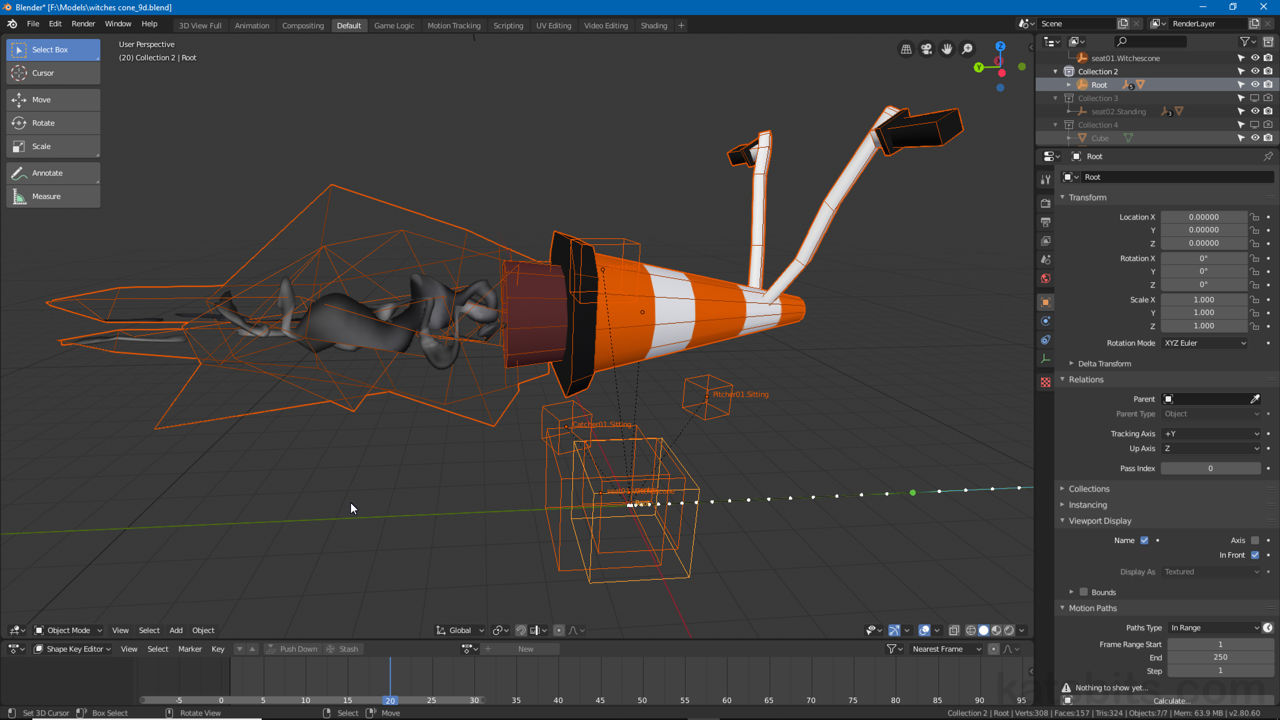
An animated furniture item to be exported from Blender to IMVU as an FBX.
Starter Files
For Blender the IMVU Starter Files have been updated to be properly compatible with the application.
Download: for more on the Blender Starter Files and what’s included see here.
- Avatar Starter File (c.8 MB).
- Room Starter File (c.3 MB).
- Furniture Starter File (c.4 MB).
FBX Checklist
Before exporting anything to FBX ensure selected items, the elements to be included in the final project, are (in no particular order of importance);
- Position: meshes are located where they need to appear in IMVU (FBX exports objects in-situ).
- UVs: meshes need to be UV unwrapped and mapped with an image assigned.
- Materials: names must include numerical append, ‘[n]‘ (e.g. Upper body [0]), inline with IMVU’s naming convention.
- Parent: meshes must be Weight Painted (Parented) to an underlying skeleton (Armature) using Vertex Groups.
- Animations: Actions are needed for each sequence (applies to ShapeKey & Armature animations).
- Clean up: remove unwanted/unused/duplicate Material references.
Design note: for more on Blenders Material system read Material Basics here. If textures are missing opening an older *.blend file, see here “IMVU & Missing Images“.

Make sure the mesh or project is fully prepped in Blender before export to avoid issues in IMVU – meshes should be UV mapped, have material assignments, be weight painted; skeletal and shapekey animations should have actions.
Export to FBX
Once the objects to be exported are prepped, right-click select or Shift + right-click multi-select everything to be included in the FBX. Next, from the File menu [1] select Export [2], FBX (.fbx) [3] (File » Export » FBX (.fbx)).

Using Blender, content for IMVU will need to be exported to FBX – select all objects to be included in the file and then export from File » Export » FBX (.fbx).
In the File Browser that appears;
- change the file name where needed.
- select the file save location.
Important: depending on the version used, upon exporting Blender may present the File Explore as a detached overlay window with export settings organised down the right-side (Sidebar, press N to toggle). The options required to export are still the same regardless. To access if not visible, click the ‘cog’ icon top-right [1], change the settings as require per product type [2], then click the Export FBX button [3].
Depending on the version of Blender in the 2.8+ series the export dialogue (File Browser) may present as an overlay window – the settings used are the same as for other versions outlined below.

Then in the Export FBX setting lower-left;
- Main enable Selected Objects.
- Geometries disable Use Modifiers Render Setting, optionally enable Apply Modifiers.
- Armatures disable Add Leaf Bones.
- Animation optionally disable NLA Strips and Force Start/End Keying.
Design note: when exporting ShapeKey animations Apply Modifiers MUST be disabled else export breaks the sequence. Use Modifiers Render Setting may be active by default and not possible to change. Where no animation is to be exported deselect Baked Animation to disabled all animation export requirements to save on the amount of data saved to the FBX file.
Once set click the Export FBX button top-right.


Using Blender 2.8 content for IMVU will need to be exported to FBX – select all objects to be included in the file and then export from File » Export » FBX (.fbx) (Animation settings show above would be for items that animated otherwise disable by deselecting Baked Animation to avoid including unwanted data).
Import FBX
Importing FBX files into IMVU differs depending on the product being made as each item type changes the options shown during the process, importing an Accessory or Avatar Pose will display the Select Skeleton Root dialogue whereas importing a chair won’t, the file will load directly into the FBX importer/converter. With this in mind, to import an FBX file into IMVU access Create Mode and derive a product, Furniture for example – Rooms & Furniture » Furniture.
Design note: if the Select Skeleton Root window appears select the option from the drop-down menu that begins with RootNode/…, for example;
• RootNode/Female03MasterRoot/Female03MasterRoot (86 bones, 10 meshes)This ensures the correct skeleton is set for import into the converter (if multiple skeletons are shown the correct one to use typically has the fewest bones, e.g. 86/87 for clothing or poses, 2 bones for accessories).
When importing certain products IMVU presents the Select Skeleton Root dialogue that lists a number of skeleton options associated with the imported item, typically the lower item shown is the one to use (subject to item being imported).


To begin the import process first derive an item in Create Mode [1], for example a Furniture item [3] from the default Rooms & Furniture category [2] of products.
When the derivation Editor appears click the fbx import tab [1] then on the Load FBX button [2] to open the File Browser. Find and select the *.fbx to be loaded then click Open to load the data into the Importer.

In the derivation Editor click the fbx import tab [1] then the Load FBX button [2] to load in an FBX, in this case a furniture item to replace the default chair derivable.

In the File Browser find and select the FBX to be imported then click the Open button bottom-right to bring the data into IMVU in preparation for conversion.
Once the FBX file is loaded its components will be shown as meshes (Mesh Selected), materials (Materials) and optionally animations (Animation/Actions and Morphs/Actions). Depending on the product being made;
- set the Mesh ID to replace any derived defaults, e.g. 0 (zero – Mesh ID 0) replaces the default chair mesh, 0 male accessory glasses, 2 female accessory glasses, [n] for body part and so on.
- de/select the Materials to be imported.
- de/select any Animations/Actions and/or Morphs/Actions.
- set Apply scale to 0.01 (Apply scale: 0.01).
- deselect Rename Room Nodes.
Design note: unwanted or unused components can be excluded by clicking a checkbox that corresponds to the item being removed, in this way large projects or imports can be filtered to include only required parts, occasionally necessary for exports that included everything in a Blender project/scene. When importing meshes that are to replace body parts, Mesh ID should correspond to the part being replaced, e.g. 2 replaces the Head.
With this done, click the Import button, then the Import Changes button in the Import Status dialogue popup that appears, to convert the data and generate the assets IMVU needs.
Design note: the Import Status dialogue will display errors and/or warnings about the data being converted. If the file has significant issues the Import Changes button will not appear, effectively halting the process, requiring issues to be addressed before (re)import will complete.

With an FBX file loaded into the importer, check the Mesh ID [2] if the mesh is being replaced – 0 overrides most derived defaults; select the Materials and/or Animations or Morphs [3] to be imported; disable Rename Room Modes [1]; change Apply scale to 0.01, then click Import [1].
Assembly
Once the FBX file is imported and data converted into the corresponding Cal3D files IMVU needs (*.xmf, *.xrf, *.xsf, optionally *.xaf and *.xpf), to assemble click the Apply Changes button [1], IMVU will automatically assembly the product replacing any defaults set to be overridden based on the options set during import [2] (shown blank after successful conversion). Once done the product will be ready for further editing or upload to the catalogue.
Design note: IMVU actually uses XML data files so the import process is one of converting an FBX into the following distinct Cal3D files, each dedicated to a particular aspect of a product;
- XSF – skeleton (*.xsf).
- XMF – mesh (*.xmf).
- XRF – materials (*.xrf – optional).
- XAF – skeletal animation (*.xaf).
- XPF – morph animation (*.xpf).

Once the FBX import and conversion process is done, to assemble the product click the Apply Changes button [1] – IMVU will automatically assemble the assets together based on the settings previously set (during import) [2], the panel for which will be shown blank by way of confirmation.

The final assembled furniture item ready for upload to the catalogue or further editing.
Videos
Summary videos exporting different product types as FBX and importing into IMVU Create mode.
Exporting a clothing item (sports vest but applies to any item) from Blender 2.8+ in a way that includes a section of the avatar to replace the corresponding default mesh section (Mesh ID 2 in this example).
Exporting a clothing item (sports vest but applicable to most clothing) from Blender 2.8+ without including any avatar parts so the items can be used over other items (as a ‘layerable’).
