How To Import Roblox Avatars Into Blender
Table of Contents
Description
Blender and Roblox use the same underlying unit of measurement (metre) so anything made in Blender using the defaults should be correctly scaled for Roblox when imported. For more accuracy, especially for clothing, accessories, tools and other ‘avatar’ related objects, it’s best to bring in a Roblox avatar character.
Duration: total c. 10 mins (00:10:00).
Info: 1080p.
Suitability: Beginner+.
Source: n/a.
Product ID: n/a.
R15 vs. R6
Avatars in Roblox all use one of two underlying architectures; the legacy R6, or more modern R15. Outwardly they don’t appear to be that different, much of each characters core structure and appearance are the same. There are differences however;
The R6 Architecture (Classic)
Introduced in the early days of Roblox, “R6” means 6 body parts.
- Body parts: head, torso, left arm, right arm, left leg, right leg.
- Joints: limbs are rigidly welded to the torso, no elbows, knees, or wrists.
- How it animates: as there are no joints, limbs rotate from the shoulder or hip only.
- Why use it: simple structure means significantly reduced physics and collision overheads.
The R6 version of the avatar uses a classic skeletal structure that limits the character to six (6), stiff, mesh parts, that have a limited range of movement.The R15 Architecture (Modern)
Introduced to allow modern, fluid movement, “R15” means 15 body parts.
- Body parts: head, upper torso, lower torso, left arm upper, lower and hand, right arm upper, lower and hand, left leg upper, lower and foot, right leg upper, lower and foot.
- Joints: uses a more complex skeletal system that include articulating joints for the ‘elbows’, ‘knees’, ‘ankles’, and ‘wrists’.
- How it animates: with a full skeleton available, characters can bend at their elbows, lean forward, align feet to the ground, and perform more fluid movements.
- Why use it: aside from allowing for more complex animation, R15 supports a number of modern features including Layered Clothing and dynamic Rigid Accessories (items that deform realistically over different body shapes).
The R15 version of the Roblox avatar has 15 body parts and supports joint articulation as well as layered clothing and accessories that deform as the body moves.Step 1: Load a Character
Roblox provides a number of base avatars to select from in Studio, but for most content creation projects, the default Mesh Avatar (2012) or Mesh Avatar (2016) are typically used as these are the defaults used in-game. Alternatively, if making an item to fit a specific custom avatar, My Avatar can be used, which exports the users active avatar.
To do this; from the Home [1] or Avatar tabs, click the Character icon [2] in the toolbar. In the Generate Rig popup, set the Rig Type, Body Shape, then click the an avatar to load [3], e.g. My Avatar. This drops in a copy or instance of the selected avatar into the 3D view, which is also accessible in the Explorer [4].
Important: recentre avatars in Studio prior to export… [more]
Avatars are exported in situ, that is from where they are located in Roblox Studio. To avoid alignment issues, in Roblox Studio check the Position of the avatar is set to 0,0,0 before exporting – in the project Explorer select the Rig then below in Properties under Transform, check the Origin data, that Transform (and optionally Orientation) is set to 0,0,0. This ensures the avatar is neutrally positioned when exported from Roblox Studio, and ready for immediate accessory creation based on that positioning once imported into Blender.
Avatars and objects are exported in situ so should be recentred before export to ensure optimal positioning in Blender.
Using the Character tool [3], a scale reference can be exported from Roblox for more accuracy when making content in Blender.Step 2: Export Character from Roblox
With avatar loaded into the project, in the Explorer right-click the avatar instance listed, e.g. right-click Rig [5], and in the context menu select Save/Export, then Export as Obj or Export and glTF [6] – [Right-click ‘Rig’] » Save/Export » Export as glTF. In the Export glTF popup that appears, set the options and click Export. This opens a standard Windows Explorer (or Mac Finder) dialogue where the save location can be set and file named. Click Save to finish.
Important: Roblox Studio export restrictions… [more]
Exporting custom avatar may be subject to “restrictions”, i.e. the author/publisher of ‘restricted’ item may have limited or blocked the ability to export their content from Roblox Studio to prevent content theft (Copyright misappropriations), when loaded into Blender parts and images may be missing – some content may be exportable to OBJ but not glTF despite restrictions, and where this happens, may also affect the ability to select and manipulate the character in part or whole.
When exporting a custom avatar, because they likely use items made by other people, parts and images may be missing once loaded into Blender due to ‘restrictions’ their creators might have in place.
Once the avatar Rig is loaded into the project, from the Explorer [5] it can be exported to Obj or glTF [6] file.Step 3: Avatar Import to Blender
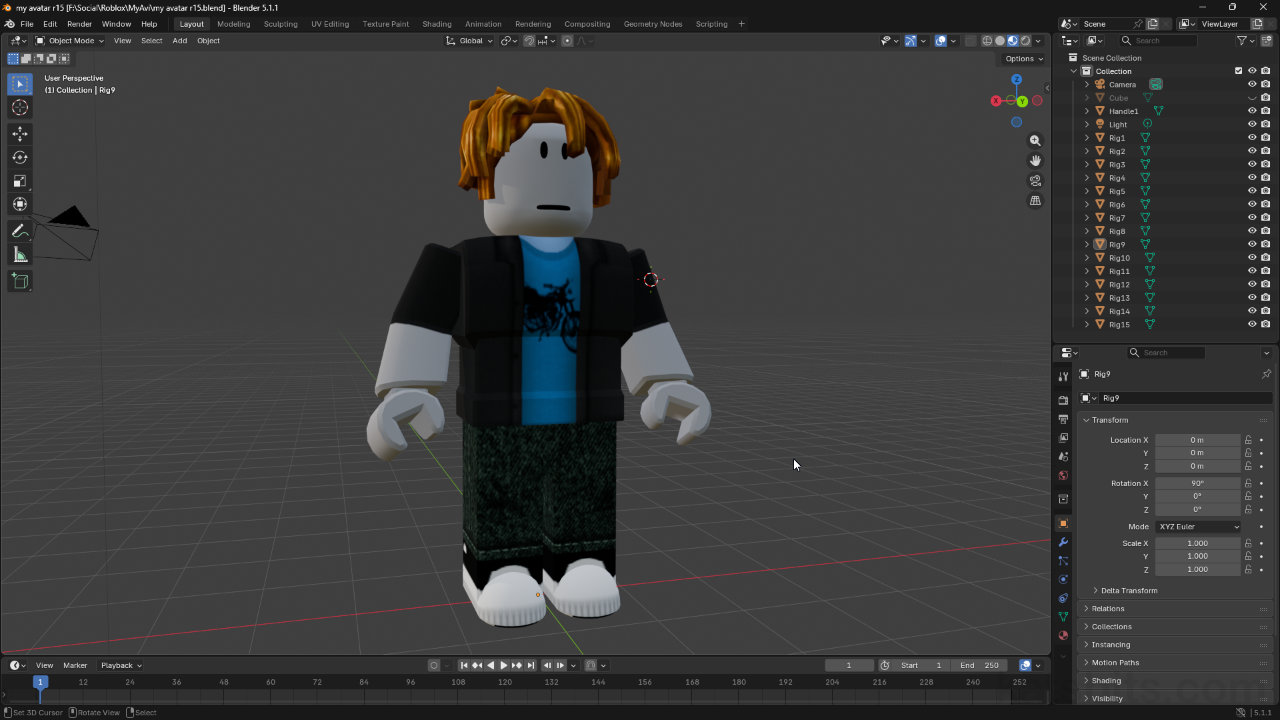
Once the Roblox avatar has been successfully export and is saved to disk, in Blender, from the File menu click Import then on the corresponding importer for the format used, e.g. glTF 2.0 (.glb/.gltf) – File » Import » glTF 2.0 (.glb/.gltf). This opens a Blender File View instance. Here, browse to the saved file [7], check and set any import options [8] – defaults suffice – and then click Import glTF 2.0 [9] to finish and bring the mesh into Blender for use as a reference.
Important: multi-object export/import… [more]
For OBJ file import, the avatar will likely import into Blender as a ‘joined’ mesh, that is, the body parts will belong to the same object making it difficult to select them individually. To avoid this, during import ensure Split by Group is set, this detaches each part so they become independently selectable, but part of the same group.
Enable Spit by Group so the Roblox avatar imports into Blender a collection of separate object that can then be individually selected and manipulated.
After export from Roblox Studio, the mesh can be imported into Blender using the corresponding importer for Obj or glTF files – in most instances the default settings can be used.


Timestamps
Times are approximate;
– 00:00 : Roblox Setup
– 02:45 : Export
– 04:00 : Blender Import
