Basic Alpha Transparency
Table of Contents
There are a number of ways to generate or create transparent materials in Blender. For real-time, live or game-related content creation using (Eevee Render Engine), transparency is typically achieved through use of a separate mask image, or more commonly, the alpha channel of a standard compatible RGB image (Red/Green/Blue), that is the A component (/Alpha) of a typical 24 bit RGBA image.
Important: Blender being able to properly and correctly render transparent surfaces is dependent on a number of criteria including but not limited to the application itself, system graphics and/or rendering capabilities therein.
Real-time preview in the 3D View and other modes where objects can be seen will differ depending on system graphics capabilities, the above for example was rendered by a Radeon HD 6700M with ‘Hashed’ blending, the header image an Intel HD 4400 which had some difficulty correctly rendering internal faces (backface culling) and shadows.

Download: Node base alpha example file (*.zip c.2 MB).
Design note: all the more commonly used image editors, Adobe Photoshop, GIMP, Affinity, Paint.net, Krita et al, are capable of generating alpha channels/masks but will differ in how this is done in practice, subject to format support, e.g. *.tga, *.png support alpha channels whereas *.jpg doesn’t.
Using these types of transparent images in Blender, where the degree of opacity is essential controlled externally to Blender, is a two part process; 1) a basic node-based Material is created which is then, 2) modified in Material Properties to activate the property (transparency being a ‘property’ of the image and subsequent material its associated with).

Above (in Affinity) the ‘alpha’ (channel) element of a simple (orange blend) image is shown as grey-scale values when selected in the Channels Inspector. This is the ‘A‘ aspect of an ‘RGBA‘ bitmap image (e.g. *.tga).
Basic Transparent Material
To set up a transparent material in Blender using the alpha channel of an RGBA image (Red/Green/Blue/Alpha), first make sure a suitable image is available that includes an appropriate alpha channel or mask.
Design note: alpha, or the degree to which something appears transparent or opaque, is generally defined by grey-scale values, typically black represents 100% transparent, white 100% opaque, grey determining degrees of transparency between the two extremes (transparency can be understood as ‘transparency’ or ‘opacity’, the language used then changing what the percentages might mean, i.e. 100% can be used to represent either extreme).

A simple bitmap image showing masked or alpha areas as, in this instance fully, transparent in an image editor (Affinity), the programs default grid checker can be clearly seen through the orange tint.
Next, in Material Properties create, click the + New button below or + button to the right of the Material List aperture, and/or assign a Material to the selected object (Object Mode) or surface/s (Edit Mode) in question and ensure Use Nodes is active (highlights blue). Rename the Material where necessary (defaults to Material, or Material.[n] where several are used).
Design note: in Object Mode new materials will auto-assign themselves to the selected item if not yet applied, in Edit Mode they need to be specifically applied to selections clicking the Assign button below the Material List aperture.

If the object or surface does not have a Material assigned, add one in Material Properties clicking the + New button (where no material exists), ensure Use Nodes is active (highlights blue).
Shading Workspace
With a Material available and assigned switch to the Shading layout, primarily to access the Node Editor and 3D View set to LookDev render mode in one place, the Node Editor will display a basic Material by default comprising the Principled BSDF [2] node linked to a Material Output node [1].
Design note: the two nodes available in the Node Editor when switching to the Shading layout or workspace, form the core components of all generic node-based materials in Blender 2.8+.

Switching to Shading Workspace shows a basic node-based Material in the Node Editor (the two nodes, Principled BSDF [2], Material Output [1]) form the basis of all general Materials), and the object to be textured in a 3D View.
Here, place an Image Texture node into the Node Editor workspace clicking Add » Texture » Image Texture [3], (once the node appears left-click drops it into the workspace) then click the nodes Open image button, browse to and select an RGBA image in the File Browser, then click the Open Image button top right to load. These initial steps form the basis of a standard material when nodes are linked; Image Texture » Principled BSDF » Material Output.
Design note: objects need to be UV mapped, which can be done at any point prior or post, else little or nothing will be displayed on the mesh after Material set-up (notwithstanding the render mode set for the viewport).
In this context, of using bitmap images to texture meshes, objects will need to be UV unwrapped and mapped for Materials to display fully – this can be done at any point, before or after material set up.


After dropping an Image Texture node [3] into the Node Editor workspace, click the Open image icon, select and load the alpha-channeled image then link it to Principled BSDF [2], which is in-turn linked to Material Output [1] – the texture will display absent transparency.
Transparent BSDF Node
Once the initial material nodes are available, for transparency to work Blender needs to know the material is supposed to render as transparent. To do this two more nodes need to be added; a Transparent BSDF, which tells Blender the material is to be rendered with some degree of transparency/opacity, and a Mix Shader, which combines a number of inputs (nodes linking in) into a single output, itself passed on the the final Material Output.
Design note: the nodes used to create the basic Material above were linked together for illustrative purposes, they do not specifically need to be connected for a transparent material to be completed.
In the Node Editor workspace click Add » Shader » Transparent BSDF [4] (note to select Transparent BSDF and not Translucent BSDF). Left-click to drop. Then click the Add menu again this time selecting Shading » Mix Shader [5] (Add » Shading » Mix Shader). Once in place connect the nodes together; BSDF output from Transparent BSDF and Principled BSDF to Shader input of Mix Shader; Color output of Image Texture to Base Color input of Principled BSDF, Image Texture Alpha output to Fac input of Mix Shader; finally Shader output from Mix Shader to Surface input of Material Output.
Important: transparency can be inverted switching the Shader input nodes of the Mix Shader i.e., if the BSDF output node from Transparent BSDF is connected to the bottom Shader input of the Mix Shader, moving that to the input above (top) inverts the transparency – depending on mask values, transparent becomes opaque, opaque becomes transparent.
Once the basic transparent material is set up the alpha can be inverted swapping the Mix Shader inputs around.


With the addition of a Transparent BSDF [4] and Mix Shader [5] Blender will knows the material should be rendered with transparency defined by the materials properties, settings and image.

Once the extra material nodes are available everything needs to be linked together [1-3], passing through the Mix Shader [5] so only one output arrives at the Material Output [1] nodes input socket – the order Transparent BSDF [4] and Principle BSDF [2] connect to Mix Shader can be used to invert how mask data is displayed.
Material Settings
Once all the basic nodes are connected, the material and bitmap will display on the mesh, subject to UV mapping, but will not show as transparent. To actually enable alpha-channel based transparency in the 3D View (as part of any workspace layout) the type of transparency used needs to be set in the Settings section of Material Properties.
Design note: the need to do this varies depending on the type of material being set up and the type of transparency required, in this context transparency is determined externally by the dictates of the alpha channel rather than any inherent properties attributed to the Material (nodes) itself.
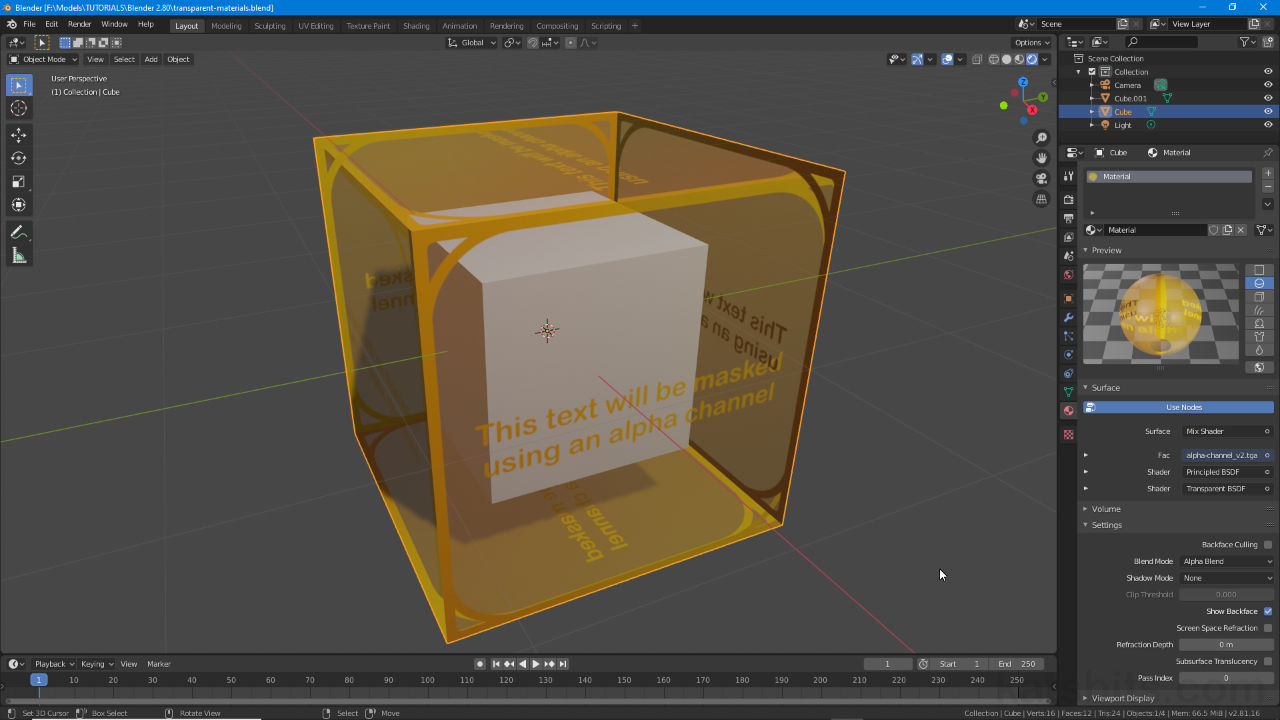
To enable alpha-based transparency, in any workspace or layout where Material Properties is accessible (right-side), i.e. Shading, Layout (default), Modeling etc., click the Settings heading to expand the options then set the Blend Mode to Alpha Blend, Alpha Clip or Alpha Hashed depending on the type of transparency required. The Material will immediate display the alpha-masked texture correctly in the 3D View, completing the process of setting up a basic transparent material based on using alpha-channel inclusive bitmaps.
Important: be aware that using transparency, either in the form of alpha-channeled bitmaps and/or transparent Materials, may cause real-time rendering issues with other elements of Blenders interface, the 3D View grid for example, can seem to disappear, or appear incorrectly ‘ordered’ (stacked) with respect to other objects in a Scene when transparency and/or back-face culling is enabled or disabled. Barring errors with a projects set up, if a static/offline image can be rendered as expected but Scene shows incorrectly in the 3D View this is likely a consequence of graphics card driver or feature incompatibility or shortfall.
Design note: changing Blend Mode modifies transparency behaviour;
– Opaque draws surfaces without any transparency
– Alpha Clip renders transparency using off/on tolerance
– Alpha Hashed provide complex on/off tolerance
– Alpha Blend renders full transparencies
Some modes previously available, namely Additive (brightens surfaces) and Multiply (darkens surfaces), are obsolete/outmoded and no longer used. Blend Mode options are also not available using Cycles render.

Changing the Blend Mode in Material Properties will change the way the transparent properties of the material are rendered, partially or fully based on the alpha values/alpha channel data that’s included with the image.
UV Map Node (optional)
For game-related content, items used outside Blender, materials, textures and images are typically positioned and orientated over a mesh based on UV mapping. As there are a number of different ways to map objects, optional nodes can be included to explicitly define which Input type is to be used. In this context this is a UV Map node.
Design note: if a mesh is unwrapped and mapped to an image, it will appear where and as it should regardless of the properties associated with a typical material.
To add a UV Map node, in the Node Editor click Add then Input » UV Map (Add » Input » UV Map). Left-click to set in place then click the UV coordinates to be used for mapping selector and select UV Map from the drop-down list. Finally, link the UV output socket of the UV Map node to the Vector input of the Image Texture node (in which the bitmap is loaded) completing set up.

Optional for most game-related content because the UV itself generally forces proper material behaviour, a UV Map node [6] can be added to the material [1-5] explicitly defining what type of Input should be used.
Overall Transparency
Once a material has been set up to accommodate image-based alpha transparency, the degree shown can be modified without additional node inclusions; one approach affects the alpha itself, the other the entire material. To change the former, the way image-based alpha elements are displayed, in the Transparent BSDF node click the colour sample area (white by default) and select a colour using the picker, or change the tone using the slider. This will tint the alpha with the selected colour, will make it appear transparent (white, default state) or black and opaque, or a combination of the two – tinted opacity.
Design note: sort order may affect the way surfaces are rendered in the 3D view independently of materials settings.

The way alpha elements are displayed can be changed using the Transparent BSDF colour setting, tinting the effect with a colour or making it opaque and black (shown above).
To change the latter, overall material transparency, in the Principled BSDF node, find the Alpha setting (near the bottom of those available) and lower the value from 1.000 to decrease the transparency of the material itself, 0.000 being fully transparent (invisible material).
Design note: changing the materials transparency modifies the entire material, all the properties that might be associated with it will become transparent to the degree set in Alpha.

Modifying the Principle BSDF‘s Alpha setting will change the degree of transparency displayed by the entire material, set to 0 (zero) it disappears (shown above).
Video Walkthrough
Video overview making an alpha-based transparent Material in Blender 2.8+. Duration: c.2 mins.
An overview making a transparent material in Blender 2.8+ using an alpha-based bitmap image – UV mapping is needed to display materials properly.
Blender 2.9+ Transparency
For Blender 2.9+ and newer versions (Blender 3.0, 4.0 etc.) basic transparency works the same way as for Blender 2.8+ so the process discussed above can be used (for both Eevee and Cycles render engines); essentially a Transparent BSDF node supplies the necessary transparency function and the Alpha input value of Principle BSDF the degree of transparency, both ‘mixed’ together through a Mix Shader.
Design note: it’s important to understand that basic transparency is making the overall material itself transparent not just an element of it, any images or other properties will be appropriately affected by the settings used.
Shown above a material is set up with basic transparency using a Transparent BSDF node that enables the effect. This modifies the material itself (shown), which might then include an image (not included above), which becomes transparent by association – images absent an included alpha channel (RGB/A) will become transparent by the same degree as the underlying material.


Making a material transparent overall so the result affects associated elements needs a Transparent BSDF node that’s connected to a Mix Shader, everything then being controlled by the Alpha input of Principled BSDF (the node tree shown above highlights the set-up for transparency to function without the need for an image).
Setting up a basic transparent material in Blender 2.9+ using the Transparent BSDF and Mix Shader nodes.
