Transparent Materials in Cycles
Table of Contents
Carried over to Blender 2.8+ from previous versions of the application, the Cycles rendering engine processes transparency in a slightly different way to Eevee and Workbench by controlling the effect, at a basic level, using the Transparent BSDF material node, allowing for different types of transparency depending on requirements.
Download: Transparent Material example for Cycles *.blend (c.2 MB).
Design note: assigned images/texture don’t appear unless objects are UV mapped so ensure the object is UV unwrapped beforehand and Cycles is set as the active Render Engine – in Render Properties toggle the Render Engine option to Cycles (defaults to Eevee).
Basic Material
A basic material in Cycles uses the same set up as for Eevee, essentially a node tree comprising three nodes; Image Texture, Principled BSDF and Material Output node. If a material is not set up or assigned, select the object in question and in Material Properties click + New to create a new instance that’s populated with a set of default properties and options – this also adds a Principled BSDF [2] and Material Output [3] nodes.
Design note: Cycles materials use nodes by default so the Use Nodes option associated with Eevee materials is not available.
Switch to Shading Workspace and to the default nodes (Principled BSDF and Material Output) add an Image Texture node [1] – Add » Texture » Image Texture. Here, click the Open or the Browse Image to be linked buttons to select or load an image into the node then link this new nodes Color output to Base Color input (Principle BSDF). The image (bitmap) will appear on the mesh in the 3D preview area.
Design note: ensure BSDF output (Principled BSDF) is linked to Surface input (Material Output). Image will only appear if the object associated with it is UV mapped.

Add an Image Texture [1] node to the default Principled BSDF [2] and Material Output [3] nodes then link Color output to Base Color input (ensure BSDF output is linked to Surface input also) – the image will only appear if the object in question has been UV mapped.
Transparent BSDF
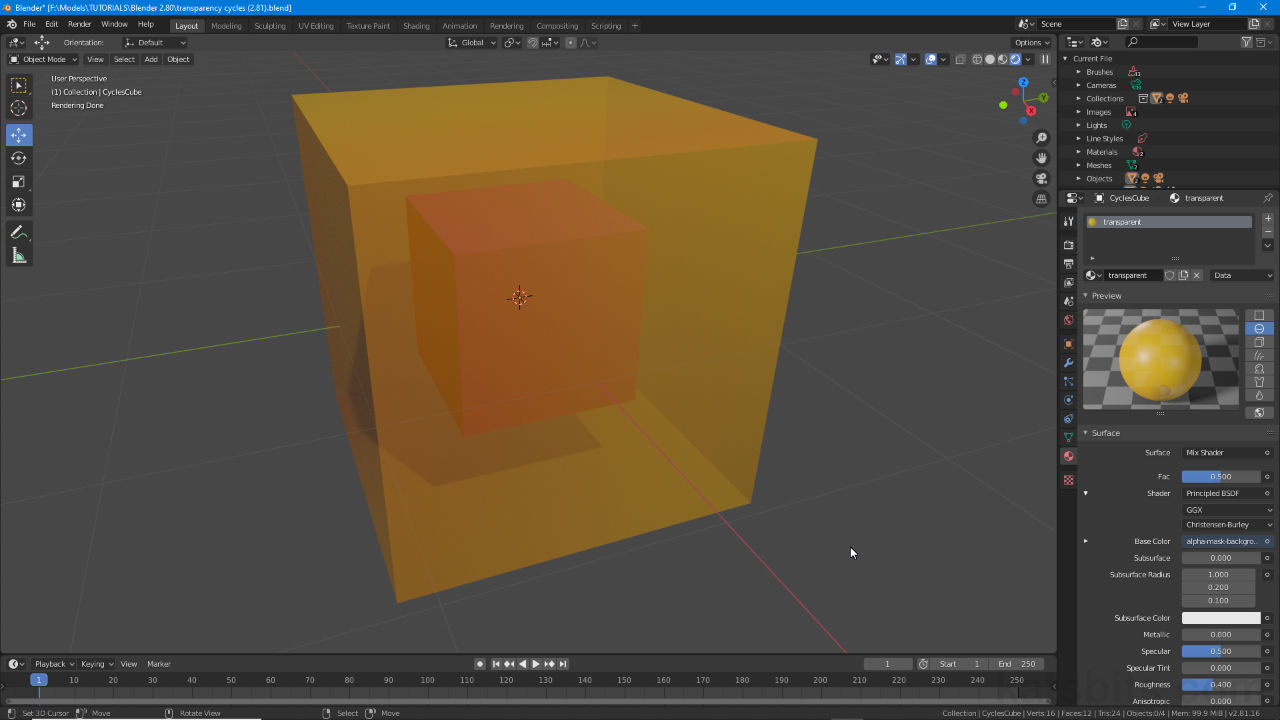
Once the basic material is set up and associated image appears correctly on the object, to make the material transparent add a Transparent BSDF node [4] – Add » Shader » Transparent BSDF, and a Mix Shader node [5] – Add » Shader » Mix Shader. Link these two new nodes to the current tree so BSDF output (Transparent BSDF) to Shader input (Mix Shader) and BSDF output (Principled BSDF) to Shader input (Mix Shader) – this should be the two BSDF outputs from Transparent BSDF and Principled BSDF linked in to the Mix Shader. And then Shader output (Mix Shader) to Surface input (Material Output).
Design note: in this instance Cycles is making the entire material transparent not just the image that might be assigned via the Image Texture node, which differs from basic Alpha transparency, should other components be linked as part of the overall material tree, they will carry the same degree of transparency.

Add a Transparent BSDF [4] and Mix Shader [5] nodes to the basic material and link them so the Principle BSDF and Transparent BSDF pass through the Mix Shader, itself then connected to Material Output.
Blend Mode Settings
Once the node tree is set up the the final step to enable transparency is to set the Blend Mode. To do this, in Material Properties scroll down to the bottom of the panel and expend the Viewport Display options then the Settings sub-section. Here, click the drop-down menu to the right of Blend Mode to set the transparencies behaviour, typically Alpha Blend, Alpha Clip or Alpha Hashed. At this point the material will appear transparent in the 3D View.
Design note: images without an alpha channel will appear transparent because the material itself is being affected by the nodes used and their settings.

Once the node tree is established the behaviour of any transparency needs to be defined using Blend Mode – in Material Properties and under Viewport Display select an appropriate option in the Settings sub-section.
Controlling Transparency
For basic materials in Cycles transparency can be controlled by changing the colour of Color vector of the Transparent BSDF which changes the transparency of the image mapped to the Image Texture node, and/or the Alpha vector of Principled BSDF which changes the materials overall transparency.
Design note: both properties are then modulated by the Fac vector of the Mix Shader.
To do this, click the colour sample rectangle, white by default, and using the colour picker or tone slider, change the value from white, down through grey, to black – this makes the material opaque depending on the tone set, white for fully transparent (100% transparent, partially opaque image), black for completely opaque (0% transparent, fully opaque image).
Design note: the degree of transparency is being controlled by the colour vector in the same way alpha generally works, white is 100% transparent (subject to the image itself) black being 0% transparent, grey values representing the different levels between the two extremes – this modulates the image mapped to the material with respect to the Fac value set in the Mix Shader – at 0.500 a fully transparent material is actually displaying the image with 50% opacity/transparency.

The degree of transparency for basic Cycles materials can be modified using the Color vector of the Transparent BSDF node, white = 100%, black 0% transparent, changed to black the texture shown above is completely opaque regardless of any properties the image might include.
To change the Materials overall transparency using the Alpha vector, towards the bottom of the Principled BSDF node is the Alpha vector. To modify the material change the numerical value from 1.000 (100% opaque) to a lower value, or 0.000 to make the material partially or fully transparent (1005 transparent).
Design note: this changes the overall material transparency not just the image mapped to it, and as with Color modification, is modulated through the Fac vector of the Mix Shader.

Using the Alpha vector of Principled BSDF the overall materials transparency (visibility) can be modified – changing the numerical value from 1.000, fully opaque, to another value for partial transparency, or 0.000 full transparency, the entire material can be affected.
Transparency with Alpha
To control material transparency in Cycles using image that’s carrying alpha channel data (RGB+A), the materials set up is exactly the same as outlined above with the exception that the Image Texture node can be linked to the Mix Shader to control transparency. To do this link the Alpha output of the Image Texture node [7] to the Fac input of the Mix Shader [8], doing this instructs the material to use the alpha channel values attributed to the image.
Design note: when using images that include an alpha channel the Color vector attributed to the Transparent BSDF node acts as a master control over the entire material, if white (default) areas defined by the included alpha channel display fully transparent, if black transparent areas similarly defined by the alpha channel display opaque (black). This means when using alpha-based transparency the materials overall opacity can be modified by two controls; 1) the materials properties and 2) the image alpha itself.
The Color value attributed to the Transparent BSDF node controls the overall degree of transparency described by any image-based alpha, set to black the alpha channel data is ignored and textured rendered fully opaque (white is the default and renders fully transparent).Using the same node set up, and the inclusion of an alpha channelled image, transparency can be inverted by swapping the Shader inputs of the Mix Shader – both input should be from the BSDF outputs of Transparent BSDF [red] and Principled BSDF [green].
Mix Shader inputs can be swapped to invert alpha-based transparency.


Transparency can also be determined by image based alpha – using the same node set up for a standard material, linking the Image Texture (Alpha vector output) [7] to the Mix Shader (Fac vector input) [8] instructs Blender to use the included alpha channel data for transparency.
Video
Walk-through setting up a basic transparent material using the Cycles render engine.
Blender 2.90+/3.0+ Blend Mode
For Blender 2.90+ and above (incl. Blender 3.0+ series), the Blend Mode settings necessary to engage transparency have been moved to Viewport Display. Once the basic nodes have been set up to create a transparent material, in Material Properties [1] scroll down to the Viewport Display sub-section [2], instead of Settings, and expand the options (click the black arrow) to expose the Blend Mode and Shadow Mode options [3]. Click the drop-down menu and select the appropriate option; Alpha Clip, Alpha Blend or Alpha Hash.


For Blender 2.90 and above, when using Cycles render engine, setting the Blend Mode for a transparent material is found in Viewport Display options [3] of the selected material not Settings.
Walk-through setting up a basic transparent material using the Cycles render engine in Blender 2.90+ and above.
