Saving Images (generated or edited)
Table of Contents
When working with images that have been edited, modified or generated internally to Blender, there are a number of places they can be saved depending on what activity is being performed, and typically this can only be done directly, i.e. in the editor or area being used, in which an image is active (visible) or being modified.
Shading Workspace
When setting materials up to use images in Shading Workspace, they can be saved, or resaved if edited, from the Image Editor area, lower-left corner of the interface. To do this, set up a material with Image Texture node as usual and generate or link an image. In the Image Editor use the Browse Image to be linked [1] drop-down an select the image to be saved – it will appear in the areas workspace [2]. Next, click the ‘hamburger’ menu, ≡ [3], and from the list select Image then Save – ≡ » Image » Save (Alt + S), Save As… (Shift + Alt + S) or Save a Copy… [4] (» Save As…, » Save a Copy). The File View window will then appear allowing the image to be (re)saved to a location of choice.

The image that needs to be saved has to be ‘active’ in the Image Editor so use the Browse Image to be linked [1] drop-down menu to select the image to be (re)saved [2].

Once an image is shown in the Image Editor work area click the ‘hamburger’ menu icon to access the various save options, which opens the File View where the format. location and other properties can be set.
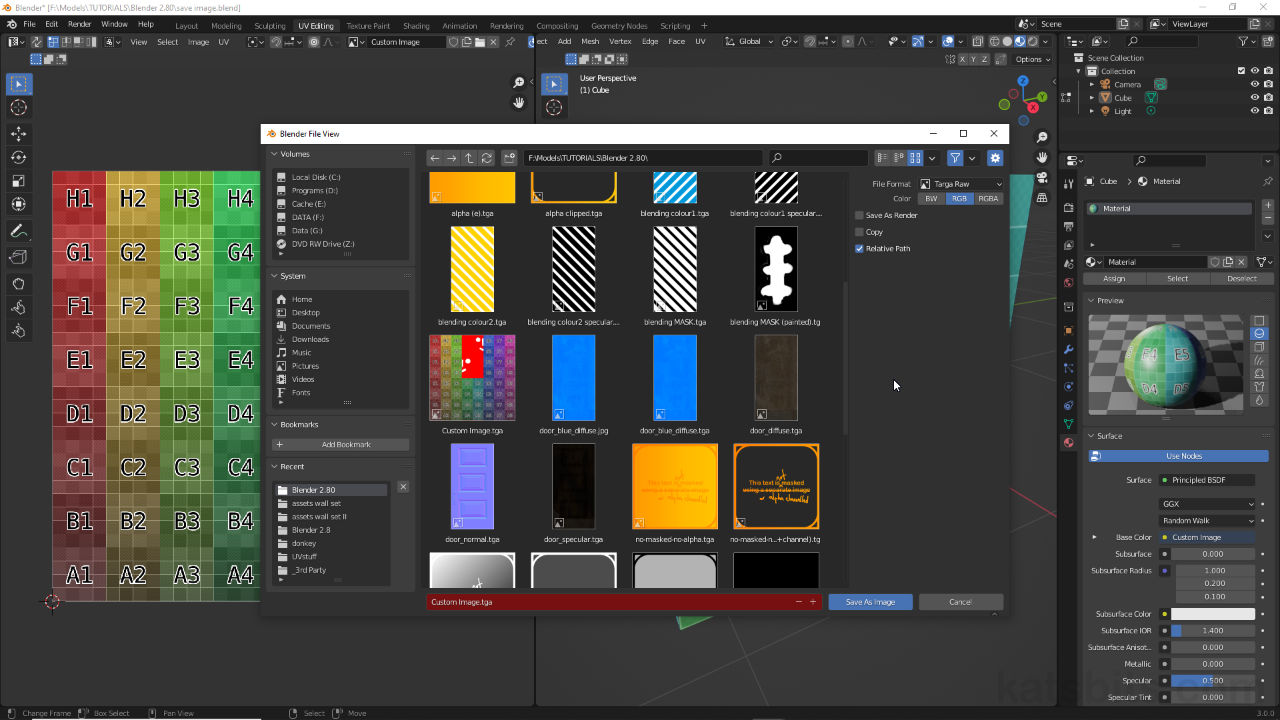
UV Editing Workspace
When editing UV maps in UV Editing workspace images can be (re)saved from within the UV Editor (left side). To do this, ensure the image to be (re)saved is visible in the workspace by first selecting it using the Browse Image to be linked [5] drop-down, then from the Image menu [6] select Save – Image » Save (Alt + S), Save As… (Shift + Alt + S) or Save a Copy…. The File View will open providing save and location options.
Design note: saving images from within the UV Editor is useful for texture baking (Bake) as the operation can be performed with UVs visible to monitor progress and check for errors in real-time – in this context the Image menu displays a star append, *, i.e. Image*, to indicate data that needs to be saved.

To save images from within the UV Editor they need to be visible in the workspace beforehand [5]. They can then be saved from the Image menu [6].
Texture Paint Workspace
When painting or modifying images in Texture Paint workspace, or using the Image Editor, images can similarly be saved within the editor. To do this, again ensure the image to be saved is visible in the workspace using the Browse Image to be linked drop-down, or in the Active Tools and Workspace settings panel (Properties), highlighting the appropriate entry in the Texture Slots aperture [7]. In the Image Editor (left side) click the Image menu, then select Save – Image » Save (Alt + S), Save As… (Shift + Alt + S) or Save a Copy…. The File View will open providing save and location options.
Design note: similar to UV editing, the Image menu displays a star append, *, i.e. Image*, against the displayed image to indicate data that’s needing to be saved.

Using the Texture Paint Workspace, once something has been modified [7], images can be (re)saved from the Image Editor (left side) [8].
Rendering Workspace
Another Workspace where images can be saved is Rendering. This applies to the workspace itself and the Blender Render window overlay that appears when F12 is pressed to render a sequence or single image. To do this, once a sequence or single image has been rendered [9], from the Image menu select Save [10] – Image » Save (Alt + S), Save As… (Shift + Alt + S) or Save a Copy… as required. In the File View window that appears file and location options will be available.
Design note: as with other editors the Image menu appears with a * append, Image*, when data has been generated or changed and needs to be saved – format options available when saving differ depending on what’s being saved, a single image or movie sequence, and what settings were used during rendering (Output Properties).

Saving images in Rendering Workspace is similar to other editor that access image data. Once sequences or single frames are rendered they appear in the workspace [9] and can then be saved from the Image menu [10].
