Necklace from Bezier Curves
Table of Contents
Supplemental: Baking Normal Maps
Description
In this exercise we take a look at using a Curve to make a simple box-chain necklace accessory item for IMVU. First we take a look at the basics of using Bezier and Curve objects before loading in the Clothing Starter File, rather than the Accessory Starter File, to shape the necklace around. Once done the resulting line-art is then given some structure and depth in Object Data Properties before using Convert – Object » Convert » Mesh – transforming it into a mesh that can be edited. Here the mesh is assigned a material and UV Unwrapped before prep for IMVU weight painting (Weight Paint) the mesh to the clothing skeleton to create the necessary Vertex Groups to deform the mesh when the avatar moves. Finally the project is exported to FBX and assembled in IMVU Studio with normal and shininess maps.
In the Supplemental we take a look at using Blender to make a normal map for the chain using Bake. First a high resolution mesh has to be made which is paired to a low resolution mesh. For baking the low resolution needs to be UV Unwrapped and mapped in a way that replicates the texture usage associated with the original necklace, i.e. a long, thin image (512 x 32) that tiles or repeats around the mesh. This set up can also then be used to generate opacity masks.
Duration: total c. 2 hr 10 mins (02:10:00).
Info: 1080p | 475 MB.
Source: KatsBits – Curve Necklace (zip c. 1 MB – *.blend, *.fbx, *.png, *.jpg).
Product ID: Box-link Necklace (57208127).
Design note: curves and Beziers should generally be used to guide meshes into shape so keep the following in mind when using them to make jewellery;
Editing Beziers & Curves
For most purposes Curve and Bezier shapes are modified more directly in Edit Mode (select the curve object then press Tab). Here Control Points can be manipulated as a group or individually by toggling Aligned (default) and Free, that then allows more acute angles and shapes to be formed. To do this, select a node or nodes then from the Control Points [1] menu click Set Handle Type, then Aligned, Free or other option [3] – Control Points » Set Handle Type » [option] or press V » [option].
The vertex Control Points of Curve and Bezier objects move as a group by default (Aligned) but this behaviour can be changed [1] so each node can then able to moved independently [2] for more angular shapes to be formed [3].Beziers/Curves & Subdivisions
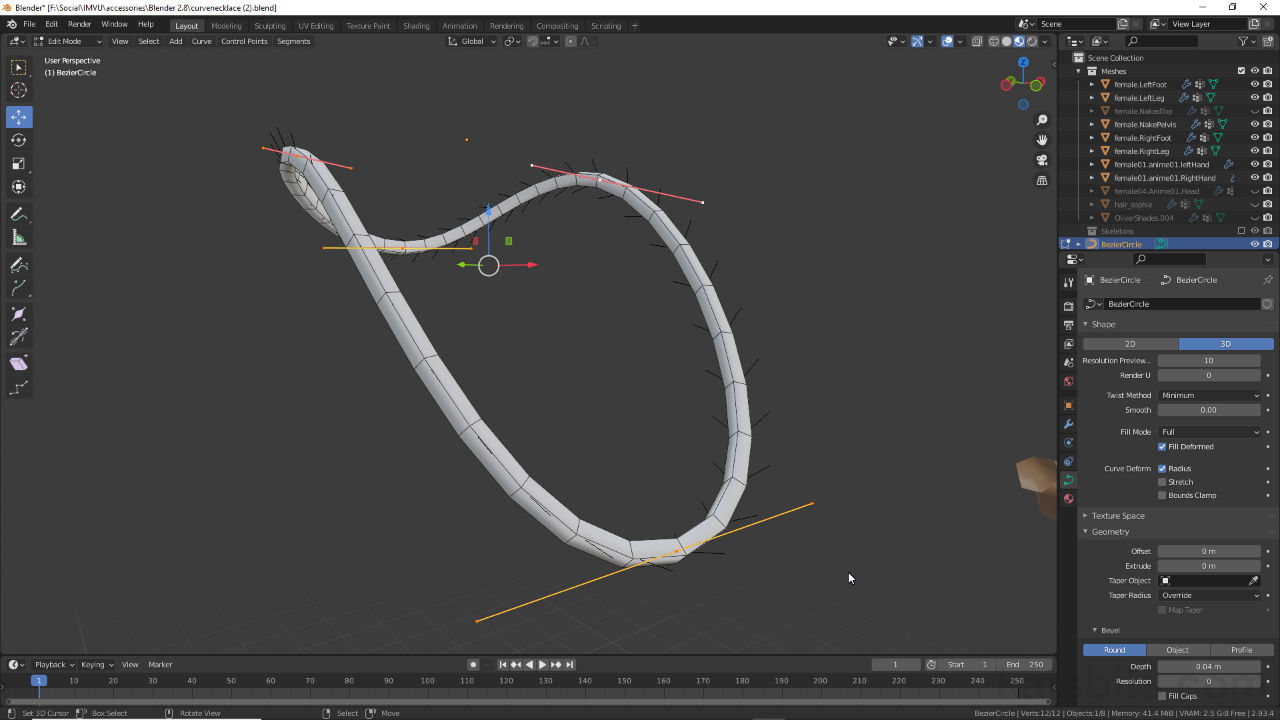
In using Curves and Bezier objects attention should be paid to the number of subdivisions, the lines Resolution, describing the shape. This can be increased or decreased changing the lines Resolution Preview [4] value in Object Data Properties. It’s important to note here however, that resolution is dependant on distribution. In other words, the distance between control points determines how smooth the line appears to be because the distance between individual subdivisions is shorter. Shown below for example, the distance between points I and II [5] is much shorter than between II and III [6], with the effect that the line appears smoother along the former than latter section. This difference cannot be altered as except to change the number and distribution of control points (select two control points and subdivide – Segments » Subdivide) – if these are evenly distributed the resulting curve will be more uniformly subdivided along its length.
A line is defined by the number of subdivisions between control points. To even out the distribution and smooth the line, additional control points may be needed else some sections may appear rougher [5] than others [6].UV Mapping & Texture Tiling
When texturing necklaces and similar items, meshes that tend to product long thin UV’s, preference should be given to unwrapping in a way that makes use of texture tiling or repetition, rather than trying to unwrap the entire mesh to a single image. In practice this might mean UV mapping so a 512 x 32 repeats several times over a mesh instead of fitting the entire UV within the same bounds. While the former may result in retain detail but risk pattern repetition, the latter tends to cause loss of detail due to compressed UV’s, but little, if any, repetition. To aid in this make sure to use well placed UV Seams – Edge » Mark Seam [7] – around the mesh [8] so the resulting UV map, when unwrapped, lays out flat.
Necklaces and similar objects tend to produce extremely long thin UV maps that are impractical to map with a single image. In these situations it’s better to unwrap UV’s in a way that accommodate texturing tiling. Well placed UV Seams [7] help in this regard [8].Vertex Groups & Weight Painting
Ordinarily a necklace might be weighted so at most two bones share influence over a given area of the mesh, both then deforming the mesh when articulating. For IMVU Studio shared influence like this is limited to four bones (the limit is 5 but applies in special cases typically involving PelvisNode), so it is preferable to weight paint more subtly so influence ‘fades’ across the mesh. When Weight Paint mode is active (select Armature then shift-click the mesh before switching), in the Active Tool and Workspace settings [9] panel the degree of influence can be adjusted changing the Weight value [10], 1.000 for full influence (red) to 0.000 no influence (dark blue). In this way how aggressively bones [11] deform the mesh reduces as influence changes from full to none [12].
Individual bones control a mesh based on the degree of influence they have, their Weight [10]. Technically this is a numerical value that is represented by colours; when a bone [11] is selected the corresponding part of the necklace can be painted [12] dark blue to red, from ‘no’ to ‘full’ influence.Normal Maps & Image Resolution
Supplemental
When making normal maps both high and low resolution version of the mesh must not be facetted or have edges marked as Sharp, both must be smoothed. What this means is that hard or sharp edges, shapes and forms are defined by the high resolution mesh and not marked edges, structure that is then reproduced through the Bake process, as RGB (Red, Green, Blue) colour information in a normal map. To smooth meshes, select a mesh then from the Object menu select Shade Smooth [13] – Object » Shade Smooth [14].
For baking to work both high and low resolution meshes need to be Smoothed [14], no factettes or Sharp edges as this information is generated structurally and then rendered to the normal map as RGB colour values.


Timestamps
Times are approximate;
Video 1 – Bezier Curve Necklace.
– 00:00 : Overview, Bezier Basics.
– 03:00 : Bezier Necklace.
– 16:00 : Materials & UV Unwrapping.
– 39:00 : Weight Painting
– 59:00 : FBX Export & Studio Assembly.
– 48:00 : IMVU Studio Import & Assembly.
– 01:08:00 : Corrections & Final.
Video II – Supplemental
– 00:00 : Overview & High-res Meshing.
– 11:00 : Low-res Mesh, UV’s & Prep.
– 22:00 : Texture Bake.
– 32:00 : Baking ‘Opacity Masks’.
