Animated Accessories (Pumpkin Pet)
Table of Contents
Description
In this video series (recorded live so may include off-topic chat) we take a look at setting up an animated Accessory, a Pumpkin Pet, using the Accessory Starter File.
In Video #1, with an item available it first needs to be positioned where its to appear in IMVU, this is important to do before adding a skeleton for positional purposes and in decided which Armature to use – typically the closest to the item is utilised. Once these initial steps are done, the appropriate skeleton selected, it can be modified, bones added and themselves positioned, to accommodate prospective animations. The mesh is then assigned corresponding Vertex Group before parenting to the Armature so the latter has control over the former.
In Video #2, once the object is prepped (‘rigged’) it can be animated in the Action Editor using Pose Mode to create an Action sequence that is then exported to FBX along with mesh and skeleton, for assembly in IMVU Studio.
In the follow-up, Video #3, we take a look at alternative ways to set up accessories if the skeleton is rigged without the appropriate ‘root’ bone(s), AttachmentRoot. Here two options are available; 1) set-up and export using an appropriately placed Empty (node), or 2) using an existing accessory attachment, an Armature, included with the Accessory Starter File.
Duration: total c. 2 hr 30 mins (02:30:00).
Info: 1080p.
Source: n/a.
Product ID: n/a.
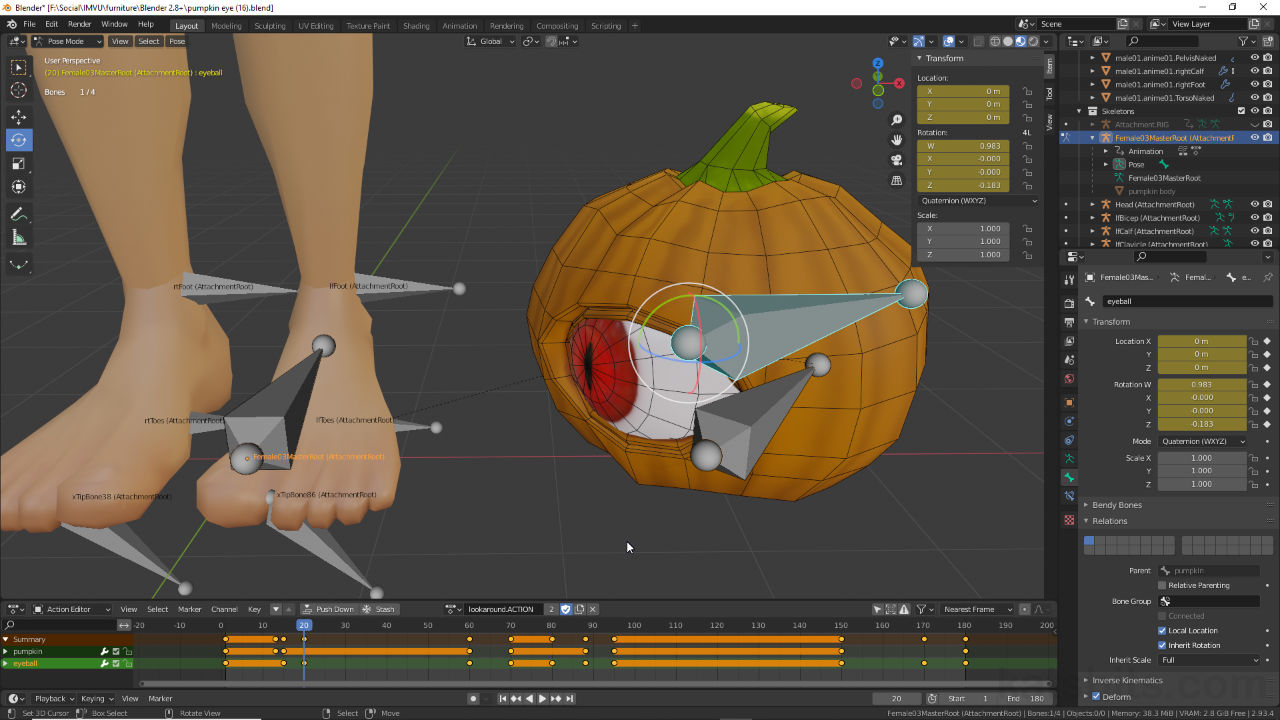
Design note: the underlying skeleton of an accessory has two bones, AttachmentRoot [1] and AttachmentNode [2], that remain fixed relative to the avatar to ensure proper functionality in IMVU [3]. They do not move. To create animated accessory items like the Pumpkin Pet shown, the skeleton has to be modified to accommodate movement, bones being added based on how and what is to be animated.
Important: the Armature objects included in the Accessory Starter File are set up to accommodate non-moving accessory items. To ensure they work correctly in IMVU this structure should not be modified except as outlined in this tutorial. See here for more on making Accessories.
The core skeleton of an Accessory item includes two bones, AttachmentRoot [1] and AttachmentNode [2] that are fixed positionally relative to the corresponding bone of the avatar [3] (in the above this would be lfCalf or the lower leg/shin bone). This setup should not be animated.When adding bones to an existing Armature objects it’s often simplest to select on existing bone and copy it. This ensures new additions appear localised to the initial selection (in roughly the same place), but also avoids issues joining Armatures together. To do this, with Armature selected switch to Edit Mode, Tab, make a selection, then from the Armature menu click Duplicate – Armature » Duplicate (or Shift + D) [4]. A new bone appears [5] & [6]. Press Esc to reset readying it for positioning.
Important: if bones are created through use of a separate Armature be mindful to join – Object » Join or Ctrl + J – the new addition to the default before doing any mesh prep or animation to avoid issues caused by differences between their respective Transform properties (rotation, location and scale coordinates).
To add bones to an existing Armature, in Edit Mode select an existing bone and from the Armature menu click Duplicate – this avoids issues that can crop up joining separate Armatures together that might have different rotation, location and scale properties.When positioning bones prior to being animating make sure they’re located to accommodates the expected articulation of whatever they control, a sphere needing to revolve freely around its centre might mean the bone controlling that movement being positioned so the Head control sphere, the bones ‘origin’ or point around which it rotates, is located at the objects centre else articulation will be lopsided. To aid in doing this use Snap – Object » Snap » [option], typically Cursor to Selected or Cursor to Active (Shift + S) [7] to reposition the 3D Cursor to an Object or selection [8], then snap the respective bone to that point [9] using Armature » Snap » [option], typically Selection to Cursor or Selection to Active.
Important: aligning different objects to one another tends to mean selecting and toggling in to and out from Interaction Modes i.e. mesh selected in Object Mode to set 3D Cursor location to the object, Armature in Edit Mode to select and position a specific bone.
Bones need to be positioned so meshes articulate as expected. For IMVU this means accommodating translation and rotation only, the latter occurring around a given bones Head node. Use the Snap [7] options to align 3D Cursor to Objects [8], then bones to 3D Cursor [9].The Action Editor is generally blank by default [10], an Action being generated as soon as a keyframe is marked to the timeline. To manually create an Action click the + New [11] – if a sequence is active in the timeline when doing this it will be duplicated, the Actions label being given a numerical append, *.001, *.002 etc., to distinguish it from the original. This can be changed clicking the label input box and typing a replacement.
The Action Editor is generally blank by default but a new sequence will be created when marking pose data to the timeline, or clicking the + New button in the Header.When exporting an animation make a sequence is active in the Action Editor timeline then select the mesh, then Armature (should be last object selected) and export, File » Export » FBX (.fbx). As animation is being included in the Bake Animation [12] settings make sure NLA Strips [13] and Force Start/End Keying [14] are disabled, forcing Blender to export each sequence to its own ‘track’ within the FBX without extraneous data.
As an animation is bieng included in the exported FBX file make sure the Bake Animation options are set correctly [12], NLA Strips [13] and Force Start/End Keying [14] should be disabled to avoid the resulting file containing unwanted data.In situations where the animated accessory is rigged relative to itself, exporting to IMVU means the product will be positioned incorrectly as the root or anchor point will be whatever ‘bone’ sits at the top of the skeletal hierarchy in the FBX file (typically the root or master bone of the items Armature). This can be corrected in two ways; 1) using a node proxy, or 2) joining armatures. To use a node, drop an Empty object into the scene – Add » Empty » [option] – and then link the existing animated Armature to it using Parent [15]. To then export, select all the parts to be included, node last so the resulting file uses it as the point of origin [16].
In instances where the skeleton has been set-up without an accessory root this can be included using a node as a proxy for the ‘attachment’ Armature – once added link skeleton to node using Parent (with Keep Transform set) which will set up the correct hierarchy [15] using the node as the items origin [16].To use a Armature, select the rigged armature first then shift-click select the existing accessory armature to be used as the root, i.e. Female03MasterRoot (Attachment Root) for a ground-based ‘pet’. From the Object menu select Join – Object » Join – creating a single object from the two. Bone relationships then need to be adjusted so the last bone of the rigged armature [17] uses AttachmentRoot as the new master bone [18]. Toggle into Edit Mode and in Bone Properties set the Parent option to use AttachmentRoot under Relations.
Using an armature as the items root means joining the rigged armature to an accessory armature then updating the bone relationship so AttachmentRoot sits at the top of the hierarchy [17], the origin then being positioned correctly relative to IMVU [18].For import into IMVU Studio, during the Skeleton & Mesh selection/set up, the Set Skeleton drop-down may list a number of bone and mesh options, i.e. Female03MasterRoot (12 bones, 2 meshes), that differ depending on how the accessory was exported from Blender. Typically the entry with the fewest number of bones should be selected.
Important: using a node as root will list a different set of options compared to a single Armature due to the way the items skeletal hierarchy is defined in the resulting FBX. This can result in issues which can usually be addressed reimporting the project selecting a different skeletal option.
During import into IMVU Studio a number of different options may appear for the Skeleton & Mesh setting [19] depending on how the accessory is set up and exported from Blender.


Timestamps
Times are approximate.
Video #1 – Rigging
– 00:00 : Stream start
– 02:20 : Project overview
– 10:30 : Armature prep (rigging)
– 25:00 : Parenting & Vertex Groups
– 36:00 : Export & Studio assembly
– 52:00 : Shininess
– 01:00:00 : Animated earrings overview
Video #2 – Action Editor & Animation
– 00:00 : Stream start
– 01:50 : Project recap
– 07:30 : Action Animation
– 37:00 : Export & Studio Assembly
– 45:00 : Animation tweaking
– 01:07:00 : Export & Studio Assembly
Video #3 – Alternative Skeleton Set Up
– 00:00 : Stream start
– 01:00 : Project recap & overview
– 22:30 : Using a Node as Root
– 43:30 : Using an Armature as Root
– 55:00 : Studio import & Action set-up
