UV Transfer (Data Transfer Modifier)
Table of Contents
One of the more difficult aspects of UV Unwrapping objects is replicating the UVs from another object, for example replicating UVs between high resolution and low resolution versions of the same mesh. Ordinarily this might mean having both iterations active in Edit Mode, and as-best-as-possible, editing UVs so one (high) matches the other (low). To mitigate the need to do this it is possible to transfer UV data from one mesh to another using the Data Transfer modifier.
Important: disparities between objects will affect end results. In other words, the nature of a low resolution mesh, for example, typically means a significant amount of surface and/or face data may have been removed for sake of a lower resolution – there is no longer a one-to-one correspondence between objects, which further compounds transfer accuracy. A number of ‘fixes’ and ‘fudges’ can be used to work around this, but they cannot compensate for mesh data not being available.
Parent Object Setup
Although it goes without saying, the object from which UVs are to be transferred, the parent object, needs to be fully UV unwrapped and UV mapped [1]. Similarly, at least one fully qualified Material [2] needs to be assigned for images (and UVs) to be displayed correctly.
Design note: at a minimum materials should carry an Image Texture that’s linked through Base Color (Diffuse) so UVs can be properly mapped relative to the texture or image that’s to be shown on the object – by default UVs are mapped to a square boundary, which may be an issue where UVs are to be mapped to an image with a horizontal or vertical rectangle aspect.

The parent object from which UVs are to be transferred needs to fully Unwrapped and mapped [1] with Material assigned [2] for image display.
Target Object Setup
Typically, the target object, that is the mesh that UVs are to be copied to, won’t be UV unwrapped or mapped [3], and likely won’t carry a Material assignment [4]. If not, assign Materials from the parent object to correspond with the UV layout being copied to ensure it will display correctly in Material Preview or Rendered modes (else object appears white).
Design note: absent an actual UVMap datablock, objects appear colour tinted with material, or white without, in the 3D Viewport regardless as to whether assigned materials referencing any images (colour tinting is extrapolated from linked images or the materials Base Color) – if parent and target objects differ structurally, material assignment may need to be approximate or, one or the other mesh modified so the any primary UV Seam or edge alignments are present to prevent or mitigate copied UVs being misaligned, distorted or otherwise malformed.
In addition, to ensure UVs are copied over correctly the UVMap datablock can be, optionally, deleted in Object Data Properties. In the UV Maps subsection, select the existing UVMap entry (and any others that might be present) and click the “–” (minus) button.

Typically the target object won’t be UV unwrapped or mapped [3] and may not have a material assignment [4] – it will appear ‘white’ in the 3D Viewport.
Data Transfer Modifier
Once the parent and target objects are prepped, to transfer UV data from one to the other, select the object UVs are to be copied to, the ‘target’, and in Modifier Properties assign a Data Transfer [5] modifier.

Assigning a Data Transfer modifier [5] to the object receiving UV data (tinted green above).
In the Data Transfer modifier panel optionally click the Edit Mode button (Display modifier in Edit mode) [6], this allows the effect to be seen when edit mode is active. Then to set the main parameters enabling the modifier; in Source [7] use the eye-dropper or select from the drop-down, the parent object UVs are to be copied from. Ensure Mix Mode is set to Replace. Lower down the panel click the checkbox that activates Edge Data [8] and expand the options. Optionally click UV Seam to enable and ensure Mapping is set to Nearest Edge.
Design note: enabling UV Seam transfers seam markings (orange edge highlights) between meshes – this is subject to structural correspondence; Blender will attempt to transfer edge data between parent and target approximately.
Below, click the checkbox to enable Face Corner Data then on the UVs button to activate. Finally switch Mapping to Topology [9]. Once set UVs will then be dynamically transferred, the image associated with the parent object then appearing correctly mapped to the target [10].
Important: if Mapping is set and nothing appears on the target mesh, click the Generate Data Layers button to forcibly generate the selected data.
Design note: depending on the objects and data being copied the default Mapping, Nearest Corner and Best Matching Normal, may map the parent image incorrectly. Where this happens, run through the available options until the image appears correctly mapped to the target object.

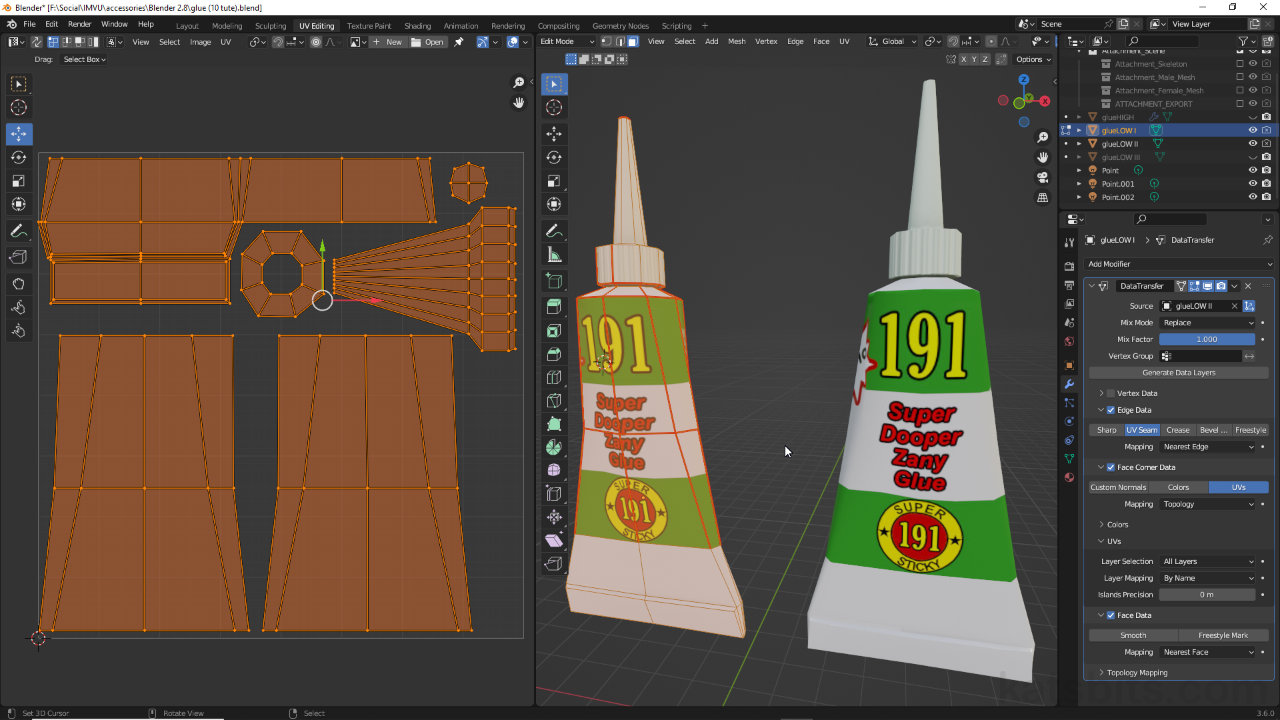
Setting up the Data Transfer options. Click the Edit Mode button [6], set the Source object [7], activate Edge Data [8] and set the Mapping [9] so the image is mapped to the target mesh [10].
Editing Transferred UV Data
Once the Data Transfer modifier has been set up UVs won’t be initially editable, that is, with target object selected [11], toggling into Edit Mode the copied UVs are not shown [12] because the modifier is essentially dynamically ‘projecting’ them into place. For duplicated UVs to be editable then, the modifier has to be applied so UV data becomes ‘real’ and instanced to the target mesh.
Design note: preference should be to make the transferred UVs ‘real’ and edited after-the-fact rather adjusting the parent mesh to accommodate any differences that may exist between objects.
To make the transferred data ‘real’, in the modifier panel click the down-arrow, ˅ [13], to expand the ‘more options’ menu. Here, click Apply. The panel will disappear (it’s applied). Selecting the target mesh [14] and switching to Edit Mode will then show the fully editable UVs [15] transferred from the parent object.

Even though an object may be selected and in Edit Mode [11] transferred UVs will not be shown [12] in the UV Editor while the modifier is active, it has to be applied [13].

Once the Data Transfer modifier has been applied selecting the mesh [14] and entering Edit Mode will display the now fully editable UVs [15] copied across from the parent object.
