IMVU Studio Toolkit – Animated Hair Basics (Accessory)
Table of Contents
Description
Using the Attachment Tool (accessory) of IMVU Studio Toolkit we take a look at making a simple animated hair accessory. As the tool is not specifically set up to make animated items like the Animation Tool is for avatar poses, animating attachments or accessories involves a few extra steps. First, the basic mesh is made and set up as a standard accessory or attachment. Second, the attachment Armature is used as the basis to create the skeleton for the accessory rig. Third, the accessory mesh is weight painted to the skeleton so it deforms correctly when the rig is articulated. And finally, once everything is in place an animation can be made using the Action Editor, everything then exported to FBX and assembled in IMVU Studio.
Duration: total c. 55 mins (00:55:00).
Info: 1080p.
Suitability: Beginner+.
Source: KatsBits – Toolkit Animated Hair (1 MB, *.blend, *.fbx). Requires installation of the toolkit for Blender. Open in Blender 2.93 LTS or above.
Product ID: Toolkit Animated Hair (PID 59933678).
Design note: making animated hair can be tricky so keep the following in mind when using the Toolkit for IMVU;
Mesh First, Rig, Then Animate
Using the IMVU Studio Toolkit, animated accessories need to be created in two steps. First the mesh is set up as a normal accessory to gain access to the Armature actually needed for the item, Attachment.RIG. Second, Attachment.RIG is then used to properly rig the mesh for animation.
Important: the initial bone selected when the item is set up establishes a target with respect to the corresponding bone of the avatar, i.e. setting ‘Head’ targets the avatars ‘Head’ bone as the attachment point of the accessory not the Armature actually used for the accessory itself.
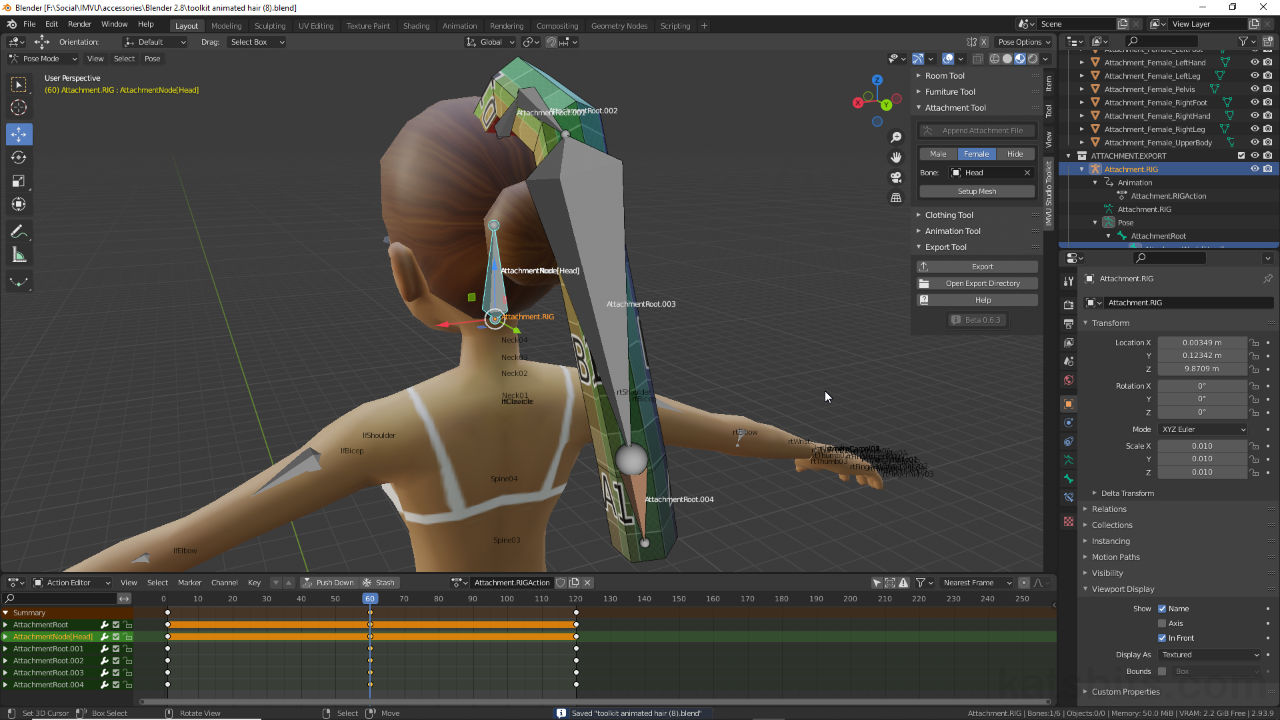
The initial bone selected [1] acts as a proxy for the tool so it know how to set up the accessory items structure – this initial bone is not actually used to create the final rigged attachment.Armature Modifier
Once the accessory mesh has been set up as a standard attachment it will be assigned an Armature modifier targeting Attachment.RIG [2] – this does not ordinarily need to be changed – and fully weighted [3] to AttachmentNode[Head] [4], indicated by bright red when viewed in Weight Paint mode. Establishing this relationship also assigns a corresponding Vertex Group also named AttachmentNode[Head] [5] to the mesh.
Important: both bone name (Armature) and vertex group (Mesh) will be labelled AttachmentNode plus [boneName], the name of the corresponding bone of the avatar i.e. AttachmentNode[boneName], or in practice AttachmentNode[Head], AttachmentNode[rtHand], AttachmentNode[lfCalf] and so on. Labels are CaSe SenSiTIve.
Check to see if the accessory is set up correctly, if yes, the mesh will have an Armature Modifier [2] assignment targeting as the Object (parent of the mesh) Attachment.RIG – this applies to accessories no matter where they are; hand, foot, shoulder and so on.
Similarly, if the mesh is correctly set up it will be weight painted (red) [3] to AttachmentNode[Head] [4] and assigned a Vertex Groups also labelled AttachmentNode[Head] [5].Attachment or Anchor Bone
Attachment.RIG consists of two bones; AttachmentRoot and AttachmentNode[boneName]. Either can be used as the basis from which the animated accessory skeleton is made. How this is done depends; 1) on the accessory, 2) the type of relationship needed between bones, and 3) the functionality this informs (how the item then animates).
For example, extruding a bone from another [6] creates a chain of bones (bone chain) with a parent » child relationship [7] in which bones are directly connected across a shared pivot point [8]. This results in bones moving and rotating based on this shared link.
Conversely, bones that are duplicated from existing selections [9], or added to the armature (whilst in Edit Mode), are relationally linked [10] but not connected and do not share a common pivot [11]. The result of this is a bone chain in which bones articulate somewhat independently.
Important: bones generally do not need to be directly or physically connected. So long as they are part of the same bone chain, the parent » child relationships always affect how the overall skeleton articulates – all the connection essentially does is change the pivot point for each bone.
Extruding [6] a bones from an existing bone creates a parent » child relationship [7] between the two and forms a physical connection that then acts as a shared pivot point [8]…
… whereas bones that are duplicated or added to the existing Armature [9] will have a parent » child relationship [10] but won’t be physically connected [11], allowing each bone to pivot around their respective origins.Vertex Group Assignments
Depending on the functionality of the accessory a section of it likely needs to be anchored to the avatars head bone [12]. In other words the section closest the head mesh [13] will need to retain or be assigned to the AttachmentNode[Head] vertex group (or AttachmentRoot if used) [14]. As this is assigned by default to the entire mesh when the Setup Mesh button is clicked in the toolkit, make sure the parts that do not use the group are removed from the it, else they will unduly influence (limit) the articulation of the mesh.
To clear the association completely, in Edit Mode select the vertices to be removed [15] from the group and click the Remove button [16] – Object Data Properties » Vertex Groups » [button option] – they can be weight painted with Weight: 0.000 but they will still remain part of the group, which can cause ‘over limit’ issues where individual vertices are controlled by multiple bones.
When clicking Setup Mesh, the target bone [12] is attributed to the entire mesh [13] regardless of the state that’s in. This can be useful for some accessory but not others and needs to be addressed…
… by clearing vertices from that initial vertex group [15]. This can be done in Edit Mode by selecting the vertices to be cleared and then clicking the Remove button in Object Data Properties [16].IMVU Import & Skeleton Selection
During import IMVU Studio may list several entries for the skeleton component of Skeleton & Mesh set up. If this happens the item at the top of the list should be selected, AttachmentRoot ([n] bones, [n] mesh) [17], as this generally represents the root or master hierarchy of the project being imported – selecting any other entry will likely break the product as the skeleton will be incomplete.
Make sure to set the correct skeleton [17] during import into Studio else the product may break due to a malformed armature (the animation won’t work either in this instance).


Timestamps
Times are approximate;
– 00:00 : Basic Setup & Meshing.
– 07:00 : Armature Setup.
– 14:00 : Weight Painting.
– 22:00 : Inverse Kinematics.
– 25:00 : Animation.
– 32:00 : Export & First Assembly.
– 35:00 : Materials & UVs.
– 49:00 : Export & Final Assembly.
