3D Printing & Blender – Units of Measurement
Table of Contents
Using Blender 3D to make content for 3D printed is relatively straightforward. However, some prep and/or set up is generally necessary to get the most from the process, especially with regards to scale and determining if there any differences between Blender and the 3D printer that might then need to be compensated for. With this in mind, the best practical test to establish the correct scale for 3D printing, is to export the default cube as an *.stl file using different Units of measurement and/or settings to see how each imports into a slicer.
Design note: the below is discussed relative to metric units of measurement and decimal placement but is equally applicable to Imperial measurements so long as appropriate decimalisation is used, i.e. 1 inch = 2.54 cm, 1 cm = 0.39 in. See here for more on units of measurement generally.
Slicer Basics
Generally speaking 3D models cannot be printed ‘as is’ straight from Blender, they typically have to be passed through a ‘slicer’, a dedicated program that preps and (re)exports a file, e.g. *.gcode, the 3D printer better understands.
Design note: the 3D printer referenced throughout is Creality’s Sermoon V1 Pro, the ‘slicer’ is the accompanying Creality Slicer. While others may differ in terms of how something is done due to interface or option differences, they all provide the same basic functionality; the importation, configuration and export of a 3D printer compatible file.
This process is guided by a ‘printer profile’ [1], a preconfiguration that defines the 3D printers environment within the slicer, that provides a simulated preview of the model and how the printer sees it relative to the size of the printer bed [2], the area or volume that’s printable [3], nozzle size, media feed rate and so on. In other words, once a model is exported from Blender to a compatible format, typically *.stl, it can be imported, opened or loaded into a slicer and scaled, positioned or adjusted in situ to fit the virtual build platform before being (re)exported, accompanied by various build properties, for printing.

A ‘slicer’ is used to prep models for printing based on a ‘profile’ [1] that defines printing environments physical characteristics, the bed size [2], printable area [3] and so on.
Blender Units
Prior to printing the first step should be to establish exactly how each step in the Blender » slicer » 3D printer process interprets Blenders units of measurement and general scaling.
Design note: due to the variety of hardware available it’s crucial to find out which Unit System, Unit Scale and Length property combination is best for the printer being printed to, especially where slicers auto-(re)scale imported data to fit the available build area, and where this can’t be disabled, seeing if this might cause precision issues going forward. In practical terms, testing will firmly established whether a 2 x 2 x 2 ‘unit‘ cube as represented in Blender, is going to be seen relative to, or irrespective of, millimetre, centimetre or metre measurement unit, and what the slicer, and eventually 3D printer, does with that data. Knowing this makes it easier to model in Blender as it negates the potential complications associated with compensating for different units of measurement.
Taking a look in Scene Properties [4], where the Units [5] system is managed, Blenders measurement baseline is set to Metric and Meters;
- Unit System: Metric.
- Unit Scale: 1.000000.
- Length: Meters.
This makes the default Cube 2 x 2 x 2 metres. For 3D printing, metres is likely too large (barring industrial machines) so the Units systems will need to be changed to better accommodate the available space – the test printer for example, has a build space that’s 175 x 175 x 165 millimetres, to match this and facilitate a WYSIWYG (What-You-See-Is-What-You-Get) printing experience, Blenders Units system should be changed to reflect this space, so centimetres or millimetres.
Design note: the ‘test printer’ used throughout is the Creality Sermoon V1 Pro, its build space is 175 x 175 x 165 millimetres or 17.5 x 17.5 x 16.5 centimetres. Either unit of measurement could be used depending on the degree of accuracy required from the end result.

Scene Properties [4] is where Blenders Units [5] system is managed.
To make these changes, in Scene Properties change Unit Scale to 0.01 [6] (1/100th of a metre) and Length to Centimeters [7] to accommodate centimetres as the unit of measurement;
- Unit System: Metric.
- Unit Scale: 0.01.
- Length: Centimeters.
Or to accommodate millimetres, change Unit Scale to 0.001 [8] (1/1,000th of a metre) and Length to Millimeters [9];
- Unit System: Metric.
- Unit Scale: 0.001.
- Length: Millimeters.
With these changes in mind, and for all intents and purposes, using Blenders metric/metres defaults mean the Cube is a 2 x 2 x 2 metre block [5]. Change units to centimetres and its seen as a 2 x 2 x 2 centimetre block, to millimetres and the cube is measured as a 2 x 2 x 2 millimetre block. In other words, the cube is always 2 x 2 x 2 units, the only difference being what those ‘units’ represent.
Design note: units of measurement, and what they mean for an objects size in terms of the volume it occupies, can be checked in the Sidebar (N); select an object and in the Item tab check the X, Y and Z values under Dimensions [i] – X: [value][unit], Y: [value][unit], Z: [value[unit] e.g. X: 2m, Y: 2m, Z: 2m.
An objects size and the units used to measure it, can be checked in the Sidebar under Dimensions, this lists X, Y and Z values relative to the items bounds (bounding box volume).


Changing Blenders Units system to Centimeters.

Changing Blenders Unit system to Millimeters.
Slicer Units
Once Blender has been set up relative to the working units of measurement its then necessary to check them against the mesh slicer app and 3D printer for correspondence. In other words, both slicer and printer need testing to determined whether they (can/do) use Blenders unit of measurement – metres, centimetres, millimetres – and/or the numerical data defining a given objects dimensions, and if so, how they are interpreted. This can be done with some simple tests.
Design note: to properly assess this next step, auto-resize, if available, should be disabled in the slicers properties to ensure meshes are tested essentially ‘raw’ or ‘as is’, unmodified by any auto-corrective settings or options. In Creality Slicer for example, click the Preferences [ii] menu then General in the panel that appears. Find the Opening and saving files section and click the checkbox to disable Scale large models and Scale extremely small models. Meshes will then be imported unmodified and as is.
Within Prefierences [ii], disabling auto-rescale/sizing [iii] in Creality Slicer so meshes are treated ‘as is’.

With this in mind the most straightforward test to check data transfer between Blender, slicer and 3D printer is to export the default cube using the default unit settings to see what that does. In Blender then, select the cube and export it as an *.stl file – File » Export » Stl (.stl). In theory, opening a 2 x 2 x 2 metre object into the slicer should fail because the build area is far too small to accommodate objects scaled to metres.
Design note: although the default cube has a material assignment and is UV unwrapped, neither is strictly necessary to export an *.stl from Blender for 3D printing.
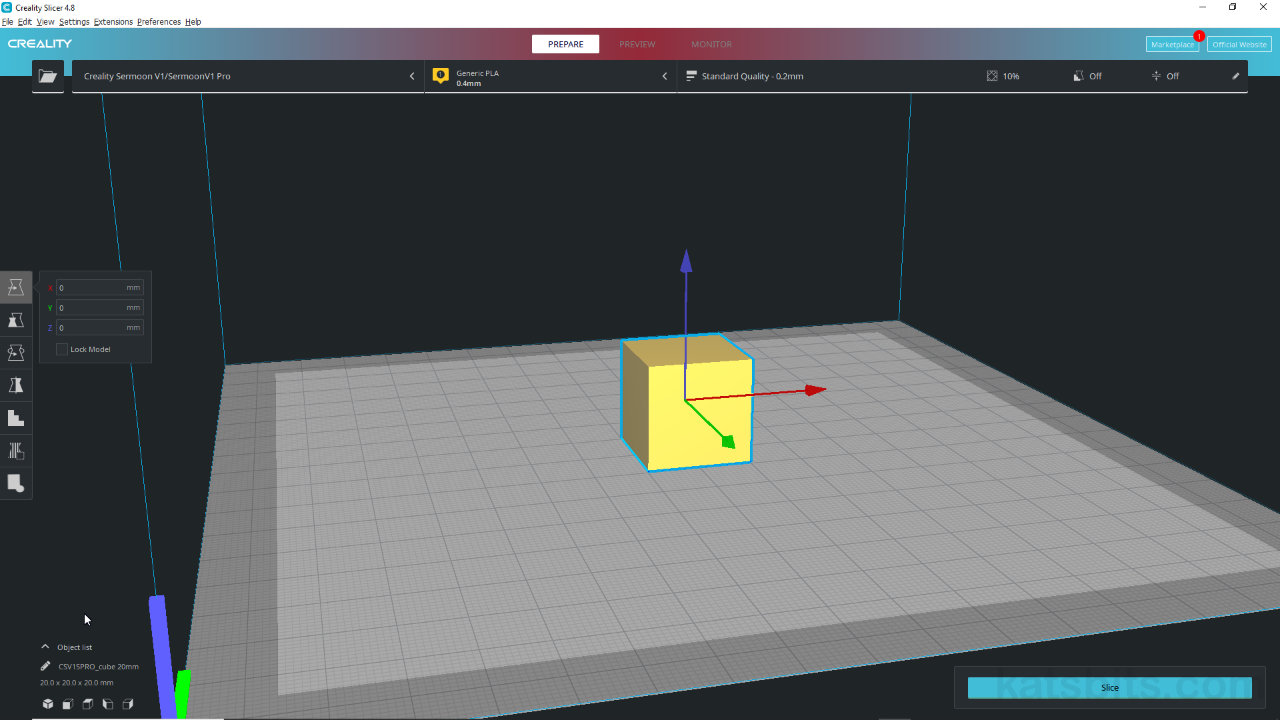
Importing the default cube then, the slicer actually brings it in without error and displays the object as a very small block centred on the build plate grid [10], the slicer has effectively ignored the files unit of measurement data, metres, but not the objects general dimensions, 2 x 2 x 2, so is defaulting to the parameters defined by the printer profile, millimetres. The cube then, is 2 x 2 x 2 units, or per profile data, 2 x 2 x 2 millimetres.

In the slicer (Creality Slicer) the default cube imports in as a 2 x 2 x 2 millimetre cube [10] regardless of ‘scene scale’ being saved the file (auto-scale disabled).
To double-check unit interpretation repeat the export test setting Blenders units to centimetres and millimetres respectively. Doing this for centimetres the *.stl file imports and is displayed as an object that’s 0.2 x 0.2 x 0.2 millimetres [11]. For millimetres the file actually imports and is displayed correctly as a 2 x 2 x 2 millimetre [12] cube.
Important: using Creality Slicer as it relates to the Sermoon V1 Pro 3D printer, the units of measurement in Blender that ensures 1:1 printing is Millimeters.

Exported from Blender using Centimeters the default cube is even smaller [11], approximately 2/10ths of a millimetre – shown above, major grid = 1 cm, minor grid = mm.

Exported using Millimeters the cube displays correctly as an object that’s 2 x 2 x 2 mm [12] – shown above, major grid = 1 cm, minor grid = mm.
Export Scale
What’s discovered from the simple tests performed above is that there’s a 1:1 correlation between Blenders Millimeter unit of measurement and what the slicer, and subsequently 3D printer, uses. In other words, when using Blender to make meshes for 3D printing, preference should be to set Millimeters as the active, ‘like-for-like’ working unit.
Design note: the above again assumes slicer auto-resizing is disabled.
With that said, there may be situations where it’s not possible or practicable to set up or switch units. Under these circumstances the tests also mean;
- Where metres are used they can be read or interpreted as millimetres.
- Where centimetres are used, meshes should be (re)scaled at export.
In practice, and working on the basis of ‘metres for millimetres’, no additional adjustments are necessary – building can be done using the default unit system so long as attention is paid to the numerical values that describe an objects dimensions. In other words a 2 x 2 x 2 metre object in Blender can be functionally seen, and worked on, as being 2 x 2 x 2 millimetres, the numbers being the important part, so a 20 x 20 x 20 m [13] objects imports as 20 x 20 x 20 mm.


Interpreting ‘metres as millimetres’ in Blender, a 20 x 20 x 20 metre [13] block (image-top) imports into the slicer as 20 x 20 x 20 millimetres (image-bottom).
Working in centimetres [14], and subject to the system unit setup discussed above, meshes can be constructed relative to that configuration, a 2 cm cube being 2 x 2 x 2 cm. For slicer and printer parity however, on export *.stl files need to be rescaled by a factor of ten (x10) [15] to bring measurements/scaling up to parity with slicer and printer. To do this in Blender, from the File menu select Export, then Stl (.stl) – File » Export » Stl (.stl). In the export window, under Transform ensure Scale is changed from 1 (default) to 10 – Scale: 10. Change save location as needed then click Export STL to complete.
Design note: it is possible to work in Meters and remain proportional to the printers build space, i.e. 175 mm or 17.5 cm is 0.175 m; a 2 cm block would be 0.02 x 0.02 x 0.02 m. However, subject to unit vs. dimension issue discussed above, such meshes would then import as a fraction of a millimetre (because the unit is ignored when metres are used) so will need to be (re)scaling at export by a factor of 1000 (x1000) for dimensional parity.


Centimetres [14] need to be scaled at export [15] (image-top) to then appear correctly proportioned relative to the unit of measurement inside the slicer (image-bottom).
