Simple Water Caustics using GIMP
Table of Contents
Without using a ‘water caustics generator‘ creating images by hand can be a little tricky as the process typically relies on using specific image filters that may not be available. However, it is possible the create that stylised ‘caustics’ look using commonly available tools and filters in GIMP.
Design note: the same techniques outlined below should be applicable to other applications in the absence of the typically used voronoi noise filter/effect.
Caustics in GIMP
The basic process of creating a caustics image in GIMP relies on using the Difference Clouds filter to generate some base noise which is then altered using the Curves tool. This can then be set up for tiling using the Tile Seamless tool.
Design note: while this quick technique does generate a caustic style image it may not necessarily result in the same caustic pattern typical of caustic images created using a generator.
So, using white as the background image colour, first add the noise; from the Filters menu [1] select Render, Noise then Difference Clouds [2] – Filters » Render » Noise » Difference Clouds. This generates the initial cloud noise pattern [3].

Starting from a white image use the Difference Clouds filter [2] to add some an initial noise data [3]…
Once the noise has been added, from the Colors menu select Curves [4] to open the Adjust Color Curves properties pop-up – Colors » Curves. Here, because a caustics style image is being created, click the curve to add an adjustment node at the mid-point [5] and drag it to the top of the aperture – essentially setting a coordinate of x:128/y:255. Next, drag the node bottom-left corner to roughly x:96/y:0 [6] keeping it locked to the baseline. Then finally drag the node upper-right corner to x:160/y:0 [7], again locked to the baseline. This should result in an image approximating a caustics base image [8]. Adjust each node to achieve the desired look.
Design note: while additional adjustment nodes can be added preference should be to limit them to three that essentially equate to low, mid and high tonal values and contrasts.

… using the Curves tool [4] alter the mid [5], low [6] and high [7] ranges affecting the initial noise data.
Important: the number of nodes, and their position relative to the curve, will vary depending on the desired outcome; the above creates a stark, contrasting image, whereas more nodes and less extreme positions will generate a softer, greyer image.
Using more nodes, and adjusting their position, changes the appearance of the caustic.

Once the caustics image is available it should be tiled so it can be repeated across a surface. To do this, from the Filters menu select Map then Tile Seamless… [9] to access the Tile Seamless properties pop-up – Filters » Map » Tile Seamless…. Here, adjust the Opacity [10] setting as needed to adjust the behaviour of the tool, leave everything else untouched then click OK once done to finish with a tile-able caustics image [11].

Once the caustic is made use the Tile Seamless filter [9] to create a tileable image.
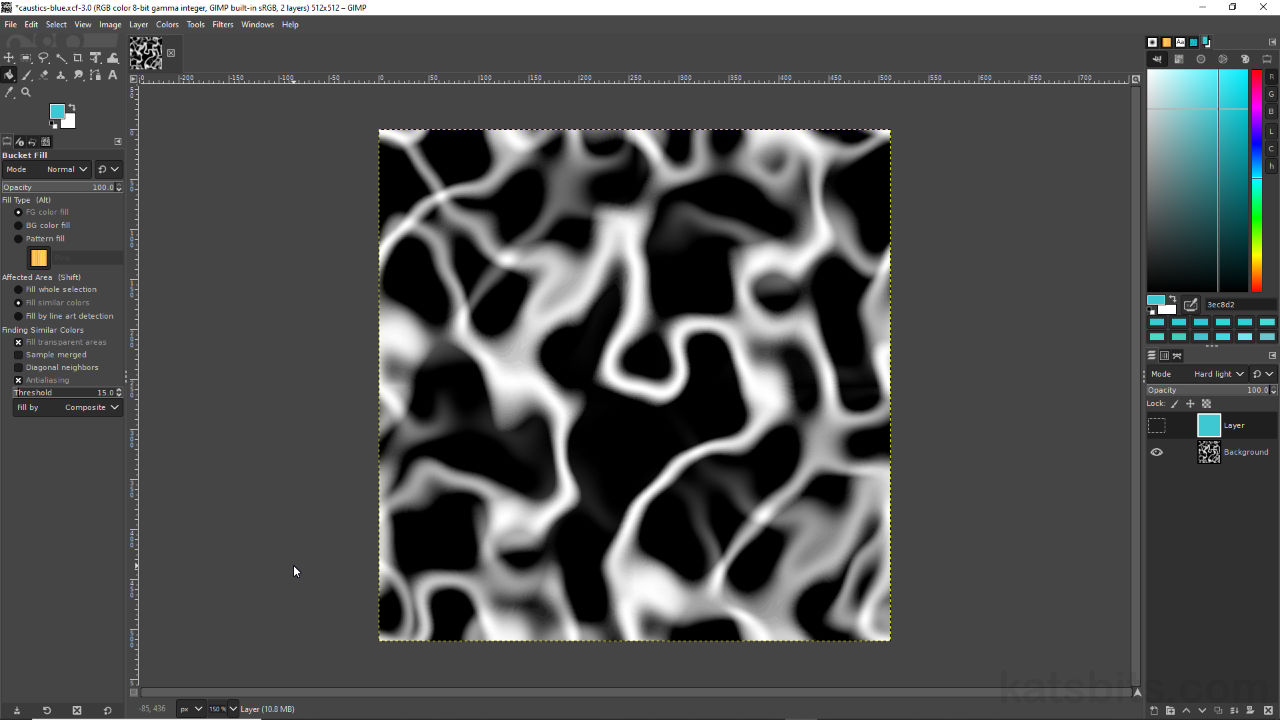
Coloured Caustics
To generate a functional caustic image, preference should be to start from white (RGB 255,255,255), mid-grey (RGB 127,127,127) or black (RGB 0,0,0) to ensure proper caustic image generation. Once this base is available it can be colour tinted by adding a new document layer [12] that’s colour flood-filled as needed, turquoise-blue for example (RGB:51,203,213/Hex:33cbd5). This can then be blended with the underlying caustics layer using Mode set to Hard light [13] to maintain the fill colour while being influenced by the caustic pattern.

Add colour to a caustic use a filled layer [12] that’s blended using Hard Light [13] (or other mode).
