Water Caustics using Voronoi Affinity Photo
Table of Contents
As with most image editors, Affinity Photo does not have a dedicated ‘caustics’ tool or filter so the effect has to be approximated using the tools that are available, for example using a Voronoi pattern along with the Maximum/Minimum filters to transform an image into a game ready water caustic.
Download: Affinity Photo example
– KatsBits – Affinity Caustics Example (c. 600KB | *.afphoto, *.tga).
Caustics using Voronoi
An alternative approach to generating a more typical caustics image is to use the Voronoi filter along with the Maximum or Minimum blurring tools. To do this, start a new project (File » New) and set the size appropriately, e.g. 512 x 512. Add a layer and flood fill it white. From the Filters menu [1] select Colours (Colors) then Voronoi… [2] – Filters » Colours » Voronoi…. The Voronoi filter dialogue pop-up will appear along with a pattern; change Cell Size to scale the pattern larger or smaller; Line Width to increase or decrease the pattern outline [3]. Click Apply to fix the image in place [4].
Design note: the pattern outline should be reasonably thick for the caustics creation process to work well.

Adding the Voronoi filter [2] to an image to use as the basis of a caustics texture image [4].
Voronoi Offset & Blur (Tiling)
The pattern next needs to be edited so it tiles correctly. First it will be offset, then manually edited to fix-up or correct any gaps or mis-alignments this might cause. From the Filters menu again, select Distort and then Affine… [5] – Filters » Distort » Affine…. In the Affine properties pop-up change both the Offset X and Offset Y [6] values to 50 %, e.g. Offset X 50 %. This offsets the pattern by 50% top-to-bottom, side-to-side [7]. Click Apply to confirm.

Typically caustics textures need to tile. In Affinity this can be done using Affine [5] with an X/Y Offset set to 50% [6].
The nature of the Voronoi pattern likely means offsetting highlights where the pattern isn’t tiling. Using the Paint Brush Tool fix the gaps and misalignments so everything links up correctly while rounding off the patterns corners so they are less angular. Use Affine to ‘revert’ the image, offsetting again by 50% on X and Y, checking tiling irregularities have been corrected. Repeat until image tiles/offsets without issue.
Design note: precision is not necessary when rounding cell corners except where addressing full tiling/repetition.

Game textures need to tile so using Affine with an Offset on the XY, the image can be edited using the Paint Brush Tool [8] to fix any disparities – and pattern corners roughly rounded/filled [9].
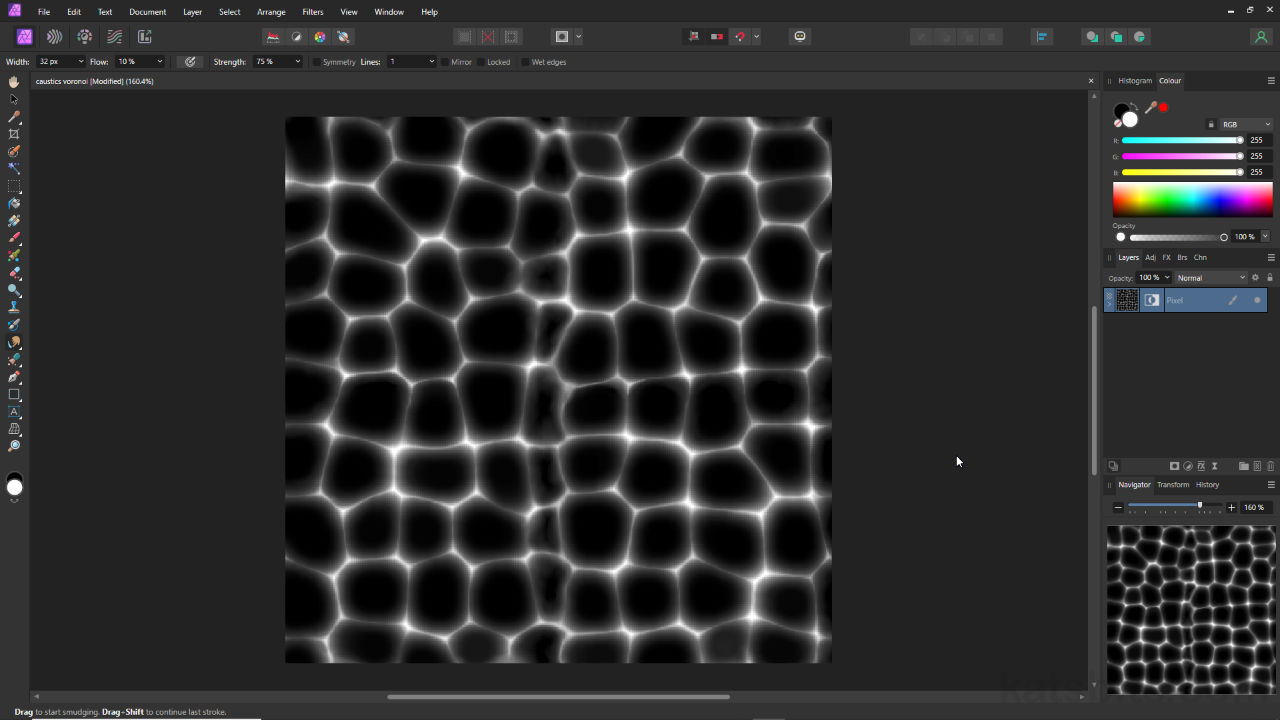
Once the pattern is prepped, add blur. From the Filters menu click Blur then Gaussian Blur… [10] – Filters » Blur » Gaussian Blur…. In the Gaussian Blur properties pop-up change the Radius [11] so the patterns outline is blurred so the edges are not discernible [12] – for a 512 x 512 image with a Voronoi pattern Line Width of 15 px, a blur Radius value might be 7 px.
Important: adding blur will likely cause tiling issues [i] so (re)use Affine to offset the image and use the Paint Brush Tool or the Smudge Brush Tool [ii] – click-hold tool group to select from fly-out if not visible [iii] – to correct disparities [iv].
Blurring the image will cause issues so use the Smudge Tool [ii] to address any disparities [iv].


To unify the pattern, using the Gaussian Blur [10] tool, it needs to be blurred, enough [11] so the lines are no longer easily discernible [12].
Maximum/Minimum Sharpen
With blur set, the final step is to use the Maximum/Minimum filter to ‘thin’ the effect and create the caustics look. To do this, from the Filters menu select Blur then Maximum [13] – Filters » Blur » Maximum. In the Maximum Blur dialogue pop-up [14] adjust the Radius value to alter the appearance of the pattern [15]. Click Apply to confirm.
Important: this step may similarly cause issues with full image tiling so again, Affine and additional image clean-up may be necessary.
Design note: depending on the outcome use Sharpen » Unsharp Mask to clarify the image, and/or Colours » Auto Levels to increase basic contrast. Alternatively use a layer Adjustment filter, e.g. Brightness/Contrast.

Once the pattern is blurred, the caustic ‘style’ is achieved using the Maximum filter [13], set to an appropriate level [14], to ‘thin’ the image [15] for the right look..
Invert
Once the caustics image is finalised it likely needs to be inverted for use in-game. If any layers have been used, flatten with Merge Down or Merge Visible by right-clicking the layer stack and selecting either/or option from the context menu. Highlight any version this might make then in the Adjustment panel [16] (double) click Invert [17] to flip to tonal palette for game use and defining transparency. With this done the image can be exported ready for use.
Important: by default the Voronoi pattern is black, which necessitates the base layer be white. As there isn’t an option to invert or set the Voronoi colour, any image generated using the described process will need to be inverted for standard in-game transparent caustics.
Design note: if the Adjustment panel isn’t visible, from the main application View menu select Studio, then Adjustment (Affinity version 1.x) – View » Studio » Adjustment. Alternatively Window then Adjustment (version 2.x) – Window » Adjustment.

Inverting the final image, using Adjustment [16] and Invert [17], to make it game ready as an opacity map.

Additional light Twist and Ripple filters (Filters » Distort » [option]) applied (with image clean-up to address tiling issues).
Coloured (Colored) Caustics
To create a caustics image using Voronoi the base layer should be white so the black pattern can be easily discerned and edited. Once established, to then colour the effect add a new layer – click the Add Pixel Layer button [18] – and using Colour (Color) panel set a colour for the layer [19]. Activate the Flood-Fill Tool [20] and flood the layer with the selected colour then change the Blend Mode for this same layer to mix together, for example setting Screen [21] to maintain highlights while darker tones take on the fill colour.

It’s best to colour caustics after the pattern has been established to make it easier to modify. Do this by flood-filling a new layer with a colour selection [19] and changing the Blend Mode [21] to maintain highlights.
