Toolkit – Clothing using Cloth Simulation
Table of Contents
Description
In this exercise we take a look at the basics of using the IMVU Toolkit for Blender to make clothing using cloth simulation. For this we need Cloth Physics (modifier) and Physics Properties. First the selected avatar needs to be set up as a Collision object that defines the simulation interaction. A flat Plain is then added to the scene and shaped to form a 2D representation of the clothing item similar to a fabric pattern cut-out. This is then set up using Cloth Physics and ‘simulated’ to dynamically shape the mesh relative to the avatar. Once this step is done, the mesh can be ‘fixed’, materials assigned and UV maps unwrapped, before using the Clothing Tool to Weight Paint, prep and export the clothing to FBX for import and assembly in IMVU Studio.
Duration: total c. 1 hr (01:00:00).
Info: 1080p.
Suitability: Beginner+.
Source: KatsBits – Toolkit Cloth Sim (c. 10 MB, *.blend, *.fbx, *.png).
Product ID: n/a.
Important: Blenders cloth simulation emulates the basic functionality of Marvelous Designer but should not be considered a replacement for it.
Design note: using cloth simulation to create clothing for IMVU, or just in general, has a number of important design caveats;
Collision
The first step in using cloth simulation is to set the avatar up so clothing meshes properly interact with it. This is done using Collision. This can be set direction in Physics Properties and clicking the Collision button [1] or by assigning a Collision modifier (that then links though to Physics Properties). The main settings for this are Damping (e.g. 1.000) and Friction (e.g. 10.000) in the Softbody & Cloth subsection [2], which determine how the simulated cloth interacts with the avatar. This needs setting up on all body parts against which clothing is to react.
Typical settings for avatar collisions in Softbody & Cloth might be;
– Damping: 1.000
– Thickness Outer: 0.025
– Inner: 0.1000
– Friction: 10.000
For cloth simulation to work the avatar needs to be turned into a Collision [1] object by enabling that option and setting some ‘friction’ properties [2] that define how the simulation interacts with the mesh.Edge Sewing
When stitching, meshes should only be connected using edges [3]; for cloth simulation to work correctly/accurately sewn elements should be free of faces. To make selections ensure Vertex Select mode is enabled and vertices are sewn using Edges from Vertex » New Edge/Face from Vertices [4] (or press F).
Ensure vertices are sewn using Edges [3], which can be done from the Vertex menu using New Edge/Face from Vertices [4].Cloth Physics
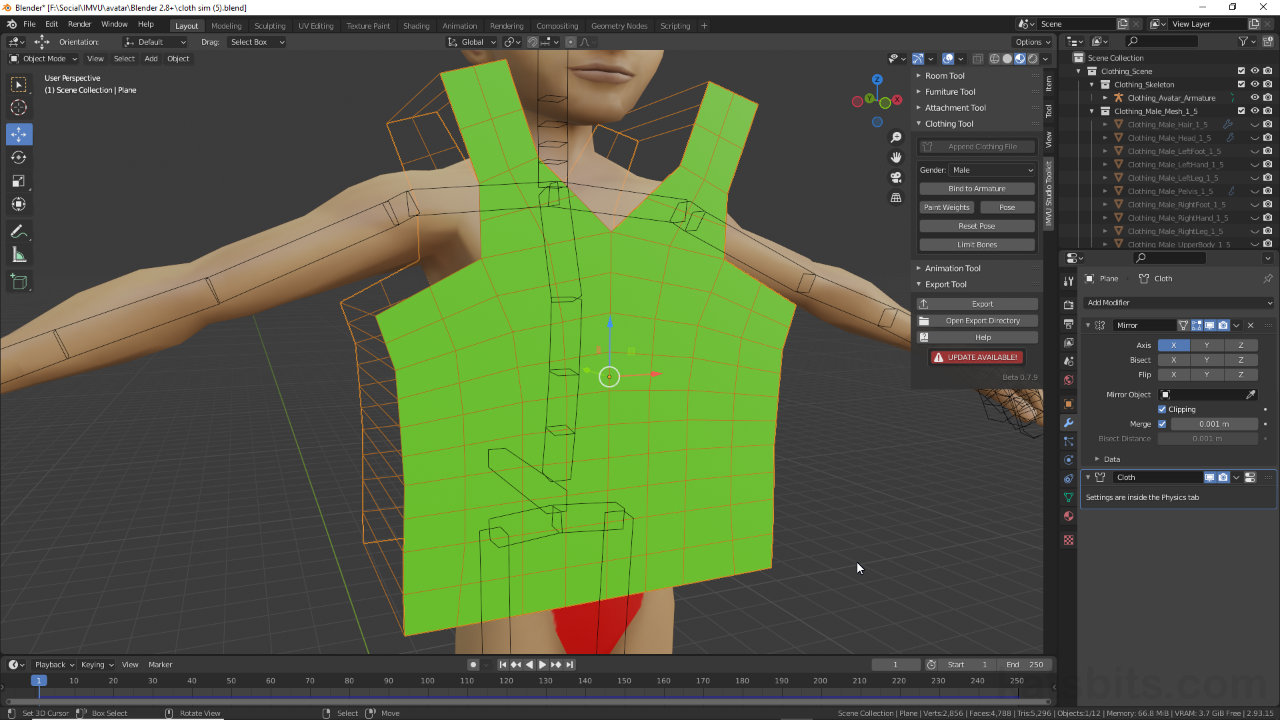
Generally speaking preference should be to keep the initial iteration of the mesh used for simulation as simple as possible [5], ideally a basic profile with few internal subdivisions, as this makes it easier to change physics properties and run the simulation. The core settings to assign to the mesh are Vertex Mass [6] under Physical Properties, and to enable Sewing [7] under Shape – Object Collision [8] should be enabled by default.
Typical settings for cloth simulation might be;
– Physical Properties
– – Vertex Mass 1.0kg (min)
– Shape
– – Sewing (enable)
– – Max Sewing Force 10.000 (min)
– Object Collisions (enable)
– – Distance 0.01 (max?)
For basic Cloth simulation applied to an initially simple mesh [5] set Vertex Mass [6] and Sewing [7]. Collision [8] should be enabled by default.Mesh Islands
For cloth simulation to work effectively, when adding details preference should be to include them as isolated islands or sections that are then linked to the main part with sewing (vertex linked edges). Avoid manually merging elements – in this context meshes should comprise separate sections as much as possible. In some instances this may mean positioning such extras more-or-less where they need to be before running the simulation to prevent collision and/or stitching issues.
Critical: when adding sections, or mesh detail generally, be sure that any new vertices or edges this might expose or create are appropriately stitched to prevent gaps at seams, and ensure cloth is simulated correctly.Important: when adding other parts they should be positioned and stitched around, or in a way that envelopes, the body part they are to interact with, i.e. arms should (typically) be stitched top and bottom, legs (typically) inside and outside.
Typical base shapes and structure before simulating cloth. Meshes can be separate and use slightly different physics properties within the same project.Pinning
Cloth simulation is governed by gravity. In practice this means horizontal structures like arms, shoulders etc., will tend to block or reduce the degree to which cloth may fall, whereas vertical structures, legs, torso etc., won’t. To address this mesh vertices can be pinned [9] using a Pin Group, to restrict and/or lock their movement/responsiveness to simulation. This is done by assigning a named Vertex Group [10] to the mesh, Weight then defining how much, or little, physics affects a given vertex.
Important: although several Vertex Groups can be assigned to a mesh cloth simulation will only reference one. This group however, can use variable weight values [i] per standard weight painting [ii].
A Vertex Group [i] can be created using Weight Paint [ii] to pin a mesh so it doesn’t collapse during cloth simulation.To create a Pin Group, select the mesh and either create a Vertex Group in Object Data Properties and then weight paint the mesh in Weight Paint mode. Or switch to Weight Paint mode and paint the mesh to automatically generate a generic vertex group named Group. Once this is available, in Physics Properties set the Pin Group [11] from the list under the Shape subsection. The simulation will then be influenced [12] by the values painted to the assigned group.
Simulation can be selectively restricted by assigning [9] a Vertex Group [10] to the mesh to ‘pin’ vertices to varying degrees.
With the Vertex Group associated with the simulation physics [11] and simulation run, the mesh will restrict [12] and, for example, prevent pants falling to the ground.Subdivision
The denser a mesh, the more accurate cloth simulation will be. An effective way to facilitate this is to use a Subdivision Surface modifier. However, what the effect does differs depending on it being applied before simulation or after; applied before meshes will be sub-divided into smaller, more numerous, surfaces whereas after, the underlying low resolution structure stays relatively intact. In practice this means the former adds more structure to fabric simulation resulting in greater overall accuracy, whereas the latter generally just smooths the mesh.
Important: adding more mesh structure increases accuracy at the expense of performance and ultimately, functionality, in IMVU.
Shown above is the same vest subdivided after (top) and before (bottom) simulation. Both iterations are exactly the same structurally (image top: mesh displayed with ‘Optimal Display’ disabled to expose mesh structure) while showing noticeably different results.Modifiers
When applying modifiers Cloth [14] should generally be last to ensure the simulated cloth retains its simulated shape. Before doing so, the Timeline scrubber/slider should be at frame 250 (or the frame considered final), again to ensure the simulated cloth retains its finalised shape.
Modifiers need to applied so Cloth [14] is last to ensure the mesh retains its simulated shape.Weight Paint
When duplicating body parts to transfer weight data, the Merge Distance [15] threshold set when using Merge by Distance [16] may vary due to slight variations in the avatar mesh. Be sure to check the value is not so high is collapses otherwise valid structure.
Due to the nature of the avatar mesh ensure Merge Distance [15], set when using Merge by Distance [16], doesn’t collapse otherwise valid structure – this also interferes with weight transfer.Export
If the mesh fails to export it may need to be manually moved into the CLOTHING_EXPORT [17] folder visible in the Outliner. This can be done by simply click-dragging the entry into CLOTHING_EXPORT from within the Outliner, or clicking the Object menu and from within Collection, select Move to Collection – Object » Collection » Move to Collection (alternatively press M. In the Move to Collection pop-up that appear select CLOTHING_EXPORT.
When a mesh is dropped into the scene it defaults to the master Scene Collection which may result in it not exporting. If this happens it can be moved into CLOTHING_EXPORT [17] by simply dragging the entry into that collection.


Timestamps
Times are approximate;
– 00:00 : Avatar Collision
– 06:00 : Cloth Mesh Shape
– 15:30 : Cloth Physics
– 28:30 : Editable Mesh Prep
– 34:00 : Materials & UVs
– 43:00 : Weight Painting
– 50:00 : Export & Studio Assembly
