Nowhere Entities & Adding Interaction
Table of Contents
In principle rooms in Nowhere, Spaces, can be as simple as a mesh and a Player spawn location. While there may be a point to doing that, for a more interactive experience a host of Nowhere specific entities are available in the :: NWR :: Entities subsection of the toolkit that facilitate more engagement with a space and/or Users therein. Using a simple room these options will be explored below.
Important: the Nowhere toolkit is under active development. Available properties and options, and consequently the information below, are subject to change.
The Room
The scene being used throughout is a simple low-polygon Minecraft style, multi-level platformer. The meshes have been optimised, that is faces not seen are removed, each accompanied by an appropriate constructed Collision hull. The materials assigned to the mesh are configured to use standard Principled BSDF materials for all world objects and a Background node material for the sky so it self-illuminates correctly. The scene also includes two Sun light sources; a primary directional source and a secondary acting to lighten shadows, further enhanced with Vertex Painted shading.
Source
Suitability: Beginner+.
Source: KatsBits – Nowhere Minecraft Source (c. 250 KB – *.blend, *.gltf, *.fbx, *.png), Compatible with Blender 3.6 LTS.
Design note: the collision hull is typically assigned a colour tinted material for ease of use, but this is entirely optional. Where it’s a duplication of the ‘game mesh’ it may also include a UV map. In either case, both UVs and materials are ignored on import of collision components into Nowhere.

The scene into which various Nowhere entities will be placed, a simple blocky Minecraft style platformer.
Player
The Player entity defines where the User appears in Nowhere. It’s not a positional absolute, instead it provides general location information; the players position when spawned varies slightly depending on how the Space loads, or how the players loads in to. Generally speaking this is the first entity to be added as the toolkit object itself, the flattened conical shape, acts as a secondary scaling reference, that is, it provides a visual cue for a scene and how big it should be relative to the User.
Design note: although Nowhere and Blender use the same Units of measurement, dropping in a Player nodule helps with proportional scene design.
To add, in the :: NWR :: Entities subsection click the Player button [1] – if one is not already placed a red 2 x 2 x 0.5 metre/unit, flattened cone [2], will appear at the 3D Cursors location. In Object Mode use the Move (G) or Rotate (R) manipulation widgets to then move or rotate the object into place.
Design note: the Player module can be scaled in Blender but this is ignored by Nowhere to ensure all User avatars are the same size and don’t consume rendering resources disproportionately to render. Some additional points to note about using the Player entity;
- the Player entity faces forward along the Y axis (Local orientation) [i] – the back of the cone is the point, the front, the flat face.
- if they Player entity is placed flush with the ground plain (or other surface), in Nowhere the Users avatar actually appears 1 metre/unit above this [ii]. In Blender this means the Player entity object represents a volume that’s 3H x 2W x 0.5D (height/width/depth) rather than the 2H x 2W x 0.5D indicated by the object itself. This difference may affect the feel of a Space if not compensated for.
- the Users ‘avatar’ appears on the front face of the Player module in Nowhere.
- in Blender, if a spot is already available, additional Player spots will appear at the location of the last placed iteration.
- if several Player spots are available in a Space, User loading is randomised between them.
The Player entity represents a number of key aspects of a Space so how it’s placed affects initial Space behaviour when the User loads, in particular its orientation [i] and height from the ground plain [ii].


The Player entity [2] is typically the first object to be added as it helps with scaling scenes in Blender so they’re correctly scaled for Nowhere – at least one is needed.
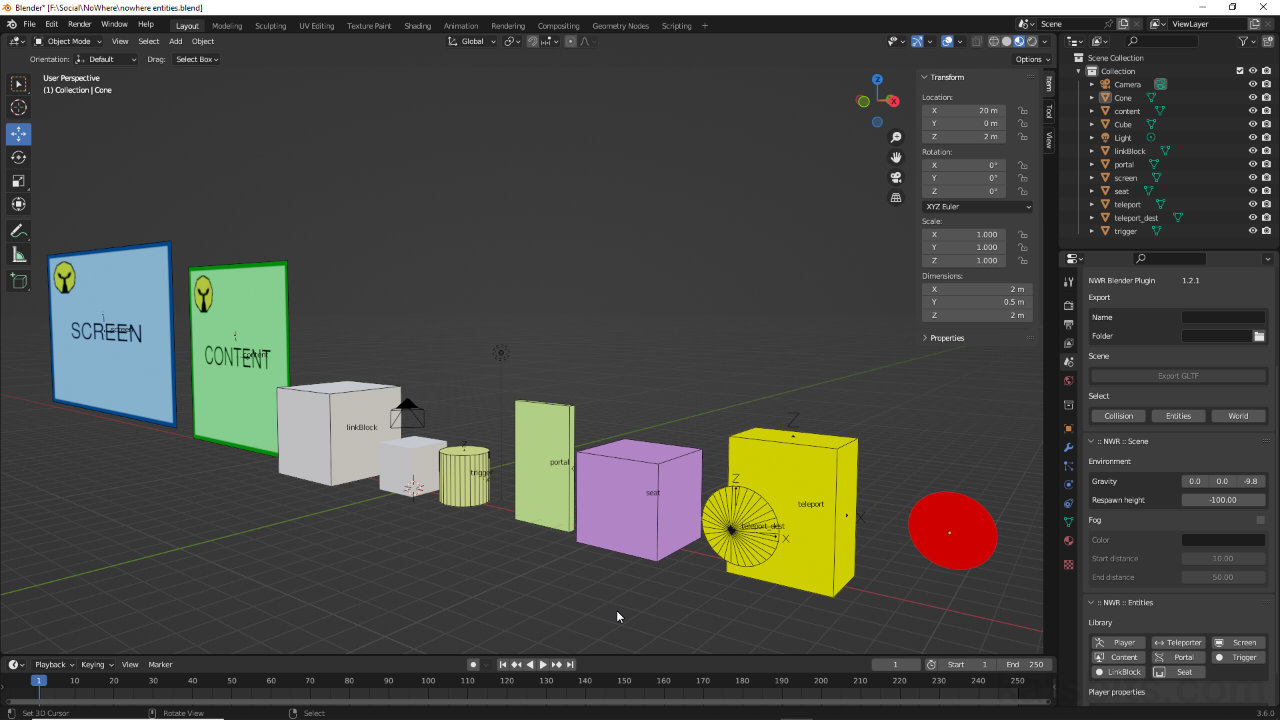
Teleporter
The Teleport entity teleports or moves the User from one location to another on activation. In Blender the entity is a pair of primitive objects colour-coded primary yellow; a trigger volume [3], labelled teleport, and a destination marker [4], labelled teleport_dest. Neither is visible in Nowhere so a prompt [6] needs to place to indicate where the trigger volume is located [7]. Once the User is within activation distance the entity can then be initiated.
Design note: the teleport entity objects are initially labelled teleport and teleport_dest, “teleport” being the identifier that indicates what the objects are and what links them together as a trigger » target pairing. To use multiple teleporters, their names will need to be updated to indicate secondary or additional groups without disturbing the underlying naming convention by, for example in the Outliner double-click each entry to add an incremental numerical append, i.e. teleport_2 and teleport_dest_2, teleport_3 and teleport_dest_3 and so on.
To add, in :: NWR :: Entities click the Teleporter button [5]. A pair of mesh objects will appear at the 3D Cursors location; a 2 x 2 x 2 cube and a 2 x 2 x 0.5 flattened cone. In Object Mode use the manipulation widgets to move the objects into position, the cube being a trigger volume the player interacts with to initiate the operation, and the cone being the destination the User is transported to. To visually assist the User a marker or other visual aid should be placed indicating the approximate location of the trigger volume.
Design note: the trigger volume can be resized in Object Mode or Edit Mode to loosely surround or encapsulate the visual prompt placed to guide the Player – when resized or scaled the volume should retain its primitive convex shape and should not be edited further. Once modified Apply then needs to be used – Object » Apply » All Transforms. Some additional points;
- the destination cone faces forward along the Y axis (Local orientation) – the back being the cones tip or point, the front being the flat face.
- where the destination cone is placed with bottom touching the ground, Users typically stand 1 metre/unit above this in Nowhere.
- for ease of use the trigger volume should be large enough to be readily accessible.
Important: teleport triggers are not distance or geometrically occluded so can be activated even though they, and their respective UI elements, may not be visible to the User. In other words, the ‘mouse over’ action essentially ‘passes-through’ meshes [iii].
Teleporter triggers can be activated through meshes [iii] – shown above, a trigger volume and its UI element are not visible to the User, who stands below the upper platform, but the volume can still be activated (‘active selection’ mouse cursor not shown).


The Teleporter entity is a pair of objects; a trigger [3] and target [4]. To add click the Teleporter button [5] in the entities section.

A prompt [6] (green ‘up’ arrow) may be needed to indicate where the Teleport trigger volume is [7] (shown as Bounding Box in Blender for clarity) as the entity objects are not visible in Nowhere.
Screen
The Screen entity is a placeholder, a flat surface that can be configured to display live video that’s broadcast into the Space. It can be resized and placed wherever needed. To add, in the :: NWR :: Entities section click the Screen button [8]. A plain with a placeholder material and image assignment will appear at the 3D Cursors location. Use the manipulation widgets to size and/or position [9] the entity for viewing.
Important: Screens are containers or editable areas room admins can change live/in real-time once a Space is published to Nowhere.
Design note: some additional points about Screen entities;
- broadcasts can be projected to available screens, or the scene background [iv]. In Screen Properties set the Placement to Scene (screen entity) or Background (skybox).
Broadcasts can be projected onto available screens or the background depending on the Screen properties setting [iv].- multiple screens can be placed, the names of which can be modified to include a numerical append to uniquely identify each screen, e.g. Screen_1, Screen_2, Screen_3 and so on – Blender appends an incremental value automatically upon duplication, i.e. *.001, *.002, etc.
- where several screens are used they will all display the same broadcast input (???).
- screen orientation is indicated by text, SCREEN, displayed on the entity itself so they should be positioned for that to be legible.


The Screen entity is a flat plain that broadcasts video into a Space. It doesn’t need any setup aside from being scaling and/or positioned as required.
Content
A Content entity is a placeholder, a flat plain that accommodates the inclusion, display or use of images, movies and audio files in a Space. To add, in :: NWR :: Entities click the Content button [10]. A flat plain carrying a placeholder image will appear centred at the 3D Cursors location [11]. Use the manipulation widgets to resize and/or position the entity where it needs to be.
Important: Content panels are containers or editable areas room admins can change live or in real-time once a Space is published to Nowhere.
Design note: generally speaking the Content entity is designed to be a ‘point of interest’ element for Spaces as it allows for the inclusion of media independently of the rooms design. In this way media can be managed on the fly after publishing to Nowhere. Some additional considerations for Content entity use;
- multiple Content panels can be placed in a scene, each able to display media independently of each other once published to Nowhere
- where multiple instances are used each needs a unique label – Blender appends an incremental value automatically upon duplication, i.e. *.001, *.002, etc., but this can be changed in the Outliner.
- media associated with the entity can be displayed on the panel itself or scene background. In Content properties set the Placement by clicking the Scene or Background buttons [v].
Media can be displayed on the Content panel itself or the scene background by setting the Scene or Background [v] option in Content properties.- supported media formats; *.jpg, *.png, *.mp4 and *.mp3.
- the entities material/image is a placeholder.
- orientation is indicated by text, CONTENT, displayed on the entity itself so should be positioned for that to be legible.

![[descriptive alt image text here]](https://www.katsbits.com/images/tutorials/nowhere/nowhere-entities-content.jpg)
In the entities panel click the Content button [10] to include images [11], movies and audio in a scene.
Portal
The Portal entity is similar to the Teleporter except it transports the User to another World wholly independent of the scene within which the Portal is placed. To add, in the :: NWR :: Entities panel click the Portal button [12]. An object shaped like a door will appear centred on the 3D Cursor [13]. Use the manipulation widgets to move, rotate (but not scale) into position.
Important: the target or destination is set or configured by a rooms admin once a Space is uploaded to Nowhere.
Design note: in Blender, the Portal entity is simply a placeholder for what is another preconfigured effect in Nowhere. Some additional notes to keep in mind;
- as they may take a moment to trigger, portals should be placed to accommodate Users passing through the entity before activation and transport to the new destination.
- a portals appearance (currently) cannot be modified.

The Portal entity [12] teleports the User to another world. It can be moved [13] and rotated but generally shouldn’t be scaled to avoid issues.
Trigger
The Trigger entity is an event activator defined by the volume or area the entity object occupies, placed near another object for example, it can trigger an animation to start or stop depending on Users interaction with the entity. To add, in the :: NWR :: Entities section click the Trigger button [14]. A yellow cylinder will appear at the 3D Cursors location [15]. Using the manipulation widgets, move and/or scale the volume into place depending on usage requirements, then in the Trigger properties panel, set the events the entity is to activate.
Design note: an example of using a trigger entity would be as an area [vi] in front of an animated object [vii] that has two Action sequences; an ‘on‘ state and an ‘off‘ state. When the User enters the Trigger volume, based on the Trigger properties set, the ‘on’ animation plays [viii], that can be set to Loop (checkbox), so long as the User remains inside the volume. Upon exiting the ‘off’ sequence [ix] can be played (also optionally Loop), or the ‘on’ action simply stopped. The same trigger can activate multiple events, objects or animations based on the properties set.
A simple Trigger entity set up that has the volume [vi] near an object [vii] that is triggered to play [viii] or stop [ix] based on the properties set in the control panel.Additional points;
- setting the Broadcasting option to either Local or Global makes the triggered event visible to the User activating it or everyone in the scene.


The Trigger entity [14] is a volume that can be used to activate animations and other effects based on where it’s placed [15] and what it triggers.
LinkBlock
A LinkBlock is a trigger volume that opens another application when clicked or activated by the User, a volume can be placed around a prompt, that when clicked, opens a particular page or website. To add, in the :: NWR :: Entities section click the LinkBlock button. A large light-grey cube will appear centred on the 3D Cursors location. Using the manipulation tools, move, rotate or scale the volume into position as required.
Important: the target or destination of a LinkBlock is set or configured by a rooms admin once a Space is uploaded to Nowhere.

The LinkBlock [16] is a trigger volume [17] similar to other entities that can be used to activate an event. It can also be scaled to fit any visual prompts as might be needed for User engagement.
Seat
The Seat entity is a volume or area within which the User essentially ‘sits’ or is ‘locked’ in place, unaffected by the scene (gravity or friction in particular). To add, in :: NWR :: Entities click the Seat button [18]. A pink cube [19] will appear centred on the 3D Cursor. Use the manipulation widgets to position, move and/or rotate, as needed.

The Seat [18] entity [19] locks the User in place so they unaffected by the scenes gravity or movement properties.
