Marvelous Designer Mesh Prep
Design note: by default meshes are triangulated [1] in Marvelous Designer to better aid cloth simulation. While this generally don’t present issues for IMVU (all meshes are broken down into triangles at render time) it may make the preparation process in Blender more complicated and fiddly than it need be, for weight painting in particular. To alleviate this in Marvelous Designer triangles can be converted into quadratic faces using Remeshing or Quadrangulate. In both instances mesh selections are reorganised and rebuilt to use a more formal or regulated semi-grid structure that is easier to then work with.
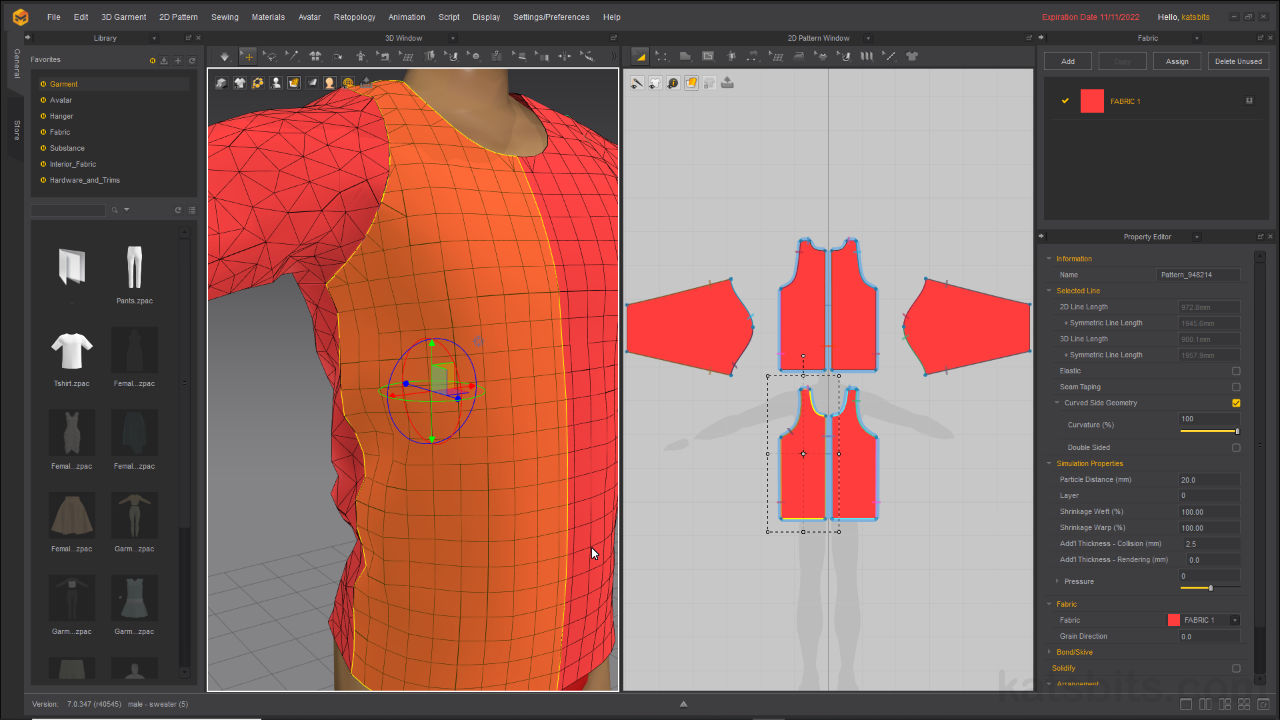
To do this, select the segments to be converted in the 3D Window and right-click to access the Pattern context menu overlay. From the options select Remeshing or Quadrangulate [2] – RMB » Remeshing or RMB » Quadrangulate. The selected mesh segments will update to quadratic faces [3] depending on the options chosen – due to the nature of the cloth simulation the resulting structure might not be uniform, even where sections are duplicates or mirrored. Some faces may also remain triangulated.
By default mesh segments are triangulated in Marvelous Designer but can be converted to quadratic faces. Simply make a selection [1], right-click, and select Remeshing or Quadrangulate [2] from the Pattern menu.
Pattern segments converted into quadratic faces [3] using, in this case, Quadrangulate. The resulting structure typically flows and restructures itself relative to the simulated shape of the mesh.When doing this however, it’s important to understand the difference between Remeshing and Quadrangulate because, while both convert the initial triangulated mesh into a quadratic grid of faces, the results differ in subtle but significant ways.
Remeshing
In essence Remeshing does not specifically take into account the shape of the segment being converted as the grid that’s generated is relative to itself rather than the shape of the mesh. In practice this means where clothing segments are misaligned, or at acute angles to one another, additional off-grid geometry has to be included to accommodate curves or odd shapes, especially at seams [4], or where segments don’t match, which can break surface continuity (across segments especially). Remeshing is also localised, conversion is relative to the individual clothing parts being converted; processing several segments at the same time may result in grids being misaligned relative to each other. Similarly, segments may not be subdivided equidistantly [5] and the resulting grid may not necessarily follow the patterns contours.
Remeshing is a quick way to convert a mesh into quadratic faces but issues can arise at seams [4], or based on the size and shape of the pattern segments being converted [5].Quadrangulate
Where Remeshing typically generates a regimented grid that doesn’t follow segment structure, Quadrangulate does, meshes are rebuilt taking into account not only individual segment shapes but also where they might be connected together. In practice this means the generated grid more keenly follows the contours and shapes of each segment, adjusting for the way the item might fall or drape over the avatar. Because it does this seams and curves are generally cleaner [6], absent the additional geometry, the grid more inclined to flow evenly and uniformly. And while segments may not be equidistantly subdivided the grid does follow pattern contours and flow [7].
Quadrangulate is an alternative way to to convert triangles into quadratic faces, and although it creates a less formal structure, it does more easily flow across seams [6] and is more evenly distributed [7] regardless of pattern shape or size.When constructing and simulating garments in Marvelous Designer seams may appear loose or disconnected. Assuming patterns and segments have be appropriately sewn together, inspecting seams more closely should reveal the ‘stitch’ between segment vertices on either side of the seam [8]. So long as this is visible, and the properly align, meshes will export from Marvelous Designer correctly welded together into a single mesh – if segments have been converted into quadratic faces the arrangement of vertex pairings across a given seam may require additional clean up in Blender.
Check seams more closely to ensure vertex pairings are ‘stitched’ [8] – so long as a this is visible the item will be exported correctly, welded together as a single mesh.


