SketchUp Style Outline Renders
Table of Contents
For newer versions of Blender, the real-time displaying of an objects wireframe in the 3D View is different than off-line rendering a wireframe or outline. Whilst the first aids meshing, being able to see structure and density at a glance whilst working, the latter can be used to make finished images look like they were rendered in SketchUp. This is done using Blenders Freestyle rendering option.
Scene/Object Set up
To render outlines make sure at the very least any object to be rendered has at least a basic node-based material assigned with a Base Color (‘diffuse’) set and scene appropriately lit. As outlines in this context are a rendering post-process a Camera entity is also required, positioned relative to the point of view expected of final image output.
Design note: rendering outlines does not specifically require complex node-based materials so a simple assignment with an (optional) diffuse colour will suffice [a] – all materials have a off-white tint by default that can be changed in the Node Editor.
Rendering and outline around objects is independent of materials but objects should have at least a basic Material assigned to be able to control some aspects of the final render, Diffuse colour in particular

Enable Freestyle
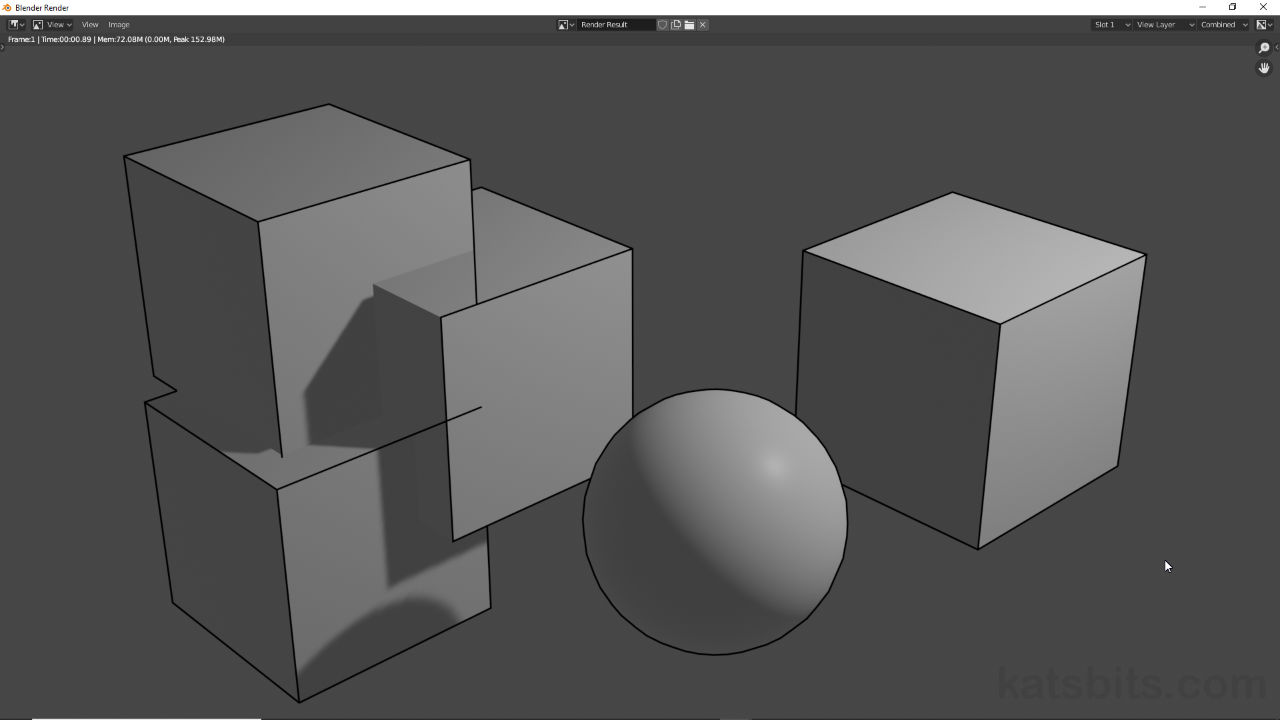
To produce a SketchUp style outline render, once a Scene and objects are prepped, in Render Properties [1] click the checkbox next to Freestyle [2] enabling access to a set of basic options (click the arrow to expand). Here the initial width of the outline can be set changing Line Thickness (1.000 px being the default, Line Thickness: 1.000 px).

Outline rendering is a setting within Render Properties [1] so access the panel and click the checkbox next to Freestyle [2] enabling and revealing some basic options, Line Thickness in particular.
Render Outline
With Freestyle now enabled to render the outline press F12 or switch to the Rendering Workspace to see the results. The Blender Render window will open, or the Rendering viewport will update showing the resulting scene/image with objects outlined.

With the scene set up and Freestyle enabled press F12 to initialise rendering and see the basic result, an outline (black by default) around all objects in the scene (using a simplified, object intersection, occlusion).
Colour/Tinted Outline
For more control over rendered outlines a set of additional options are available to change the appearance of the line. At it’s most basic the Freestyle options available in View Layer Properties [3] allow the outlines colour to be changed under Freestyle Line Style [4]. Here accessing the Color options [5] within which the lines Base Color [6] can be set clicking the colour sampler and subsequence colour-wheel selection.
Design note: the properties and options available allow for far more sophisticated line work to be rendered from the basics discussed above.

To change the outlines colour access View Layer Properties [3] and Freestyle Line Style [4] options to select the Color properties so a Base Color [6] can be set.
Render Outline Only
To render objects with just an outline the material assigned to objects can be set up with transparency. To add basic transparency, in Material Properties [7], enable Blend Mode [8] in Settings and then change the Alpha [9] value attributed to the Principled BSDF node. Once set up rendering the objects will then show the outline only, the objects being transparent as defined by Alpha.
Design note: there are several ways to set up transparent materials so outline rendering may differ accordingly.


Objects can be rendered in outline only if materials are set up to be transparent. In Material Properties [7], make sure Blend Mode [8] is appropriately set and Alpha [9] adjusted as required before (re)rendering.
Old *.blend files
As a consequence of changes to Blenders rendering and material systems loading old or legacy *.blend files set up to produce SketchUp style outlined renders initially won’t work – all the settings and options included in the file will likely be available but not necessarily updated for use in Blender. In this situation what’s likely missing is a Freestyle Line Set, the datablock that holds all the attributes of an given outline.
Design note: when loading old *.blend files disable Load UI in Open Blender File settings bottom-left to utilise Blenders interface – for truly old files, pre Blender 2.49, loading legacy interface data may cause issues so it’s preferably to disable this information.
Access View Layer Properties [1] and in the Freestyle Line Set subsection [2] click the + (plus) button [3] to the right of the lineset aperture. A new entry will appear, titled LineSet by default, accompanied by a new group of settings and options below, pressing F12 now will include a basic outline in the render per the properties set/used.
Design note: LineSet functions in a similar way to materials in that a Material acts as a container of sorts for associated options and settings.


For legacy SketchUp style rendering projects it’s likely the LineSet property [2] is not available/has not been created [3] resulting in no outline during rendering. Add one, click the + button [3], to generate an outline.
