Toolkit 1.2.10 Workflow Workaround for Blender
Table of Contents
Description
With the IMVU Toolkit for Blender v. 1.2.10, workflow has changed from previous versions that require a slightly different approach to setting up static avatar poses using the Animation Tool. The same settings are all available but they don’t seem to function quite the same way, or they result in a different outcome than expected.
• Blender 5.x LTS with IMVU Toolkit for Blender v1.2.10.
Duration: total c. 15 mins (00:15:00).
Info: 1080p.
Suitability: Beginner+.
Source: n/a.
Product ID: n/a.
Auto Key (Auto Insert)
Version 1.2.10 of the Toolkit has an option, Auto Key, that should automatically insert a keyframe into the Action Editor timeline whenever a bone or control object is manipulated or posed. When this fails, pressing I (“i” not “l”) to Insert should perform the same operation. However, this too can fail to add keyframes. When that happens click the Set Key button in the Toolkit.
Enabling Auto Key should automatically insert markers into the timeline whenever the avatar rig is posed. If it doesn’t click the Set Key button instead.Auto Key & Keying Set
Before posing the avatar and adding frame markers into the timeline ensure the auto-insert options are set to include the correct data. As avatar poses involve the manipulation of a set of shape key (morph) and skeletal bone controls, both need to be captured.
With Auto Key enabled, click the Open Action Editor button in the Toolkit and check the ‘record’ button is ON (red). Next, click the Keying menu item and check the Keying Set input field. If this is blank, click the icon displaying a pair of keys on the left (Active Keying Set), and from the list select Available. This forces a broad data collection, ensuring the appropriate information is gathered whenever Set Key is clicked.
With the Action Editor visible (click Open Action Editor), check the Keying options to ensure Available data is being collected when posing, capturing both shape key and skeletal pose data.Static Pose Set-up
To ensure static poses export correctly from Blender using the Toolkit the timeline has to be set up to force the recognition that the resulting FBX export contains ‘pose’ data. Without this the Blender export » FBX » Studio import pipeline assumes any data that is included happens to be the objects bind pose, that is the pose the avatar strikes at rest or when its not doing anything, because all frames are the same, as they are for static or single avatar poses. This necessitates the inclusion of a reset pose.
Design note: Auto-reset pose set up… [more]
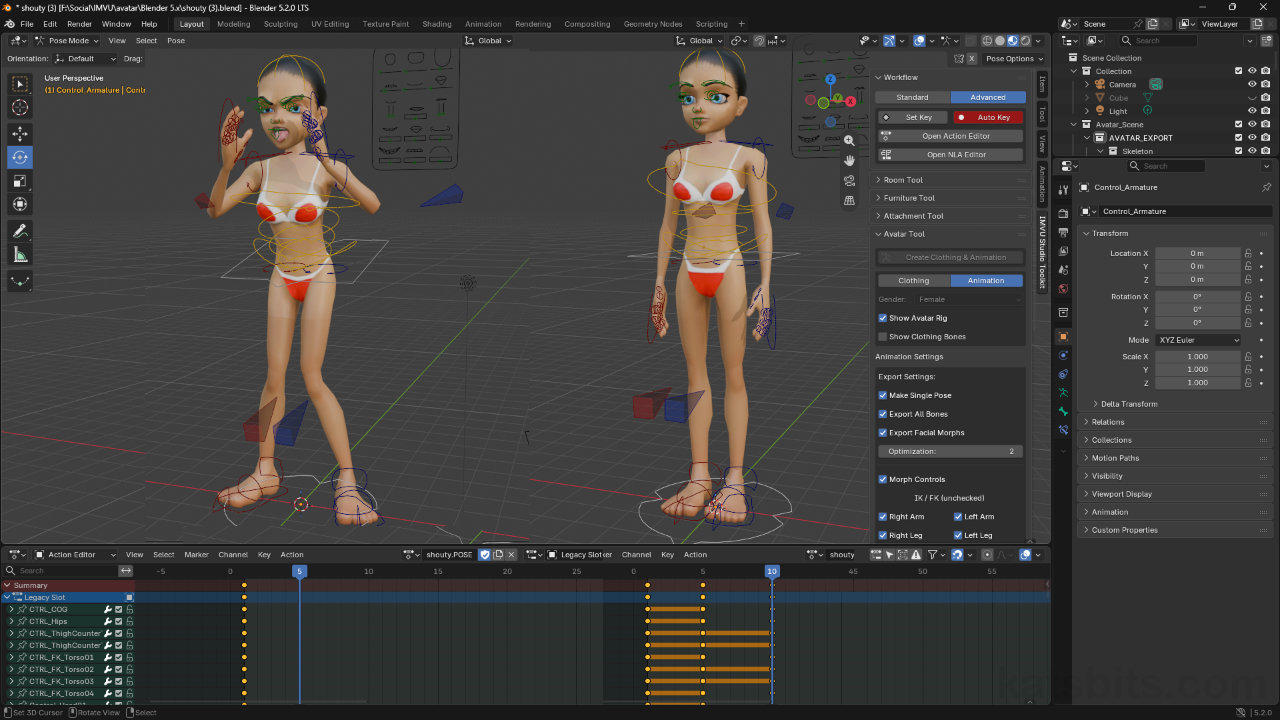
Once the initial pose is in place at frame “1”, continuing in Pose Mode, select everything, A, and click-drag move the timeline scrubber to frame “5”. Click the Set Key button again to mark another frame. This range, frame “1” to “5” sets the static baseline the pose will be pulled from in Studio. Next, click-drag the scrubber to frame “10” and from the Pose menu select Clear Transform, then All – Pose » Clear Transform » All. This resets the avatar, removing all pose manipulations, and marks the change to the time line (click Set Key if markers don’t appear in the timeline). Scrubbing the timeline back and fourth now renders a short sequence between initial pose and reset, the difference being enough to force recognition of movement.
If the export process doesn’t automatically ‘reset’ the pose it will need to be done manually, else it will be read as the bind pose in Studio and not move.Static Pose Settings
For static poses (single-frame sequences) to export correctly a number of options need to be set in the Toolkit. Without these, issues may be encountered during import or assembly of the pose in IMVU Studio. In the toolkit ensure Make Single Pose at minimum is set, this enables the static pose procedure that properly configures the exported FBX for static pose use. Optionally set Export All Bones if the file is to include every bone, or specific bones, that have being manipulated and posed, useful for partial poses. If the pose includes a facial expression be sure that Export Facial Morphs is enabled. The writes the shape key sequence to the exported file.
☑️ Make Single Pose
☑️ Export All Bones
☑️ Export Facial Morphs
A number of options need to be set in the Toolkit to ensure static poses are exported correctly, Make Single Pose particularly.Action Setup in Studio
To ensure only pose data is brought into IMVU Studio, during import deselect Use Imported Skeleton, all Mesh parts (Skeleton & Mesh selection), all Materials (Material selection), and double-check that pose data is shown in Animation (Animation selection) – if a facial expression is included both an Anim and a Morph will be listed. Doing this avoids conflicts and issues with existing elements of the product being derived, e.g. Empty Female Top or Empty Male Top.
For assembly, after creating an Action and populating the Skeletal Animation and Morph Animation components with the corresponding pose elements, e.g. “Pose_owmyhead.xaf” and “Morph_MorphName-mouth.Open[…].xpf“, if upon Preview nothing happens, or the pose appears to be moving unexpectedly, change the Start and End frames from those typically used, “1” and “2” (Start: 1, End 2), and instead use “0” and “1” (Start: 0, End 1). This forces Studio, and IMVU generally, to use the default system for the start and end points of a sequence.
Design note: IMVU Start and End frame defaults… [more]
Using the normal Start and End frame range for static poses, they sometimes don’t work. When that happens, change them to force the defaults – the also more compatible with Classic Editor & Client and Studio Editor and client.


Timestamps
Times are approximate;
– 00:00 : Setup & Pose
– 03:00 : Morph Controls
– 05:00 : Set Key, Rename
– 06:00 : Pose Options
– 07:00 : Timeline Prep
– 09:00 : Studio Assembly
– 11:00 : Troubleshoot
