Normal Maps & IMVU Studio
Table of Contents
With the advent of IMVU Studio products can be assembled to include additional effects, Shininess and Normal, both special images, or ‘maps’, that enhance and objects appearance displaying light-responsive highlights and increased surface detail without using what would otherwise be a lot of superfluous mesh complexity. These are optional texture assets and both be made in a 2D photo or image editor.
Design note: for more information on creating normal maps read “How not to make normal maps” here.
Download: software or tools for converting images to normal maps; GIMP, nJob.
Normal Maps
Without getting too technical normal maps work by interpreting a particular palette of colours as being representative of surface orientation, that they essentially store complex three-dimensional structural information in a less resource hungry two-dimensional, easily compressed, image format. With this in mind, when looking at a normal map each coloured pixel represents a ‘vector’, the angle, direction or orientation a corresponding face might be pointing, and as part of a larger image, the shapes, forms and detail this may describe. Because of this making normal maps tends to employ special tools or processes;
1) normal maps are baked using high-resolution meshes.
2) normal maps are converted or generated from 2D images or artwork.
Important: for normal maps to work properly the colours used conform to a specific range or palette (‘normalised’) else rendering issues can occur (‘non-normalised’).

The preferred way to make normal maps is to ‘bake’ them from high-resolution meshes but this can be time-consuming and can strain resources as the mesh density required can run into the high millions of polygons.
Golden Rules of Normals from Image
To generate normal maps from images a few ground or golden rules need to be observed;
1) Image should be grey-scale tone only.
2) White represents height, black depth.
3) Height & depth are relative to the average.
Before images are converted to normal maps then this means they need to be painted, created or converted to being fully grey-scale, there should be no RGB (Red, Green, Blue) colours present, and the structure is relative to white being the highest point, black being the lowest. In other words processing a photograph of something that includes shiny highlights and shadows will invariably result in a malformed normal map, one that shows structural peaks where shiny highlights occur and indentations where there are shadows.
Important: Highlight = Height. Darkness = Depth.


Shown above for illustrative purposes – this should not ordinarily be done – a flower is shown with shadows occluding strong highlights (top) and the resulting normal map (below) – the tool used has ‘correctly’ interpreted the darker tones as depth however, relative to the subject, this means the effect is malformed in those areas, the contrast creates a hard edge in the normal map.
Normal Map from Image
With the above in mind, to convert an image or photograph into a normal paint, create or generate the image to be converted as, or using, grey-scale tones ensuring the height is represented by light tones and depth by dark.
Important: the image to be converted needs to be painted or created using grey-scale tonal values not necessarily be converted to a grey-scale ICC Colour Profile. In other words it can remain a 24 bit RGB image but consist solely of grey tones rather than an 8 bit (single channel) grey-scale image.

Image (a pumpkin skin) converted to and painted in grey-scale tonal values, darker tones will recede, lighter tones protrude from an averaged value between the two extremes, brightest and darkest.
Next, and depending on the image editor, flatten the image to ‘background’ or ‘layer’ then optionally, if using an external normal map converter, Save As or Export the template to a lossless image format, or a format with image compression disabled, e.g. *.bmp, *.tif, *.tga etc. – the image should be saved in a raw state absent compression artifacts. The externally saved image can then be opened in another application for processing and conversion to a normal map.


The saved image, originally exported from Affinity Photo image editor, can be opened in another application for processing, e.g. GIMP (top – zoomed in) or nJob (bottom – to scale).
Normal Map Filter
How the grey-scale image is actually converted to a normal map will depend on the image editor or conversion tool being used. To convert using GIMP, with the grey-scale template open access the Filters menu [1], select Generic [2] then finally Normal Map… [3] from the listed options – Filters » Generic » Normal Map…. The Normal Map filter interface will appear [4] and convert the image into a normal map [5]. Click OK to complete [6].


In GIMP the grey-scale image can be converted using the inbuilt normal map filter – from the Filters menu [1] select Generic [2] then Normal Map… [3] from the options available, the filter dialogue will appear [4] with various settings and the image converted in the background (real-time preview) [5].
To convert an image in nJob, load in file then from the Filter menu [7] select Heightmap > Normalmap [8] – Filter » Heightmap > Normal map. A Height to Normal [9] filter dialogue popup will appear with various settings – for most uses the default settings are appropriate – the the image converted in real-time below [11]. Once set click OK to complete [10].


In nJob once a (grey-scale) image is loaded from the Filter menu [7] select Heightmap > Normalmap [8]. The filter dialogue appears [9] with the image converted in real-time below [11]. Click OK [10] to complete.
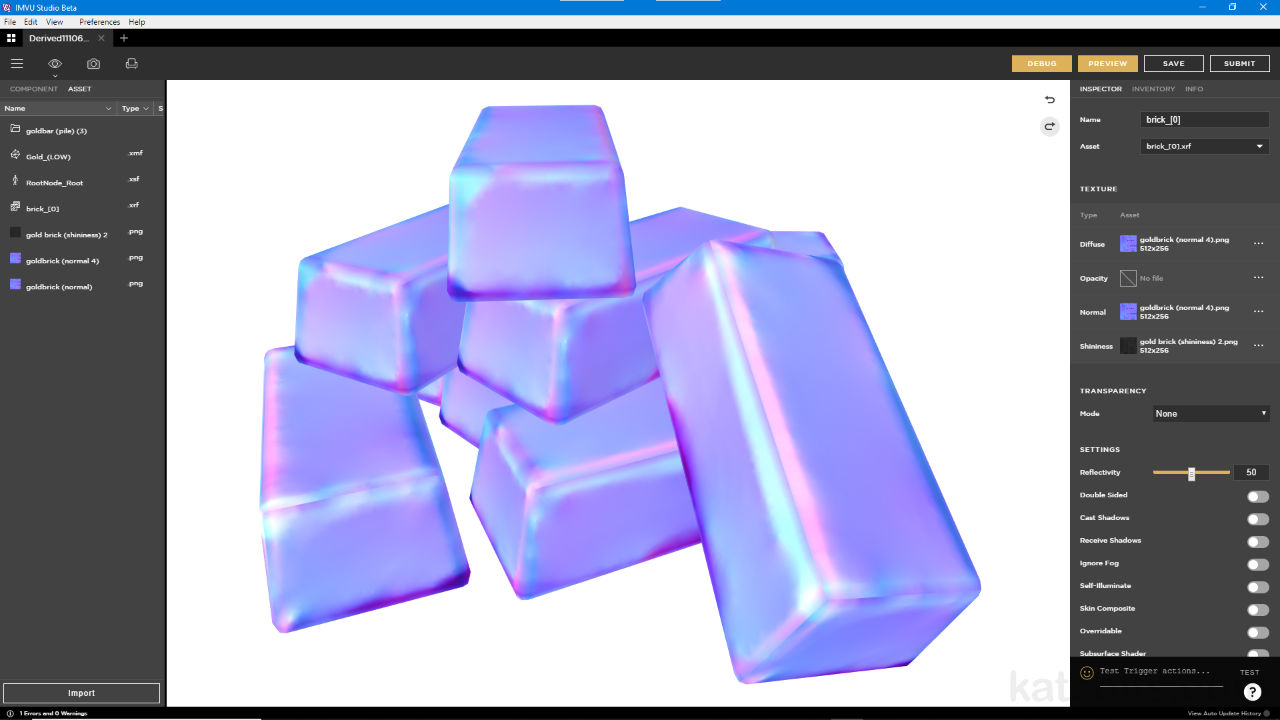
Normal Map in Studio
Normal maps are essentially loaded into IMVU Studio the same way as other textures so once the derivable project is set up, click the Material components of the project [12] to see the Inspector properties where the available Texture slots will be shown. Click the Normal image slot icon [13] then in the Texture panel that appears click the + icon [14] to load in an external image using the standard file browser. Once the image loads click the new thumbnail [15] to select and set it in place within the texture slot and click Preview [16]. The image and effect will appear on the product in the main view.
Design note: generally speaking all textures used in a material should be the same size ([this is important] power-of-two dimensions) however, normal maps can be larger as this give the impression of increased visual (surface) detail without adding too much to the products overall file size, e.g. Diffuse 128 x 256, Normal 256 x 512, Shininess 64 x 128.


Once a project is set up Normal map images can be loaded into Studio the same way as others, by selecting the Material [12] and then clicking the available Texture slot [13] to open the file browser [14]. Once loaded the map can then be selected [15] and applied clicking the Preview button [16] – project above shown using a flat uniform coloured Diffuse to highlight the effect cause by inclusion of a normal map, the surface striations top-to-bottom of the pumpkin.
