Eevee, Transparency & Blender 4.x+
Table of Contents
Blender 4.0+ introduces a slight re-organisation of the material system to accommodate some new features. While transparency itself remains the same in terms of how it’s rendered, they way each type is set up differs a little from previous releases of Blender from an organisational point of view. Updated for Blender 4.0+, how each type of transparent material is set up is outlined below.
General Changes
As briefly mentioned above the interface has been reorganised slightly so material properties and/or shader effects are collated together, essentially by ‘type’ or ‘likeness’. For Blender 3.6 or below, in Material Properties, options are listed [1], whereas in Blender 4.0 and above, they are grouped [2].

Material properties and options are listed [1] in Blender 3.6 or below…

… whereas in Blender 4.x and above, they are grouped [2].
The same holds true for material nodes in Shading Workspace; in the Node Editor Principled BSDF for example, lists [3] material properties in Blender 3.6 or below, or groups [4] them for Blender 4.x and above. Menus too, have been updated from options being listed [5], to grouping [6].

In Shading Workspace material nodes list [3] the available options in Principle BSDF for example, and the Add menu options [5]…

… whereas in Blender 4.x and above, the same options on Principled BSDF are grouped [4], and similarly for the menus, options are grouped [6].
Eevee: Principled BSDF Alpha
In this context basic alpha transparency refers to using the Alpha property of the Principled BSDF node. To use, ensure the Blend Mode under Settings in Material Properties is set appropriately, e.g. Alpha Blend [7], then in the Principled BSDF node, change the Alpha [8] input value – click-drag or click then type, 0.000 = fully transparent, 1.000 = fully opaque.
Important: for all Eevee based transparent materials, Blend Mode can be found under Settings in Material Properties.
Design note: image-base alpha channel transparency is essentially ignored using Principled BSDF simple Alpha; if the value is changed the entire image, and any image-base alpha it may carry, will change also. There may also be (alpha) Sort issues when setting up and using transparency in this way.

Basic material transparency can be done using the Alpha input of Principled BSDF. First make sure the materials Blend Mode is set [7], then change the Alpha [8] input value to alter the materials overall level of transparency.
Eevee: Image Based Alpha
Basic image-based transparency refers to materials where transparency is controlled by an image, or more specifically, the alpha channel saved with the it, the A of an RGBA image (Red/Green/Blue/Alpha).
Important: image-based transparency defines the effect relative to the image itself, not necessarily the overall material. This allows the materials overall transparency to be separately controlled apart from the image alpha.
To set up, in Material Properties ensure Blend Mode [9] is set appropriately, then in Shading Workspace drop in an Image Texture node – Add » Texture » Image Texture. Load in an image that includes an alpha mask/channel. Finally link the Alpha output of the Image Texture node to the Alpha input [10] of Principled BSDF.
Design note: for image-based alpha the materials Blend Mode determines how transparency is rendered; Alpha Blend and Alpha Hashed for variable transparency, Alpha Clip for delineated transparency that’s defined by a threshold (see Alpha Clip below).

For image-based transparency ensure the materials Blend Mode is set [9] before linking the Image Texture’s Alpha output to the corresponding input (Alpha) [10] on Principled BSDF.
Eevee: Opacity Map
An alternative approach to controlling transparency using images is to utilise an opacity map, a grey-scale image that define variable transparency, or a black and white image that acts as a stencil or mask.
Important: similar to image-based transparency, using a separate opacity map defines the effect relative to the images themselves, not necessarily the overall material. This again, allows the materials overall transparency to be controlled separately.
To do this, make sure the materials Blend Mode [11] is appropriately set in Settings, then to the basic material add an Image Texture node to define the diffuse aspect of the material – Add » Texture » Image Texture. To this load in a diffuse image, what’s actually seen on an object, and link Color output to Base Color input of Principle BSDF. Add a second Image Texture [12] node and to this load in the grey-scale/black and white opacity map image. Finally link this new nodes Color output to the Alpha input [13] of Principle BSDF. Depending on the type of image used for the opacity map, and the Blend Mode set, the material will render transparent appropriately.
Design note: using a ‘mask’ or ‘stencil’ style opacity map typically means setting Alpha Clip as the Blend Mode, which in turn requires the Clip Threshold to be set. See Clip Mask below.

Using a separate image to define transparency; make sure Blend Mode [11] is set, add a second Image Texture [13] node to house the opacity map, then link this nodes Color output to Principled BSDF’s Alpha input.
Eevee: Clip Mask
Using a clip mask is identical to using an opacity mask in that both material types define transparency using an image. The difference comes from the image used, typically black and white for a clip mask, and the Blend Mode being set to Alpha Clip to essentially stencil the transparency.
Important: as with other image-based transparency, clip masks defines the effect relative to the images themselves, not necessarily the overall material. This similarly accommodates the overall material transparency being controlled separately.
To do this, under Settings in Material Properties, change the Blend Mode to Alpha Clip [14] and set an appropriate Clip Threshold, typically 0.500 [15] – Clip Threshold: 0.500. In Shading Workspace add an Image Texture node and load in an image. Link Color output from the Image Texture to Base Color input of Principled BSDF. Finally, if the image has an included alpha channel, link Alpha output from the Image Texture node to the Principle BSDF’s Alpha input [16]. With Clip Alpha set, transparency will be rendered relative to the image and the Clip Threshold value.
Design note: when using a separate image to define transparency per an opacify map, add in a second Image Texture node to carry this image and then link its Color output to Alpha input of Principled BSDF [i], and ensure the Blend Mode is set to Alpha Clip [ii] and a Clip Threshold [iii] has been set. The result should be the same, transparency rendered relative to the image and threshold set.
Mask based transparency can also be done using a separate image added to its own Image Texture node. This can then be link to Principled BSDF, Color to Alpha. Ensure Alpha Clip [ii] and Clip Threshold [iii] is set.


Setting up ‘clip’ based transparency is identical to other image-based transparency except for Alpha Clip being the Blend Mode [14] and Clip Threshold [15] being used, and then linking Alpha to Alpha [16] between nodes.
Eevee: Transparent BSDF
To accommodate more complex transparency the Transparent BSDF node can drop into a material tree, where transparency then behaves similar to Principled BSDF’s variable Alpha value. To do this, create a standard material, with an image carrying Image Texture node, linked to Principled BSDF. Set the materials Blend Mode appropriately and drop two additional nodes into the tree; Mix Shader and Transparent BSDF – Add » Shader » Mix Shader. Link both BSDF outputs from Transparent BSDF and Principled BSDF to the Shader inputs of the Mix Shader, one output to one input. Next link the Shader output of the Mix Shader to the Surface input of Material Output. Once everything is linked up the Fac variable of Mix Shader can be changed to increase or decrease the overall materials transparency, e.g. Fac 0.000 full transparency, Fac 1.000 full opacity (0 transparency).
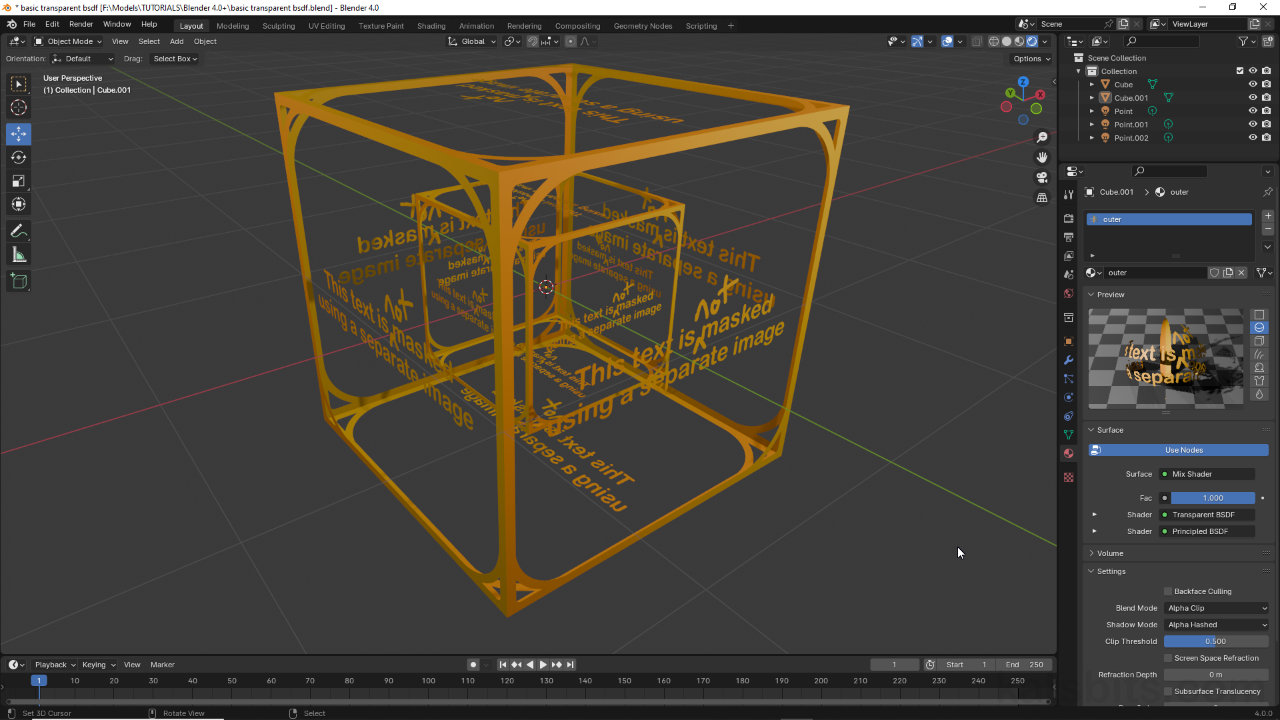
Design note: adding Transparent BSDF to a material allows transparency to be changed independently of any image-based alpha transparency associated with the material. In other words, an alpha mask might stencil some framed text when linked to Principle BSDF’s Alpha input [iv] which, with the inclusion of Transparent BSDF, can then be modified setting the Fac [v] variable to change the overall materials transparency – this could be used to hide an alpha transparent object that is then revealed as part of an animated sequence.
Augmenting image-based alpha transparency with Transparent BSDF. Image-based Alpha [iv] can be adjust further using the Max Shader’s Fac [v] input.


To make more complex materials Transparent BSDF can be used. In the Node editor drop in a Transparent BSDF [17] and Mix Shader [18] nodes. Link Transparent and Principled BSDF to Mix Shader [19] then use Fac to set the level of transparency.
