IMVU Toolkit 1.2.10 Clothing Workflow in Blender
Table of Contents
Description
The workflow for making clothes in version 1.2.10 of the IMVU Toolkit differs slightly from previous versions as both the Animation and Clothing tools have been combined into a singular Avatar tool. Here one or the other can be set as a project context, usability changing to suit. For clothing however, elements from each context is needed to make, and then test, meshes before their export and assembly in IMVU.
• Blender 5.x LTS | IMVU Toolkit 1.2.10
Duration: total c. 25 mins (00:25:00).
Info: 1080p.
Suitability: Beginner+.
Source: n/a.
Product ID: n/a.
Clothing Tool Setup
The initial setup of a clothing based project, an actual clothing item or a body-based accessory, is to enable Clothing in the Avatar Tool (available after clicking the Create Clothing & Animation button). This establishes the editing context and primary avatar selection, either legacy male and female body types, or the updated 1.5 versions, which displays the corresponding avatar body in the scene, standing in a T-Pose (arms outspread to the side), items can then be modelled around as normal.
Design note: Why use the T-Pose… [more]
Clothing is now part of a broader Avatar Tool that includes both clothing and animation capabilities. click Clothing for clothing and accessory items.Bind Clothing
Once a clothing (or body-based accessory) item has been modelled it needs to be weight painted so the avatar skeleton can deform it when it move and articulate. To do this, the mesh needs to be ‘bound‘ to the avatar; this assigns a set of Vertex Groups to the mesh, each corresponding to a particular bone of the skeleton. It also assigns an Armature modifier so Blender know which skeleton has influence over the mesh. These steps are done after clicking the Bind Clothing button.
Design note: Vertex Groups list… [more]
Vertex Groups can be inspected in Object Data Properties under Vertex Groups. The toolkit defaults to including all groups not just those associated with the underlying body part.
Vertex Groups assigned to the mesh can be inspected in Object Data Properties, under Vertex Groups.Important: Missing vertex groups and mesh distortion… [more]
If the weight painting step is missed and the mesh exported without groups (or some vertices are missing weight values or group associations), imported into Studio these vertices will appear locked in place rather than articulate with the avatar because IMVU automatically assigns Female03MasterRoot as a controlling bone fallback whenever it discovers vertices that don’t have vertex group assignments. In doing this clothing will move as the avatar moves around the scene but won’t articulate as the character animates and moves because meshes will then be weighted to Female03MasterRoot.
If vertices are missing weight or group assignments IMVU auto-assign Female03MasterRoot as the control bone.
Meshes need to be ‘bound’ to the avatar, which controls how the deform, and secondarily so they export correctly.Clothing Bones
Once a mesh has been made it needs to be linked to the avatar. This is done using the Clothing Bones skeleton that acts as a proxy rig for weight painting. To enable it click the Show Clothing Bones button. If the clothing or accessory mesh is already bound to the avatar, with Clothing Bones now visible weight painting can then be carried out.
Important: Black mesh in weight paint… [more]
Design note: When to use Clothing Bones… [more]
The Clothing Bones skeleton is used for weight painting meshes to the avatar to they articulate properly when the character moves.Clothes Testing
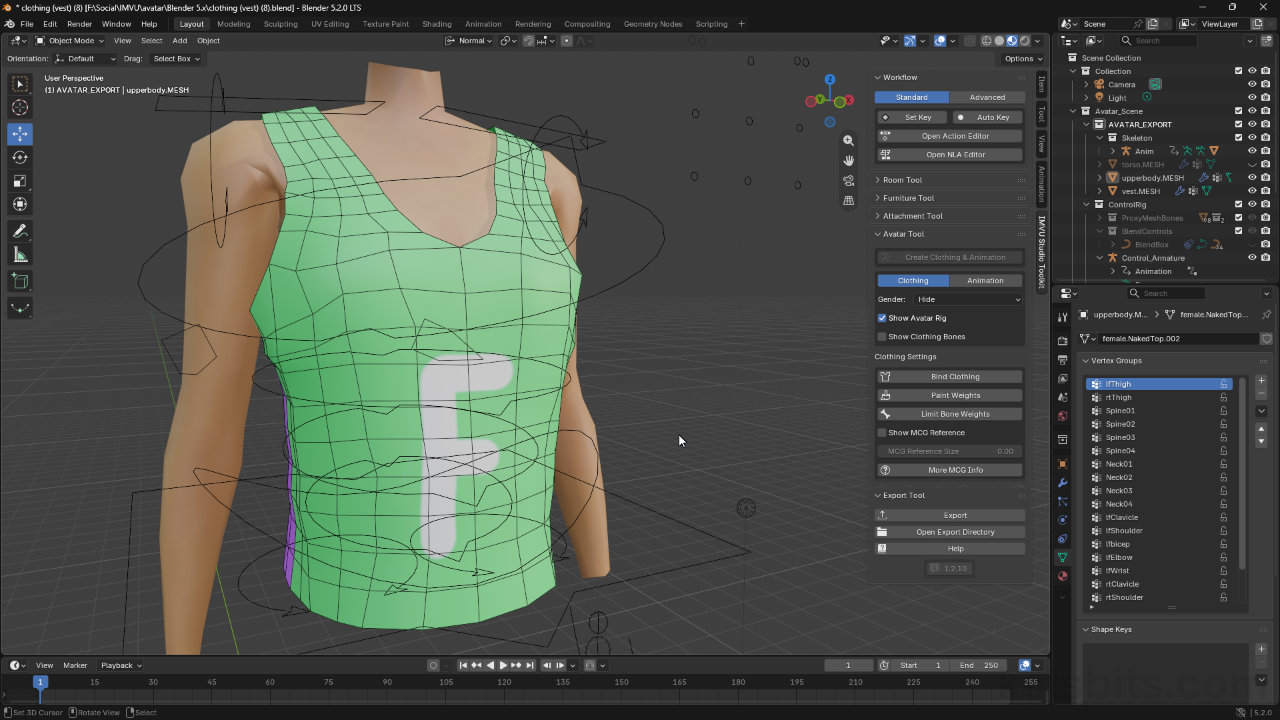
As clothing and animation functions are combined into a single tool, because the underlying rig controls both clothing and animation skeletons, to test how well clothing deforms against the avatar, a mode or context switch is necessary. Once the mesh has been bound to the avatar, in the toolkit enable Show Avatar Rig. The ‘pose’ rig will be displayed – a series of ‘wireframe’ objects and shapes. To then pose or articulate the avatar and clothing, make sure the ‘pose rig’ is selected and from the main interaction mode selector upper-left, switch to Pose Mode. The pose rig will change from being a uniform orange wireframe to one in which the wire shapes change colour. The rig can then be posed by selecting an individual ‘wire’ or coloured control object, and moving it. This moves the avatar and any bound clothing or accessory mesh based on how they have been weight painted.
Important: Where did the Pose button go… [more]
To then address deformation issues, toggle out of Pose Mode back into Object Mode (mode selector upper-left again), and then from there, (re)select the clothing or accessory mesh and click the Paint Weights button – re-enabling Show Clothing Bones may be necessary.
Design note: Resetting the avatar pose… [more]
Re-editing weight values does not specifically require the avatar to be reset into its default position as, ideally, the pose should be maintained so the effects of weight adjustments can be seen immediately – vertices will reposition themselves relative to the vertex group and controlling bone. If a pose does need to be cleared, while Pose Mode is active, from the Pose menu select Clear Transforms, then All – Pose » Clear Transforms » All (alternatively Alt + G clear transforms, Alt + R clear rotations, Alt + S clear scaling). This can be done for individually selected bones, or the entire rig (A).
Clear pose data to reset the avatar using Clear Transforms from the Pose menu (Pose Mode active).
Toggling into Pose Mode to be able to test clothing (or accessory) articulation as the avatar is posed and moved.Layerable vs. Replacement
Clothing can be set up for use in IMVU in one of two ways;
• Layerable – layers on top of existing items.
• Replacement – replaces existing items and body parts.In Blender this means the export prep differs between the two slightly to ensure the resulting items work properly in IMVU.
Layerable Items
For layerable items, products that can be used in conjunction with other clothing or accessories, they are exported on their own, as is. To ensure this, once bound and weight painted to the avatar, the mesh (or meshes) to be exported must be inside the AVATAR_EXPORT collection in the Outliner. From here, it’s then just a question of clicking the Export button in the toolkit.Replacement Items
For replacement items, products that override existing content, typically a body part that includes another mesh element, models need to be exported alongside an existing body part else avatars appear missing arms, legs, etc. in IMVU. To ensure correct assembly, once bound and weight painted to the avatar in Blender, clothing and accessory meshes need to be inside the AVATAR_EXPORT collection in the Outliner. For the additional body part elements, with avatar visible select and duplicate the part that’s needed, Shift + D, and move into the same AVATAR_EXPORT collection. Select the duplicate and rename something appropriate. Once done, use the Export button to export clothing/accessory and body part to the same FBX file.Important: Moving object between collections… [more]
Everything in the scene sits inside a Collection. The root is Scene Collection. For export however, content in this location won’t work, they need to be in a different collection named AVATAR_EXPORT so the toolkit can properly process the data. In the Outliner this can be done simply by click-dragging a selection into the correct collection, or by pressing the M key and selecting AVATAR_EXPORT from the list – M also works from within the 3D viewport so long as the mouse cursor is over the view.
Blender tends to drop objects into the root collection, Scene Collection. For IMVU this won’t, objects need to be moved into AVATAR_EXPORT. This can be done in the Outliner or 3D viewport pressing the M key.
Once a clothing or accessory item has been made it can be exported as a layerable or a replacement item depending on how the product is to be used.Studio Import
Depending on the type of product being assembled in IMVU Studio, import differs slightly between layerable and replacement items and how that relates to the avatar Mesh IDs used to augment or replace existing body parts.
Layerable
During import of layerable items the Skeleton & Mesh section will display the list of meshes discovered in the incoming FBX. Here, click the drop-down next to the mesh part and set a Mesh ID to a number greater than 12 – numbers below this are reserved as default avatar and item parts, overriding these for layerable items results in missing body parts.Replacement
For replacement item imports that include body parts, the MESH section of Skeleton & Mesh displays a list of found parts, at least one of which will be assigned a named body part, i.e. “[2] chest and arms“, based on what the product is derived from – Empty Female Upper. For remaining non-body part meshes, the actual clothing items, ensure each respective Mesh ID is greater than 12 to prevent overriding the default character parts.Design note: Mesh IDs and Derivables… [more]
IMVU Studio auto-assigns Mesh IDs based on the product being derived from, e.g. using Empty Female Top implies the upper torso (upper body and arms) is being replaced so Studio sets the corresponding ID to the first mesh discovered. This may not always be an actual body part so some correction may be necessary.Default body part Mesh IDs*
0 – Head
1 – Hair
2 – Chest & Arms
3 – Right Hand
4 – Left Hand
5 – Abdomen & Hips
6 – Left Leg
7 – Right Leg
8 – Left Foot
9 – Right Foot*although the list assigns 0-9 (10 IDs total) to existing body parts, one or two other IDs are sometimes allocated to other IMVU originated products so care should be taken to ensure derivation is from an ’empty’ rather than a ‘occupied’ item, i.e. Empty Female Top, Empty Male Hair etc., products that have no dependencies.
• Community derived Mesh ID list
An additional list of Mesh IDs used for products is also available but this is an informal initiative generated over time by the Creator Community itself, support for which is largely voluntary.
When creating a product in IMVU Studio be sure to derive from an ’empty’ product that have been stripped of any asset dependencies.
IMVU uses a numerical ID to determine what incoming assets are in relation to the avatar – 1 > 12 are parts of the avatar and default items, 12 and above are unassigned and safe for custom meshes.


Timestamps
Times are approximate;
– 00:00 : Intro & Setup
– 02:00 : Clothing Bones
– 04:00 : Weight Paint
– 07:00 : Avatar Rig
– 10:00 : Export Collection
– 14:00 : Body Parts
– 19:00 : Studio Assembly
– 22:00 : Missing Skin
