Toolkit – Partial Pose (+ Accessory)
Table of Contents
Description
The IMVU Toolkit for Blender is designed to make it easy to make avatar poses for the male and female avatars. Both static, or statue, and animated poses are possible, and depending on the pose itself, will typically affect the entire skeleton. Partial poses, that is poses that only effect certain bones or parts of the avatar, are possible but require a slight change in approach.
Duration: total c. 20 mins (00:20:00).
Info: 1080p.
Suitability: Beginner+.
Source: KatsBits – Partial Pose (+ Accessory) (c. 15 MB | *.blend, *.fbx, *.png).
Product ID: Lollypop Lick (PID 73222835).
Download: IMVU Toolkit for Blender.
Design note: additional considerations setting up Accessory items with partial avatar poses;
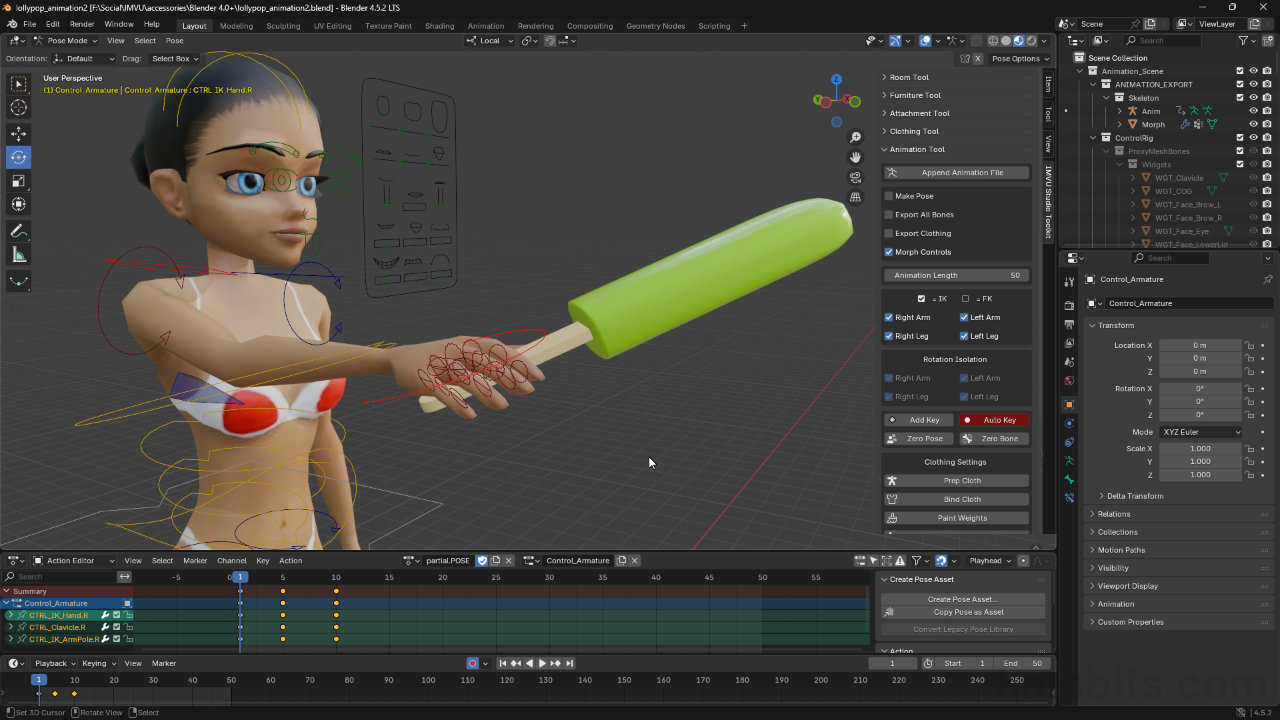
Timeline Scrubber
The timeline scrubber should be at frame “1” by default [1]. If not click on frame 1 in the timeline, or click-drag the widget into place, then pose the avatar. If Auto Key [2] is enabled every time a pose control element is moved into position, in the timeline, a ‘pose’ marker appears in the corresponding ‘bone channel’ – one channel per bone/control. The timeline scrubber can then be moved to another frame and the pose process repeated.
Make sure the Timeline scrubber (widget) is at frame 1 [1] (click or click-drag) and enable Auto Key [2] to have Blender automatically mark poses to the timeline.Action Setup
In essence, to export a partial pose the Action is treated as though it were a fully custom avatar animation, the difference just being the number of bones marked to the timeline, and the composition of the sequence;
• Frame #1 – avatar pose
• Frame #5 – duplicate pose
• Frame #10 – resetIt’s important then, to make sure that only the affected bones (and bone channels) are shown in the timeline. This then replicates the FBX export setup of the Make Pose feature while forcing a standard avatar animation to be generated, i.e. only the bone channels and keyframes marked to the timeline [3].
Make sure the timeline is set up the way the Make Pose feature works by duplicating and resetting the avatar.Base Derivable
Any product that includes any degree of avatar pose with a mesh, so a partially posed accessory as is being done above, a clothing empty [4] should be used as the base derivable, the product derived from for assembly in IMVU Studio. Typically any of the male or female empty’s can be used; Empty [F/M] Top or Empty [F/M] Bottom – Empty [F/M] Shoes is generally not used for ‘clothing’ items although it can be – this is a matter of preference and derivation chain. This is important because it grants access to the avatar skeleton while accommodating the addition of a mesh, similar to a project being a clothing item.
Accessory items that include an avatar pose need to be derived from a ‘clothing’ item – typically an ‘Empty’ [4], a product that essentially grants access to the avatar skeleton, else the avatar pose may not work.Mesh ID
Because a clothing file forms the basis of the derivation, a Mesh ID [5] needs to be set during import of the mesh FBX file. This MUST be 12 or above so as not to conflict with normal clothing items or avatar body parts – “0” and “2“, the IDs normally used for Accessory/Attachment items, conflicts with “[0] head” and “[2] chest and arms” in this context, meaning, when the item is worn avatar clothing or body-parts will disappear.
Because a mesh is being imported as part of a product, and the base derivable is a clothing item, a Mesh ID [5] needs to be set that doesn’t conflict with the default body parts. This should be “12” or above.


Timestamps
Times are approximate;
– 00:00 : Overview
– 01:00 : Accessory Setup & Export
– 06:00 : Pose Setup & Export
– 15:00 : Studio Import & Assembly
