Brush Volumes, Brush-Based Terrain Entities & megaTexture (idtech4+)
With Quake Wars the advent of a new terrain system called ‘Mega Texture‘ is being implemented which allows artists much more freedom to create outdoor (or indoor) environments that are more visually sophisticated than ever before.
Gone are the days of only being able to blend two textures at a time, gone are the days of trying to get the terrain mesh density correct to give nice blend details, and gone are a myriad other things that made making terrain ‘the old way’ difficult. The upside; anyone that could use Radiant and write a shader could build a terrain. The downside; terrain made like this took considerable skill to perfect and still look realistic.
The advent of mega texture changes all this; the upside is far greater creative control over how a terrain looks visually; the down side is that Mega Texture terrain’s can only make use of 3D models created in programs like Blender 3D, 3DS Max, Maya, Lightwave et-al. This presents a fundamental problem for mappers – the general thought is that making levels for Quake Wars will be a ‘locked out process’ unless they can learn and use a 3D application.
This isn’t wholly true, and as will be shown below, level designers still have options when it comes to creating terrain’s for use with Mega Textured games (this is actually a good way to quickly generate a terrain for use in any game that requires the placement of a terrain ‘model’).
General Q&A On Terrain & Mega Texture
-
Q : Can I Use My Old Terrain Mesh?
A : YES
Brushwork needs to be converted over to a model format so that it can be imported into the 3D application and further worked on or UVW mapped, textured and re-exported out to the correct format.
-
Q : Can I Use A Terragen Generated Terrain?
A : YES
How the terrain mesh is actually built doesn’t matter so long as it is able to be exported out to a format that can then be brought into a 3D modeling applications like Blender 3D.
-
Q : Can I Make A Mega Texture Terrain Using GTK Radiant?
A : YES
As above, how the terrain is made doesn’t matter, it just need converting to a 3D app friendly format.
-
Q : Can I Use Normal Brushes For Terrain?
A : YES
It’s best for all brush based objects to be broken back down into ‘world’ entities, i.e. the func_group or func_static role played in Quake 3 (game) terrain needs to have all references to ‘terrain’ removed.
-
Q : Can I Use Patch Meshes To Make My Terrain?
A : YES
As above, patch meshes need converting to a suitable model format for use.
Basic Principles, Making A MegaTexture Terrain From Brushwork
As you may have guessed or realised from the information above, the terrain’s used in games like Quake Wars are built from 3D models. Because of the way Mega Texture works it needs a more uniform texture map than is normally supplied on brushes, this is done via a UVW map applied to a collection of triangles (‘tris’ / ‘polys’) rather than individually as with brush objects.
With this in mind how the terrain is initially created doesn’t matter so long as the end result is a UVW mapped model in ASE or LWO format (terrain models are usually ASE format; because it’s a text based format it’s easier to change texture and file paths than with the binary compiled LWO format which can only be reopened, reedited and re-exported for changes to be made). This means that a mega texture terrain object can be initially built using GTK Radiant and brushes or patch meshes.
BUT, the brushes, patches or brush based terrain entity cannot be directly used in mega texture terrain, they need converting into a 3D model.
Converting a brush or patch based terrain mesh or entity into a model is exactly the same as converting any other type of brush object into a model, so read the following tutorial for extensive details on how this is done; the fact that this is a ‘terrain’ makes no difference to the conversion process.
Design note: If you have access to Doom 3 or Quake 4 you can import or build your brush mesh in the respective editors and export them out as *.OBJ models. Also GTK Radiant 1.5 also has a ‘brush2OBJ’ exporter. "editWorld", the level editor for Quake Wars also has the ability to export selected objects out to either ASE or OBJ files;
"Something to look forward to in editWorld: you can select your brushes (or patches, or models), enable model optimisation (Selection->Export->Optimise Models), then export to OBJ or ASE (Selection->Export->To ASE/To OBJ.) That will run the selection through a BSP process and triangle optimisation, just like the level compiler uses, before outputting the model". [quote jRAD from Splash Damage]
To summarise the tutorial;
-
The terrain object is built using brushes, any ‘entities’ are stripped out of the map and any brush based entity objects are broken back down into either ‘world’ objects or the key/value data applied to the group is removed. Only ‘valid’ func_groups and world brushes are processed.

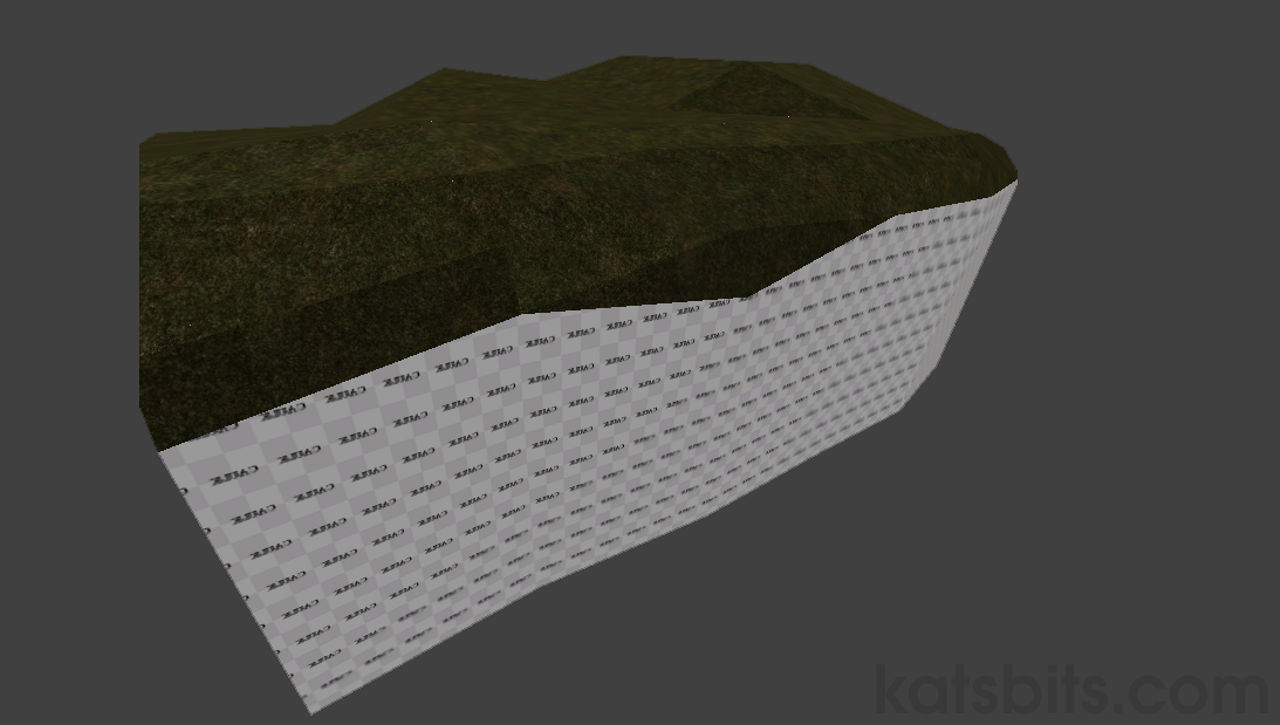
Terrain object that will be converted to ASE : Surfaces that are needed are covered with a texture; anything covered in caulk (‘white’ texture in this case) will be ignored by the compile process.
Key/Value entity settings : B before the brush section can be exported, to avoid error messages it’s best to remove any entity key/value pairings
Valid entity values : Func_groups and ‘world spawn’ entities (‘raw’ brushes) are generally the only valid objects that will be converted to ASE.
-
info_player_start is place in the scene and the area needed to be exported is surrounded in a caulk hull box; it must seal the area required.
Caulk hull and info_player_start : Surrounding the terrain mesh in a caulk box and placing in an info_player_start; both are required in order to get a functional ASE model from the terrain mesh section for use with Mega Texture later on
-
Map is saved and then a BSP file is compiled.

Loading the saved map and basic compiler settings : Although compiling maps can be done from a *.BAT file, many find it easier to use a GUI front end such as Q3map2Toolz. The *.map file is selected and a BSP only compile is done to it to get just a BSP file.
-
The compiled BSP is then recompiled using the "-convert ASE" switch to convert it into an ASE model. This will produce a usable ASE model that is ready for further work in a 3D application.

Compiling the BSP to ASE : Selecting the BSP, the result of the previously compiled map, and altering the compiler settings to convert the file out to ASE.
Converting a map into an ASE model : Using Q3map2Toolz to convert the terrain map section into an ASE model using the "-convert ASE" parameter.


Once you have and ASE model from the conversion process, it is, in theory, possible to use that mesh ‘as is’ for a mega texture terrain; it’s not advised this be done however because the texture (UVW) mapping applied to brushwork is often not efficient or optimal for the requirements of a model (and mega texture). This mean further work is necessary in a 3D application.
Importing, UVW Mapping & Re-Exporting The ASE Terrain Mesh
This next stage can be a bit overwhelming but as the mesh only really needs one or two things doing to it before export, it’s thankfully a rather painless process. This part of the procedure is as follows;
-
Load the ASE import script and import the mesh

Importing the converted brushwork ASE : The brushwork that was converted into an ASE model using Q3map2 is imported into Blender 3D for further work. Notice that there is no smoothing applied to the mesh by default. Also be aware that the model map import in sections which need to be connected.
-
Apply a material to the mesh (along with a place holder texture image)
Applying a material to the mesh : Meshes need materials applied before then can be fully exported; an ‘undercoat’ of paint before the ‘top coat’ (the texture images) is applied. The material applied to one of the sections of the imported ASE model.
-
Apply a straight forward UVW map to the mesh
UVW mapping the mesh : The mesh needs to be UVW mapped relative to it final state in game so that means connecting any sections into a single solid shape before UVW mapping. Once connected the UVW map can be done and adjusted relative to the look being sought.
-
Load the ASE export script and export the mesh out as an ASE model object
Exporting the ASE model : Once the UVW map has been applied and the object re-centred based on it’s final position in game then it can be exported back out to ASE. This should produce the basic underlying mesh that’s used for a Mega Texture terrain.
Amending imported ASE model : Once the ASE model is imported a new material, texture and UVW map is applied. Once done the mesh is exported to ASE our from Blender ready for use with Mega Texture


The ASE model that’s created at the end of this process is then ready for use as a mega texture terrain.
Conclusion
Although brushwork can’t directly be used to create terrain for use with Mega Texture, it can form the basis from which the underlying model can be made so if you must use brushes then this is the best way it can be done.
This means level designers can use GTK Radiant and other brush based editing tools to create an initial terrain ‘object’ from brushwork and/or patch meshes, which need to be suitably prepared by caulking unwanted faces, with that then simply being converted into an ASE model using Q3map2; this is what’s needed, this model converted from the editing tools, it’s this model that Mega Texture is then built upon using the Mega Gen tools.
Essentially all that’s being done, once this is imported into a 3D app, is to apply a UVW map it means that mappers not overly familiar with 3D software don’t have to worry to much about other things specific to create a mesh from scratch. Some basic understanding of 3D app’s is going to be required, Blender 3D is used in this instance because it’s free and legal (as well as being powerful and more than suited to the job at hand).

