Transparency in Blender
There are two basic approaches to making objects and surfaces transparent in Blenders 3D View (real-time transparency); one is to use a bitmap image with an alpha-channel component, the other by changing a given Materials ‘alpha’ properties. The difference between the two relates to the way transparency behaves; the former allows for greater control over individual surfaces; the latter for more global application to objects (although there is a certain amount of cross-over).
The following tutorial discusses both approaches as a means to properly display transparent objects and surfaces in the 3D View as relates to production for games and other real-time content – transparency as used for rendering static images requires a slightly different approach so is not covered in the below. Additionally an understanding of Blender and making or editing materials is necessary (even if just at a basic level). It may also be helpful to have a bitmap image with alpha-channel available whilst reading/working through this tutorial on transparency (see sample file if not available).
Transparency & Context
How transparency is used largely depends upon a given projects requirements; making game or other types of ‘real-time’ content usually necessitates using a slightly different approach to 3D View transparency because the outcome is generally different to that of static or ‘off-line’ rendering. Being able to see some form of transparency then, preferably "WYSIWYG" ("What You See Is What You Get") and real-time, is important because it helps the production process by removing or mitigating the amount of guesswork otherwise might be employed when trying to figure out what a particular transparent surface is supposed to look like.
With this in mind then, and as briefly mentioned in the introduction, the two main approaches to correctly displaying transparent objects and surfaces in Blenders 3D View are; 1) using images, or 2) using materials (neither necessarily being mutually inclusive). Whilst both use an "alpha" property of some sort, they differs in that the former relies on UV mapped images – transparency then being determined by the accompanying alpha-channel of the bitmap. Whereas the latter relies on specific Material properties that can also be set to ignore or override any image based alpha data that might be present.

Transparency based on the alpha-channel of a bitmap assigned to surfaces through UV maps allows the same texture to be applied to difference surfaces without the need for any underlying Material (with Blender version caveats – see below)

Alternatively transparency based on Material ‘alpha’ does not rely on textures and can be assigned to Objects without the need for complex materials containing image references
Viewport Shading
Before setting up transparency in Blender ensure the 3D Views "Viewport Shading" property is set to "Texture" mode, "Alt+Z", else feature won’t display correctly – this is especially so when using Material based alpha as that set-up is not predicated upon the presence of images, or their being mapped to objects in the scene or to a given Material (see below).
Design note: "Texture" viewport shading mode is referred to as "Textured" mode pre Blender 2.60, but is still accessible from the same location, the "Viewport Shading" selector in the 3D View menu Header.

When a texture is applied to a mesh, by default it’s rendered within the scene without any form of transparency even though the image assigned to the Material itself has an alpha-channel (as a 24bit RGB+A source file). The image above shows the Scene in "Textured" ("Texture" mode in Blender 2.60 and above) viewport shading mode, "Alt+Z", and with "Wire" outline active to distinguish edges
Alpha Channels & Images
Before using image based transparency in Blender it’s important to make sure textures have an "alpha channel", are in a format supporting the feature – typically rgb(a) TGA, BMP, TIF or similar, and that Blender can use said image. How this is achieved will vary depending upon the image/photo editing software used, but should result in a what’s commonly referred to as a 32 bit image, that is a 24 bit ‘red/green/blue’ image with an additional 8 bit ‘alpha’ channel (24 + 8), the latter being the component that determines the necessary levels of transparency.
Design note: alpha-channelled textures are sometimes referred to as "32bit images". This is slightly misleading because true 32 bit images are in fact the "CMYK", "Cyan", "Magenta", "Yellow" and "Black" colours of printed materials (colour brochures, books etc.). "32 bit" in this context, games, means four channels of eight bit depth, i.e. one each of "red", "green", "blue" and "alpha" (8 + 8 + 8 + 8 = 32), all of which represent a saturation value from full (single) colour, 100% red for example, to no colour (black). When saving or exporting images from an image editor then, be sure to double-check the correct type of "32bit" image is being used before preceding otherwise transparency will fail in Blender (and elsewhere). Although most image based transparency is generally facilitated through the use of bitmaps with an embedded alpha-channel component, it’s also possible to create Materials that use separate ‘mask’ images for transparency – the grey-scale )or black and white) values of the image are interpreted as alpha values; white equates to full opacity, black full transparency, with varying degrees in between represented by the different ‘grey’ values. The advantage is in the mask image being a full 24 bit image in its own right, making for greater tonal variety and complexity than an embedded 8 bit alpha.

The tutorial texture in GIMP showing the alpha channel in the main view and the separate ‘channels’ in the "Channels" panel to the right

The same texture in Corel Photo-Paint showing the red tinted visual aid in the main window and the individual channels in the "Channel" list on the right (alpha-channel selected)
Material Transparency with Alpha
When setting up a material for use with transparency the bitmap with alpha-channel should be loaded into an available "Image" slot within "Texture" properties as normal, and applied to the objects UV map from within the "UV/Image Editor". Once done a number of settings can then be changed.
Design note: for more information on using Blender Materials system click here, and to understand UV unwrapping click here.
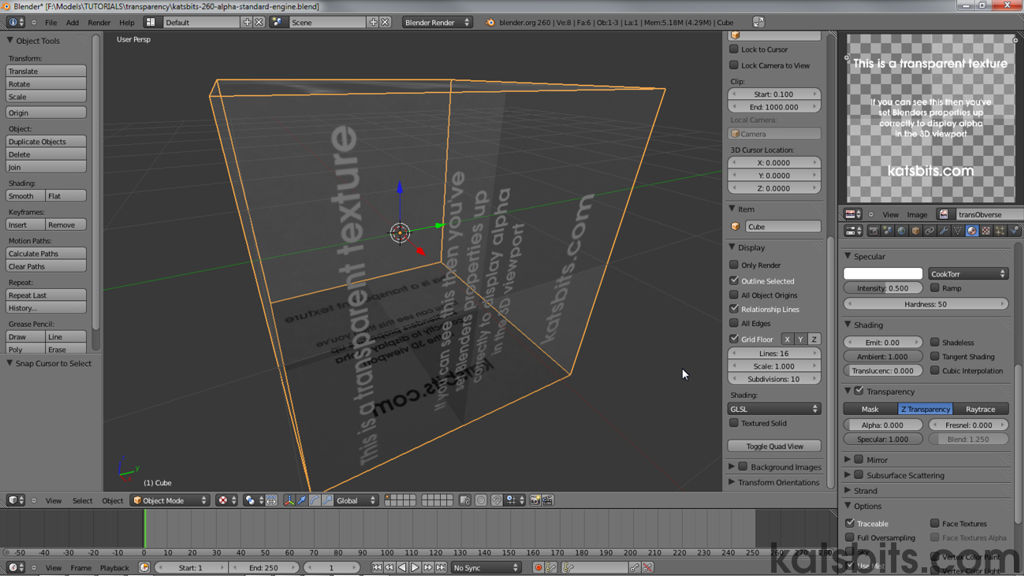
With the basic Material available, click the "Material" properties button[1]. Scroll down to the "Transparency" subsection and click the check-box[2] to the left of the heading. This activates the feature. Click the arrow to the left of the checkbox to expand the options if not already shown and ensure the "Z Transparency" button is selected (highlighted blue/default state), click to select if not. In the "Alpha:" input field[4] change the value from "1.000" to "0.000" ("Alpha: 0.000") – either "Ctrl+LMB" click in the data input field and type "0", or "LMB+drag" the area to ‘slide’ the value to "0". Immediately upon doing this the "Preview"[5] window will show a completely transparent sphere (with default specular highlight visible).
Design note: this initial step essentially activates the ‘transparent’ property and makes the Material slot of the material transparent so none of its properties subsequently interfere with the Texture slots image, else the diffuse colour might be visible in areas not masked by the textures alpha-channel.

In "Material"[1] properties, activating a number of parameters under "Transparency"[2], namely the "Alpha" value[4] which then ‘forces’ the "Texture" stage of the Material to use the alpha channel present in the source image[5]. However, the texture itself is still rendered in the scene ‘opaque’[3]
Once the Materials initial properties are set the next step is to add a "Texture" slot. Click the "Texture"[1] properties button (to the right of Material properties) and either select the pre-existing slot if available, or click the "+" button below the "Texture List" window, and to the right of the "Texture ID" input box, to add one. Scroll down to the "Influence" subsection and under "Diffuse:" click the checkbox to the left of "Alpha:"[2] to activate that option. Leave the value at "1.000", i.e. "Alpha: 1.000"[3] – this instructs Blender to treat the tonal values of the bitmaps alpha-channel as is.
Design note: the Material assigned to the Scenes default cube tends to have an associated ‘Texture’ slot by default; depending upon the version of Blender used this may not be the case however. If one is not available, Texture properties is blank when clicking the button, add one as per the above by clicking the "+" directly under the Texture list window and to the right of the Texture ID input box.
The final step is to add an image with an alpha channel component. Whilst still in "Texture" properties, click the drop-down list to the right of "Type" (directly under the Texture ID input box) and select "Image or Movie" from the list of options (changing it from the default "None"). Scroll down to the "Image" subsection and under "Source:" click the "File" icon to the right of the input field, this opens the "File Browser". Browse to and select the image to be added then click "Open Image" to load in the bitmap and be returned to textures properties with the file now loaded into the Material.
Design note: for more comprehensive instructions on setting up and working with Materials in Blender read the "Materials, Textures and Images" section of the getting started with Blender tutorial.
Depending upon the version of Blender used, the above should have the Object appear transparent in the 3D View as determined by the bitmaps alpha-channel and its UV map assignments. If this is not the case, it means a change to the material system and rendering engine may be needed. This is done through "Material mode" and "Render Engine".
Design note: generally speaking setting up a Material as described above should have an alpha-channelled texture appear correctly in the 3D View without additional steps in most versions of Blender 2.50 through 2.59. For Blender 2.60 and above, up to and including the latest versions, changes to the Material systems (as discussed below) may require additional steps, else transparency might not work correctly.

In the materials "Texture"[1] options, under the "Influence"[2] subsection, activating "Alpha:1.000"[3] is needed, again to properly force Blender to render transparency in the 3D View based on the bitmaps alpha-channel rather than the overall Material. Note however, the image may still displays ‘opaque’ at this point depending on the version of Blender used so additional steps may be required
Material Mode Shading & Transparency
If Objects in the 3D View still appear without transparency it may mean Blenders "Material mode" system needs to be changed.
Design note: each of the "Material mode" subsystems changes the way Blender handles transparencies in relation to the editing and rendering environment.
To do this press "N" to display "Transform/View" properties. Scroll down to the "Shading:" subsection and then click "Multitexture" to access the "Material mode" drop-down menu. From the list select "GLSL". Immediately upon doing this all transparent surfaces in the 3D View should display properly relative to the bitmaps alpha channel and the associated Materials assignment. If this still doesn’t work it likely means Blenders "Engine" (render) mode needs to be changed.
Design note: if textures don’t update check "Viewport Shading" mode is set to "Textured" (or "Texture" in Blender 2.60 and above), "Alt+Z" , then go back over the Materials settings to make sure nothing has been missed. In addition, double-check the texture actually has an alpha channel present and is assigned to the Objects UV map (and that is unwrapped).

Once Blenders "Material mode" is changed to "GLSL" Objects should appear transparent in the 3D View based on the alpha values of the image mapped to the Material and object (UV mapped)
Texture Face & Transparency
So far transparency has been discussed relative to the application of Materials and their respective properties determining how it behaves. Alternatively textures (images) can be assigned directly to surfaces without the need for complex underlying Materials, so long as they are applied to a UV map.
Design note: normally a Materials properties control (bitmap) image associations so a full material is often required to have a "Material", "Texture" and "Image" slot (into which the bitmap is placed). Assigning the image directly using the UV/Image Editor bypasses this completely so transparency has to be engineered to function in a different way.
There are a number of advantages to doing this; transparency can be managed per-face rather than per-material assignment; and depending upon application, can reduced the performance hit associated with extensive use of transparency.
Design note: performance hits tend to occur when using transparent surfaces as a result of excessive ‘overdraw’, the constant re-rendering of a the Scene to account for varying layers of transparency and what can be seen through each, especially when using "GLSL" ("Multimaterial" is preferred).
The way to facilitate this approach is to use Blenders "Texture Face" properties.
IMPORTANT: in Blender 2.50 up through Blender 2.59 "Texture Face" continues as it was in Blender 2.49. For Blender 2.60 and above, including latest versions, see section below for more details.
To use "Texture Face" first UV unwrap the object and select a face. In the "UV/Image Editor" click the "Image" menu option then select "Open Image". In the "File Browser" that opens choose the image to load and click "Open Image" top-right. Blender will return to the UV/Image Editor. As a UV was pre-selected, loading in an image should automatically assigned it, if not select a face on the Object and then click the "Browse Image to be Linked" button in the UV/Image Editor. Select the image just loaded from the list. This initial step simply loads in an image (with alpha) and assigns it to a select surfaces UV map.

Using "Texture Face" properties allows transparent textures to be applied directly to surfaces without the need to use Materials, but allowing for different types of alpha based transparency (basically a clip mask or blended alpha) – simply assign the alpha-channelled image to selected UV’s/face via the UV/Image Editor then set the ‘type’ of transparency (see below)
With a surface still selected, next click the "Object Data"[1] properties button and scroll down to the "Texture Face"[2] subsection. Here change "Transparency:" to "Alpha"[3] or "Clip Alpha" as needed – the selected face should immediately display as transparent in the 3D View[5] based on alpha channel values present in the image.
Design note: it’s important to note that "Texture Face" transparency can only be assigned to individual ‘surfaces‘ at a time (not ‘group’ assigned), irrespective as to whether that’s a single "triangle", "quadratic" polygon or "Ngon", as there is no "Copy (to all)" feature as was previously available in Blender 2.49. To make selecting faces easier and quicker use "Ctrl+Tab" to switch "Mesh Select Mode" to "Face". Additionally note that "Multitexture" material mode uses the Scenes default lighting whereas "GLSL" doesn’t, it requires "Lamp" items to be present otherwise objects appear black. Furthermore surfaces are opaque by default, transparency will only display when the option is set.
If the surface is to be doubled-sided enable "Two-side"[4], this forces Blender to render the same texture and properties to the reverse side of the face. Deselect the updated surface, select a new one and repeat – change "Opaque" to "Alpha", set "Two-side" where necessary. Repeat the procedure for each surface requiring alpha channel determined transparency.

Textures are rendered by default as being "Opaque"; switching to "Alpha"[3] tells Blender to use the alpha-channel of an image. Each face can also be flagged as "Two-Sided"[4] – the same texture and properties assigned to both sides of the selected surface. Both settings ensure UVW mapped texture appear in the viewport properly[5]

In Blender 2.50 through 2.59, the different "Texture Face" options for "Transparency:" treat alpha-channelled textures as a ‘clip’ masks (interprets colours as black and white, forcing a ‘clip’), an ‘alpha’ mask (grey-scale colours are used), as an opaque surface (ignores any alpha values a texture may have)
Game Settings & Blender 2.60 and Above
Introduced to Blender 2.60 and carried through to all subsequent versions, is a major change to "Texture Face" properties that sees all previously available options grand-fathered in to a renamed/re-tasked Material sub-system called "Game Settings". The change effects the way both alpha channel based transparency and "Two-Side" properties are handled and displayed in the 3D View. With this change, whilst legacy support (backwards compatibility) is provided for old *.blend files, it is no longer possible to edit or add transparency as might have been done in previous versions of Blender 2.59 and below or Blender 2.49 and below, including the ability to set individual faces as transparent as described above.
Design note: the change doesn’t explicitly mean having to use the "GLSL" mode (as discussed above) but it does often necessitate a ‘render engine’ change from the default "Blender Render" to "Blender Game" to ensure alpha-channelled textures display correctly in the 3D View.

In Blender 2.59, "Texture Face" options are available in "Object Data" properties once an individual face is selected in Edit mode – note that "Transparency:" provides the options to change the way surfaces are treated when textured with alpha-channelled images …

… whereas in Blender 2.60, "Texture Face" properties have been grand-fathered in to the new "Game Settings" subsystem available in the "Material" properties stack instead of "Object Data" – essentially many of the previous options have been reorganised in to fewer sub-elements

In Blender 2.70+ although the User Interface changed slightly, specifically the "Tool Shelf", the properties and options for "Game Settings" remain the same – aside from minor formatting improvements, the actual tool features remain the same in terms of function and placement
To set up transparency using "Game Settings" first select "Blender Game" from the upper menu Header[1], this enables the appropriate mode of rendering and makes available the options in "Material" properties – if a Material doesn’t exist, create one and assign it to the object.
Design note: "Game Settings" (formerly "Texture Face" properties) only become available when "Blender Game" render mode is active – they are not otherwise accessible. Additionally, note that Materials do not need the usual accompanying "Texture" or "Image" slot when using this approach to transparency.
Next in the UV/Image Editor, click the "Image" menu and select "Open Image". In the "File Browser" that appears, choose the file to load (with alpha) and click "Open Image" top-right. Blender will load the image and return to the UV/Image Editor. In Edit mode select a face and unwrap it, assign the image previously loaded in the UV/Image Editor. Then in "Material" properties[2] (if not visible click the "Material" button) scroll down to "Game Settings" sub-section[3] (which became available changing the render "Engine" per the above) – click the arrow to the left of the heading to expand the options if not visible. In this new area click the "Alpha Blend:" drop-down menu (which will likely display "Opaque" by default)[4] and select a "Blend Mode" option – typically this will be "Alpha Blend"[5]. Immediately upon assignment the texture will change to display in the 3D View as transparent based on the selected option and the textures alpha channel. If not check the material "Shading" parameter in "View Properties" ("N", scroll down to the "Display" sub-section), making sure to be using "Multitexture" instead of "GLSL".
Design note: "Games Settings" typically works better within the context of replacing "Texture Face" settings if the material "Shading" system is left in the default "Multitexture" mode; switching to "GLSL" typically over-rides the former because it expects transparency to be based on the Materials ‘alpha’ settings rather than simply reading the alpha data directly from the image, displaying it as-is over the UV. When choosing a "Blend Mode" note that "Alpha Blend" generally pays explicit attention to the alpha values present in the bitmap image sourced to the Image slot. "Alpha Clip" tends to treat the alpha channel as a mask, relying instead on a much more black and white interpretation of the alpha values – in affect, the alpha channel is treated as a simple ‘stencil’. "Alpha Sort" changes the order or sequence in which transparent objects are drawn on-screen relative to each other – the process checks to see which objects are in front of others and draws transparency relative to that scenario (cf. "Sort Order" below).

From Blender 2.60, alpha-transparency based on "Texture Face" properties has changed to needing to be set from a new Material sub-section called "Game Settings", where a number of previously ‘local‘ properties that could be assigned to individual faces are now only assignable as ‘global‘ parameters

For Blender 2.70 and above, the minor interface changes (mainly the Tool Shelf on the left) do not adversely affect properties or options associated with transparency; essentially the same options are in the same location as previous
Games Settings & Backface Culling
For double-sided surfaces "Game Settings" grand-fathers in the previous "Two-sided" setting. Now called "Backface Culling" the option still performs the same function, toggling a surface or texture assignment between being single or double-sided.
Design note: double-sided in this context means the same texture drawn to both the inside and outside (front and back) surface of a structure. To draw double-sided meshes with different textures on either side, read the double-sided tutorial.
Note however that like most Game Settings options, Backface Culling is applied per-material, not per-face. In other words where culling or other Game Settings property is used, every surface assigned the respective material will take on that property.
Design note: because Backface Culling is applied per-material, in situations where the same texture is required to perform more than one role, where the application of a single texture is used for both single and double-sided assignments for example, an additional duplicate material will need to be created so one can be culled whilst the other can remain double-sided. In other words, it’s no longer possible to assign this property to an individual surface (face) element as a distinct property apart from a Material, as was the case with Blender 2.59 or below. For more information on making two-sided meshes read click here.

Activating "Backface Culling" forces Blender to draw images assigned to surfaces as single-sided only. In the case of transparency that would mean being able to see ‘through’ an object (nothing appears on the inside)

De-activating "Backface Culling" causes Blender to draw the same texture on the reverse side of a face so looking through an object, the inverted images will be seen through the mesh
Object (Material) Transparency
So far discussion relates to the use of bitmaps where the degree of surface transparency is determined exclusively by the tonal range of an accompanying alpha-channel component In instances where a more uniform appearance might be needed an alternative approach is to alter a Materials properties, by changing their respective "Alpha" value.
Design note: in a nut shell the difference between the two approaches, using images versus materials, has the former facilitating more detailed transparency, they can be patterned, shaped etc., whereas the latter provides a uniform level of transparency across objects and surfaces regardless of there being an image with alpha present.
To change Material alpha create a standard material and assign it to the mesh. Double-check the Scenes render "Engine" is set to "Blender Render" from the main Header menu. Change "Shading" mode to "GLSL" from "Multimaterial" – press "N" to expose "Transform" properties and scroll down to the "Shading" subsection; click "Multimaterial" (the default value) and select "GLSL" from the "Material mode" drop-down list. This sets the Scene and Material basics. Next, changing transparency.
Design note: Material transparency does not explicitly require a "Texture" and/or "Image" slot be present as this technique changes the Material slots alpha; bitmaps are not specifically required and do not need an alpha-channel because that aspect of an image is not being used (when one is loaded).

To set a Materials global transparency rather than using an alpha-channel carrying bitmap, activate the "Transparency" property and change the associated "Alpha" value
With the Material and Scene set up, In "Material" properties scroll down to "Transparency" and click the checkbox to the left to activate, and the small ‘expand/collapse’ arrow to expand the options (if needed). From here note the "Alpha:" property, currently at "1.000" ("Alpha: 1.000"). This single option changes the Materials overall transparency. Click and then drag or type a numerical value between "0.000" to "1.000" to change, completing the process – the 3D View will automatically updates to display object transparency relative to the value set.
Design note: "0.000" is fully transparent – the object is completely see-through; "0.5000" is 50% transparent/opaque; with "1.000" being fully opaque/object has no transparency so cannot be seen through. Ensure "Texture" shading is set, "Alt+Z".

Changes to the Materials "Alpha" value directly reflects the transparency level of the material as assigned to an object. Note that transparency is uniform and not subject to being influenced by the bitmaps alpha-channel when used in this way
Surface Sorting (Draw order preference)
In discussing transparency it should be noted there is a significant caveat to its use where objects and surfaces are seen through one another – surface ‘B’, being transparent, visible through surface ‘A’, also transparent etc. – the compounding effect of which can result in a "sort order" error. Essentially the renderer (or game engine) cannot properly determine the hierarchical relationship between surface layers and how they are subsequently supposed to be drawn to screen, so a ‘fight’ for precedence occurs – objects and surfaces will flash, flicker or be appear improperly stacked as their order is incorrectly determined and rendered.
Design note: "sort order" is also referred to as "surface sorting", "alpha sort", "draw sort", "draw order", "render order", "render sort", and other such terms, depending on the exact context of the problem. Generally speaking however they all typically refer to the same basic underlying process used to work out the hierarchical order object surfaces are drawn to screen – calculating and rendering surface order is important because its the primary process used to render three-dimensional depth on a two dimensional surface (monitor screen), i.e. why something appears to be inside or behind other transparent elements.
The solution to this problem is to ‘sort’ surfaces, to selectively force their render order using Blenders "Sort Mesh Elements" options.
Design note: the flashing and flickering is similar to, but not to be confused with, typical "z-fighting", another type of sort-order error which occurs for a slightly different reason – surface proximity.

Three cubes, each partially occluded inside a parent to show the degree to which "sort order" can be problematic when used extensively – because the renderer can’t properly determine the order of display, surfaces are often treated as if they were opaque and appropriately (but incorrectly) clipped/rendered

A simulation of what should be seen when multiple layers of transparency are drawn to screen correctly – any other suitably treated surface should be visible though others and drawn relative to their relationship with one another and how that then represents scene depth on screen
To force sort order, in Edit mode make individual or group selections of vertexes, edges or faces and then press the "W" key to access "Specials" (not otherwise currently accessible as a menu option from the 3D View Header). From the list of options click "Selected" to assign the property. Depending on the desired outcome, deselect and repeat the process taking care to make selections and assignments in reverse order – the last item/s selected will be preferentially drawn after everything else, in other words it will be on top of other elements.
Design note: several aspects of this feature to note; 1) even though properly applied, Blender may continue to incorrectly render surfaces and their relative relationships to one another; 2) the exact order surfaces should be arranged is not always obvious so a certain degree of trail and error may be required; 3) the orientation of objects within a scene may also have an affect on sort order – whilst the hierarchy may be correct when looking at a scene front-on, it might not be when viewed from the side, and so on; 4) the feature may not be supported where content is to be used outside Blender; 5) sort order issues are not a problem specific to Blender but the way graphics processing generally handles transparency – the reason why it occurs in other 3D applications and games; 6) sort order issues in Blender tend to occur regardless as to whether transparency is based on the presence of bitmap alpha-channels or Blender generated material properties.

To access "Sort Mesh Elements", in Edit mode with a selection made press the "W" key, the "Specials" menu appears, which is not otherwise accessible directly as a menu option

From the "Sort Mesh Elements" options, select "Selected" to force re-order surfaces; selection and application should be done in reverse order so ‘front’ faces should be selected last to ensure the render on top of previous selections
Texture Face Transparency & Blender 2.49
For Blender 2.49 and below transparency is used in similar fashion to the above, it can be controlled through the use of bitmaps with alpha-channel components using "Texture Face", or as a Material "Alpha" value. For the former, "Texture Face", this means image assigned directly to surfaces with alpha but not necessarily with an underlying Material.
Design note: as with the above, although textures with alpha-channels can be applied directly without Materials, if treated items are to be exported for use in a game engine this may cause problems as there is usually an expectation of a proper Material assignment being present.
To apply and control transparency using bitmap alpha, in the UV/Image Editor click the "Image" menu and select "Open Image". In the "File Browser" that appears choose an image with an accompanying alpha-channel component and click the "Open Image" button top-right to load. The view will return back to the UV/Image Editor with the selected texture shown and ready for use. In the 3D View, select a surface or surfaces in Edit mode, "Unwrap" them ("U") and then using the UV/Image Editor, assign the image just loaded to the UV maps. This applies the image to the selected surfaces but is not yet transparent. For that "Texture Face" properties need to be used.

Using the "UV/Image Editor", images containing alpha-channels can be mapped directly to objects without the need to use an underlying Material or any associated properties
With a face selected click the "Editing" button ("F9") and find the "Texture Face" panel (should be grouped with "UV Calculation" and "Multires"). Here a collection of properties and options are shown, including the "Active Face Alpha Blending (Transp)" subsection, which controls the way surfaces are displayed in the 3D View. By default "Opaque" is selected.
Design note: when viewed in "Textured" shading mode ("Draw type:"), surfaces display white in the 3D View absent a Material or image assignment.
To use the alpha-channel component of the UV mapped and assigned image, click either the "Alpha" or "Clip Alpha" button depending upon the desired outcome, i.e. a subtle mask or a stencil. Immediately upon doing this the selected surface in the 3D View will update to match the property set.
Design note: "Clip Alpha" interprets alpha-channel data as simple black and white stencil maps – tones (colour) other than ‘white’ are seen as ‘black’ and shown as clipped transparency. "Alpha" on the other hand reads alpha data as is.

When textures with alpha-channels are applied directly to surfaces without Materials "Texture Face" properties are used to manage surface characteristics and the way transparency behaves – "Clip Alpha" (clip mask), "Alpha", "Opaque" etc.
To duplicate properties to other surfaces, rather than repeating the process of selecting individual faces and clicking either/or Alpha/Clip Alpha button, make a group selection to include the surface just set (select last) and then click the "Copy" button to the right of the "Active Face Alpha Blending (Transp)" heading – this copies and duplicates the assigned properties and options from the ‘active’ face to other members of the group.

Where additional surfaces need to use the same property as another surface, make a group selection which includes the surface from which a particular property is to be copied, then click the "Copy" button in "Texture Face" properties. The group will immediately update with the same property as the ‘active’ element (the last selected face carrying the desired property)
Material +Texture Face Transparency & Blender 2.49
Without an underlying Material, images and their respective alpha properties are difficult to manage when used extensively because faces have to be selected manually – there isn’t currently a way to select images on their own absent a material association/link. This is why Materials are used in combination with Texture Face properties – Materials are assigned to surfaces, textures to Materials, making the latter, when UV mapped, selectable based on the formers application.
Design note: Materials basically contain three individual components; a Material slot, a Texture slot and an Image block. Each can be used for different purposes inclusive of exclusive the other slots. So whilst there are many other reasons for using Materials, data management, i.e. selecting/deselecting elements, is a primary function of their assignment.
If a Material is not available, click the "Material" properties button ("F5" for "Shading" properties) and in the "Links and Pipeline" panel click the double-headed arrow under "Link to Object" and click "Add New". A new datablock will appear. Next click the "Texture" properties button (to the right of Material properties). In the "Texture" panel click the double-headed arrow to select and available slot or create a new one. To the right, in the "Image" panel, click the "Load" button to open the "File Browser". Choose an image (with alpha) to assign then click "Open Image" top-right. This loads the image into the Material, making it available for assignment in the UV/Image Editor, and completes the basic Material set up. Next the image needs to be assigned with an appropriate "Texture Face" property.

Assigning an alpha-channelled image to the Texture properties of a Material, allowing better (easier) management of surfaces – image applied directly to objects via UV’s without an associated Material reference have to be selected individually; they cannot be group selected by ‘type’ or assignment
With the Material basics set up, toggle Edit mode ("Tab") and using the UV/Image Editor, assign the image just loaded to the object (unwrap the mesh where necessary then select the image from the "Image ID" drop-down menu in the UV/Image Editor). Whilst Edit mode is still active click the "Editing" properties button ("F9") and find the "Texture Face" panel. Here in the "Active Face Alpha Blending (Transp)" section click to activate either "Alpha" or "Clip Alpha" depending upon transparency requirements ("Copy" to other faces as needed) to complete the process.
Design note: it should be pointed out here that without the addition of Texture Face properties, the underlying Material won’t display transparent. In essence the Material simply acts as a mean to select images mapped to the mesh, or for adding more complex properties – specular, emission etc.

With a Material assigned, associated surfaces are given a particular "Texture Face" property so when those surfaces are select, based on Material assignment, the alpha-channelled texture is also selected
Material Transparency in Blender 2.49
Transparency behaves differently depending upon the systems render, or "Game", mode. Using the default "Blender Multitexture Materials", image alpha ostensibly controls it. In "Blender GLSL Materials" mode, which is required for material transparency, the aforementioned is controlled by a material alpha setting. The difference allows Scenes and objects to be set up relative to different circumstances, game editing, content for static images etc. For Material controlled transparency the first step is to create a standard Material with "Material", "Texture" and "Image" slots, loading a bitmap image with alpha into the latter. With that done, UV unwrap the mesh and assign the image loaded into the Material by selecting it from the "Image ID" drop-down in the UV/Image Editor.
Design note: objects will display white at this point typically indicating no textures and no UV map assignments.

To set up Material-based transparency a standard Material needs to be created with a "Material", "Texture" and "Image" slot; a bitmap image with an alpha-channel component being associated with the latter (although not absolutely necessary) depending upon requirements
Next switch render mode, changing the Material subsystem used. In the main Header (top) click the "Game" menu option and from the list select "Blender GLSL Materials". The 3D View will update likely displaying the object in greyish tones based on the current lighting scheme, but absent and form of transparency.
Design note: lighting in GLSL mode is determined by the presence of Lamp objects in the Scene, making it dynamic – as opposed to the default Material mode which uses a static three-point lighting system.

To use material-based transparency switch render ‘engine’ ("Game") to "Blender GLSL Materials" from the default "Blender Multitexture Materials" – textures won’t yet display transparent until additional options are set/activated in other properties panels
With the "Game" mode set, in "Texture" properties click the "UseAlpha" button in the "Map Image" panel if a texture has been loaded into the Material, then in "Material" properties ("F5") find the "Material" panel. Here change the "A" ("Alpha") slider at the bottom of the panel to a lower value, e.g. "A 0.500" for 50% transparency – "1.000" equals full opacity, "0.000" fully transparent.
Design note: if the Material contains a mapped image "UseAlpha" generally needs to be activated for it to properly display in the 3D View. Absent image, it can be left deactivated/off, relying instead purely on the Materials properties for transparency (no textures being used).
The Material will still display in the 3D View as opaque but tinted blue. To make it fully transparent in the "Links and Pipeline" panel click the "ZTransp" button from the "Render Pipeline" subsection. The Material will immediately become transparent based upon the previously set ‘alpha’ value.
Design note: the colour tint seen when setting transparency without activating "ZTransp" derives from "World" settings and the "HoR:", "HoG:" and "HoB:" (red, green and blue colour) values. This minor consideration can generally be ignored if Materials are to carry full transparency because it disappears once "ZTransp" is set.

With the basic Material created, its transparency is set using the "A" ("Alpha") option slider in the "Material" panel – it will not display transparent in the 3D View until "ZTransp" is activated
One final, and optional, step is to ‘map’ the previously assigned image to the Materials ‘alpha’, forcing consideration of its alpha-channel component. In "Material" properties find the "Map To" panel (usually grouped with "Texture" and "Map Input" panels). At the top of the section are a series of button, click "Alpha" once. This activate the option and displays the Material in the 3D View with transparency matching the alpha-channel of the associated image.
Design note: most "Map To" buttons can be clicked twice, once for a ‘positive’ outcome, and again for a ‘negative’ (and a third time to deactivate). Doing this with "Alpha" for example actives transparency, when clicked again alpha values invert essentially generating a ‘negative’ version of the alpha map.

Activating the "Alpha" option in "Map To" properties forces the transparent material to take into account the alpha-channel belonging to the bitmap image associated with the Material
Conclusion & Caveats
Being able to see real-time transparency in Blenders 3D View is useful as a content creation tool, and as discussed above can be achieved in a number of ways to suit a projects particular requirements; which should determine the approach used – notwithstanding availability in Blender. And although options and settings may have changed from Blender 2.50 onwards, transparency itself is relatively forward compatible in that transparent objects set in Blender 2.49 will work correctly in newer versions (assuming corrections).

