Gingerbread Man – Animation (#4)
With a fully rigged and prepared character (mesh and Armature) it’s time to turn to creating an animation, in this instance a simple ‘walk’ sequence that loops (a sequence that ‘repeats’ rather than just plays through once). In Part IV of “Make a simple animated Gingerbread character in Blender“, the process of generating an animation is discussed, from switching Editors through to Armature posing and keyframing.
Animation
The basic principle behind animation is relatively straightforward, the challenge is in making the result convincing to the observer. How this is done depends largely on what the sequence is for but generally speaking will tend to use the same basic process irrespective; of ‘marking’ a series of individual poses strategically along a timeline that when played though gives the impression of movement from simple ‘idle’ animations to complex weapons movements or cinematics’. This all essentially breaks down as follows;
- “Timeline” is where most sequence editing and managed takes place and is divided into a series of individual “frames“, typically twenty four for every one second of playback.
- “Keyframe” is a single, individual frame holding the data associated with a given pose of the character.
- “Duration” is the length of the animation in terms of the number of seconds it take to run, and the number of frames played through.
- “Tween” refers to the transitions ‘in between’ “Keyframes” and is what generally carries the illusion of momentum and movement pose-to-pose.
In other words, a sequence of just ten seconds “Duration” running at 24 frames-per-second (fps) will contain 240 frames. If this is marked with just four “Keyframes” it leaves 236 to be automatically “Tweened” by the system. For the most part, animation and sequence editing tends to concern itself with the keyframes and making sure they’re positioned, and contain consistent pose data, to properly guide the ‘tween’ frames, resulting in a smooth running action.

Using the “Timeline” (bottom), “keyframes” markers are added a specific points where the character is posed and when played back create the impression of movement [“walk.blend“]
Pre-animation checklist
Before continuing on to create a sequence it’s important to first go through a basic checklist that prepares the objects for use. The primary reason for doing this relates to the way positional data has a direct effect on the coordinates attributed to bones when posed, that, if discovered late in the process can be difficult to fix, often requiring deletion and rebuild. Before animating then it’s essential to address the following;
Design note: the reason for checking mesh and Armature beforehand is due to the way coordinates for both are relative to the Origin of each; if changed at any point during animation, it can upset the correlation between object and timeline data – the positional coordinate data held for a given keyframe versus what that implies positionally for the objects in the Scene, for example the keyframe data attributed to the ‘root’ bone tends to maintain its position relative to what the user is seeing, but in relation to the Armature object itself the root bones coordinates may differ between “0,0,0”, if its Origin is at those same coordinates, versus “-36,0,0”, if the Origin were located higher up at the Armatures mid-point.
Make sure the MESH is;
- Is fully UV mapped and textured.
- Is ‘solid’ with no splits or holes.
- Correctly positioned at grid centre.
- Correctly orientated, typically facing “Front“.
- Origin is set to “0,0,0” grid centre.
- Vertex groups are assigned to the mesh.
- Vertex groups are properly named.
And then make sure the ARMATURE is;
- Is set to “0,0,0” grid centre relative to mesh.
- Is facing the correct direction (typically “Front“).
- Has properly named bones and vertex groups.
- Bone relationships and hierarchy is properly set up.
- IK’s are assigned to the correct bone/s.
- IK chain length is correctly set.
Design note: if mesh and/or Armature is repositioned relative to their respective Origin points make sure to use “Ctrl+A” afterwards to “Apply” their adjusted object data and fix it in place – this may mean temporarily removing the “Armature” modifier and/or using “Alt+P” to “Clear Parent” associations between mesh and Armature objects (although this latter aspect is not used directly in this tutorial the relationship may be generated automatically as a result of certain functions)..
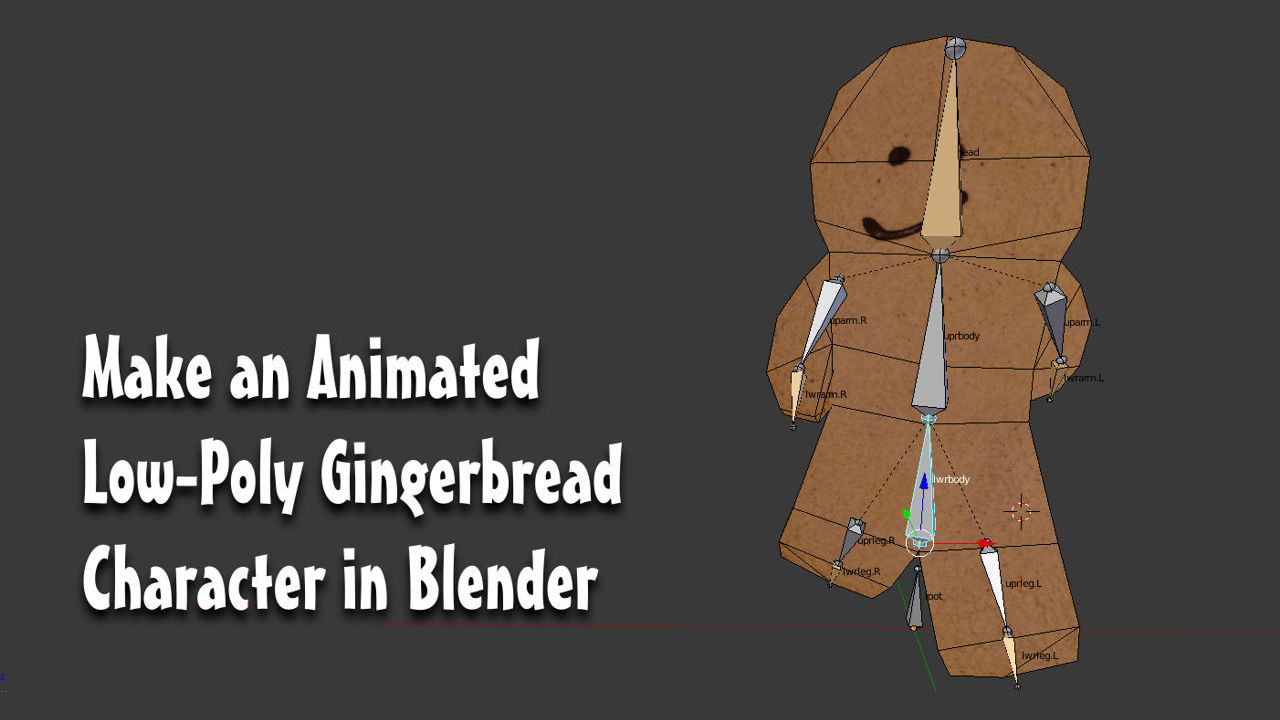
Before starting the process it’s worth activating “X-Ray” on the Armature object so it can be seen uninterrupted by the mesh. To do this “RMB” select the Armature and click the “Object Data” button (illustrated by a spread eagled biped icon). Here in the “Display” subsection click the checkbox to the left of “X-Ray” to activate. The Scene will update to show the Armature visible at all times and from (most) angles.
Design note: activating “X-Ray” doesn’t prevent the Armature self-occluding so in certain circumstances bones positioned behind other bones might not be visible.

Activating “X-Ray” allow the Armature to be seen ‘through’ the mesh making the editing process easier – with the Armature selected in “Object Data“, click the checkbox to the left of “X-Ray” to activate [“walk-start-xray.blend“]
The Action Editor
For content related to games or other types of interactive media, the most straightforward way to edit and manage animation sequences is to use the “Action Editor“. It’s similar to the default “Timeline” in terms of function but differs in that it’s not a ‘stand-alone’ editor, it can only be accessed through the “Dope Sheet“, and it’s ostensibly used for Armature based posed animation (keyed poses), i.e. once the Armature is posed in the 3D View the respective XYZ coordinate data for each bone is keyed (‘marked’, ‘saved’, ‘baked’) to a given frame of the timeline and represented as a simple diamond shaped object that can be adjusted individually or in groups.
Design note: generally speaking the default “Timeline” isn’t used because that animates objects so can operate across a much broader data range and as such is not normally used for game development (except for the internal Blender Game Engine). Note additionally that “editing” in this context largely refers to the ability to move/remove markers along/from the timeline, markers themselves cannot be edited, only the data they contain or is associated with them (see below).
To access the “Action Editor” click the “Editor Type” bottom far left of the “Timeline” Header (running along the bottom of the application and directly under the 3D View). From the list select “Dope Sheet“. The view will change to display another timeline. From the Header menu of this new window, to the right of the text menu options, click the “Mode” selector choosing “Action Editor” from the options available. The view will change once more showing a similar timeline with some minor differences. This is the “Action Editor“; on the left is the “Dope Sheet Summery“, a section that will list bones once they have been marked with pose data; on the right is a timeline into which poses are keyed (marked).
Design note: overall the timeline essentially uses referential data, in other words, bones listed in the “Dope Sheet Summery” can be included or removed without having a direct effect on the Armature itself, bone names are ‘references’ to a physical object, a bone or other object in other words. The same holds true for ‘key’ data attributed to a pose, none of it has any direct bearing on objects themselves so can be changed, edited etc., without affecting the characters components.

The Gingerbread character ready for animating and showing the “Dope Sheet Editor” below the 3D View – a dedicated editor that’s witched to from the default “Timeline“.

Although similar in appearance, the “Action Editor” is used to specifically create/edit keyframed animation sequences – to access simply select “Action Editor” from the “Editing context..” selector in the Header [“walk-start.blend“]
The basics of a ‘walk’ cycle
There are two basic considerations for ensuring an animation correctly loops; 1) both ‘start’ and ‘end’ frames should be the same, and 2) motion should follow-through. Omitting, or not properly setting up one or the other, or both, will mean the resulting ‘cycle’ appearing at odds with respect to what it’s supposed to represent, a walk cycle for example might appear to skip because the ‘return’ action is missing, the legs don’t follow through, or the start and end frames are different.
Design note: looping animations tend to have different requirements that sequences that just play through once, it affects the way figures are posed and the relationship between poses, especially between first and last frame.
Bearing this in mind it helps to break actions (a ‘walk’) down into their basic constituent parts, a walk cycle for example has three; 1) the right step forward (start), 2) the left catch-up and step forward (middle), 3) the final right follow-through and step forward, bringing the action back to the same/similar starting point (end).
Design note: two additional points; 1) depending on the cycle there may not be a lead in, i.e. the character isn’t walking from a standing start but captured (posed) mid-stride. And 2) animation sequences that loop must do so through at least a single ‘start » middle » end‘ cycle (more can be used, often as a means to disguise the start/end transition point).

Although there is a lot more going on, action sequences can generally be broken down into a few basic poses, a walk cycle having a start, middle and end that has a continuous follow-through allowing it to loop properly left to right then back to left
Once the basic poses of a sequence have been broken down the nuance associated with each can be considered, for each step forward for example, the character looks straight ahead whilst the body twists in the same direction as the step, accompanied by a reverse swing of the arms. What this generally means for animating is that each pose and subsequent detailing necessitates several passes at the sequence; it’s often easier to roughly position the core poses – the ‘start’, ‘middle’ and ‘end’ -adding the nuance after the initial structure has been keyframed (marked) into the timeline.
Design note: it’s generally preferable to treat animation like any other aspect of the process and block or rough out the sequence first, this make it much easier to adjust the timing and duration of animation overall before filling in or editing the details.
First however, ensure the Armature is selected and in “Pose Mode” – select that option from the “Interaction mode” selector in the 3D View’s menu Header, or press “Ctrl+Tab” – then in the “Action Editor” timeline “LMB” click or “LMB+drag” the green frame-marker and make sure it’s positioned at frame “1“.
Design note: the number “1” will appear in the small box-out bottom-right of the frame marker/timeline widget indicating what frame its currently on (the number displayed automatically reflects the frame number).
The first pass to make establishes the basic left/right twist of the torso as each leg swaps over. This is done by rotating the lower torso bone, in this instance “lwrbody“, a fixed distance. To do this “RMB” select “lwrbody” press “R” then “Z“, then type “-10” (minus 10) to “Rotate” ten degrees to the left (screen left) locked around the vertical (“Z“) axis. Press “Enter” to confirm. Alternatively activate the “Rotate” widget and “LMB+drag” the ‘blue’ loop a short distance so the character faces to the left of the screen. Release “LMB” to confirm. Although a relatively minor adjustment, this is in fact a ‘pose’ because a bone has been moved with the intention of it meaning something relative to the final action.
Design note: rotational values are displayed far-left side of the 3D View’s Header, whilst all other buttons and options are hidden until the action has been confirmed. Holding “Ctrl” after initiating rotate using “R” or the “Rotate” widget, activates rotational snap, which defaults to “5°” increments.

Using the “Rotate” widget (or press “R” then “Z” to lock around the vertical axis) the lower torso bone, which controls the entire structure, is rotated by “10°” or so – pressing “Ctrl” whilst manipulating the bone snaps to the fixed increments making it easier to align [“animation-pose1(start).blend“]
Once the bone is positioned, with the mouse over the 3D View press “I” (“i” for “Insert” not lowercase “L”), or from the “Pose” menu select “Animation » Insert Keyframe” (“Pose » Animation » Insert Keyframe“), to access the “Insert Keyframe Menu“. From the list of options select “LocRot“, which sets the “Location” and “Rotation” of the selected bone (“Scale” is not needed/always usable) to the Timeline, indicated by a small orange diamond shaped pose marker and an accompanying reference to the bone posed under the ‘summary’ to the timelines left.
Design note: although there are a number of options to choose from when inserting keyframes they are all essentially one or more variants of ‘location‘, ‘rotation‘ and ‘scale‘. For most game related content however, “Scale” is rarely used because bones are typically considered fixed object types in terms of the size and relationships with other bones, in other words, individual bones don’t physically change, only their respective positions (where ‘scale’ is unused).
 data")
Once the selected bone is positioned press “I” to “Insert Keyframe” and mark the pose to the Timeline with “LocRot” data (“Location” and “Rotation” coordinates) -an orange marker will appear where the timeline widget is located confirming the pose [“animation-pose1(start).blend“]
Once the initial pose has been keyed into place, “LMB+drag” to move, or left-click in the Timeline, to set the frame marker widget at an end point, frame “32” in this instance. Then whilst the previously selected bone (“lwrbody“) is still active, press “I” and again select “LocRot” from the list (or alternatively from the 3D View Header menu, again select “Pose » Animation » Insert Keyframe“). Another orange diamond will appear setting the pose in place at frame “32” and defining an initial length to the sequence, “31” frames, with both the first and last frames being exactly the same.
Design note: unless otherwise set, Blender does not default to using frame “0” as the beginning of a sequence so an animations length is typically one frame less-than indicated by the widget position, i.e. if the widget and a pose is marked to frame “32“, the sequence is actually “31” frames long, not”32” as might be indicated by the widgets position in the timeline. This needs to be borne in mine when creating sequences of specific length, in needing to make a “32” frame sequence, the widget and last pose would be as frame “33“.

With the ‘end’ frameset because ‘first’ and ‘last’ are the same, Blender will highlight this fact using an orange strip between the two (this indicates ‘same’ from one to the other and all frames in between) [“animation-pose2(end).blend“]
With the first and last frames in place and an initial ‘duration’ set (length),”LMB” click the timeline or “LMB+drag” the widget to frame “16“, the midpoint between the two and press “I” once more to insert another “LocRot” keyframe (or alternatively again from “Pose » Animation » Insert Keyframe“). This sets a third and final ‘base frame’. However, it needs to be opposite facing (to the right) which can be done in a number of ways depending upon the accuracy desired. To be precise, i.e. have the armature rotated by the same amount but facing the opposite side, in the “Rotation:” subsection of the Properties panel (“N” if not visible) edit the “Y:” value to remove the “–” (minus/negative value indicator). Press “Enter” or click elsewhere on screen to confirm. The Armature will immediately flip to face the other side, and because the pose/bone was changed, press “I” again to re-key the new “LocRot” data and update the frame fixing the pose in place.
Design note: if “Y:” reads as being “Y: -0.174“, edit the value to read “Y: 0.174“, changing a ‘negative’ value into a ‘positive’ one – this is how Blender determines whether something is being rotated to the ‘left’ versus the ‘right’, i.e. counter-clockwise versus clockwise. When re-keying frame data make sure the mouse is over the 3D View else naught will happen.

Depending on preference, for precision the Armature can be flipped using the “Rotation:” values of the “Properties” panel (“N“), simply remove the “–” to ‘invert’ the number changing it instantly from a negative to positive value (left or right rotation) then re-key the frame to lock it in place [“animation-pose3(middle).blend“]
Before checking to see what these three frames look like when played back, in “Render” Properties (click the button on the right illustrated with the camera icon) change the “End Frame:” value under “Frame Range:” properties to “31” from the default “250“, i.e. “End Frame: 31“. Leave everything else as is and then from the 3D View menu Header click “View » Playback Animation“. The character will animate, in this instance simply swinging left to right on a loop. To stop the sequence click “View » Playback Animation” again or press “Ctrl+A“. This is the basic sequence.
Design note: in practice the “End Frame:” value is set to “31” because”32” would mean both the ‘start’ and ‘end’ (first and last) frame being included during playback; as they are exact duplicates of each other this results in a short and perceptible pause as the sequence runs across that start/end transition point – the purpose of having both frames is to allow the animation to correctly lead-in and lead-out of the same pose, which in turn allows the sequence to play through the start/end transition cleanly as if it were contiguous (without pause or breaks). “Ctrl+A” both starts and stops sequence playback.

With the end of the frame range set to “31” (not “32“) playback loops without pause when transitioning across the start/end frames because only one is needed – use “Ctrl+A” as a shortcut to start/stop playback [“animation-framecount.blend“]
Adjusting playback speed/duration
At this point with the base frames in place, the duration (length) of the sequence can be adjusted to either speed it up or slow it down. This is not done changing the playback “Frame Rate:“, which is set to”24 fps” by default, but rather by adjusting the position of each frame relative to the others to increase or decrease the number of frames there are between them in the timeline (distance between keyframes). In other words, to make the sequence play faster, fewer frames are needed, to make it play slowly, more.
Design note: speed relates to the time it takes to play back the entire sequence – if a sequence contains 24 frames it will take one second to play (using the default “24fps” – 24 frames-per-second), 48 frames will take two seconds, 12 will take 0.5 seconds. Meaning the same motion, a walk cycle, will appear ‘normal’ at 24 frames, slow at 48 (twice as slow), and fast at 12 (twice as fast).
To adjust the duration, in the Timeline “RMB” select the ‘end’ frame marker and press “G” to initiate “Translate“, move the mouse left or right and then “LMB” click to set and confirm the new position. To prevent the character having a limp because one half of the sequence takes longer to play than the other, “RMB” select the ‘middle’ frame, press “G” again and reposition it at the new mid-point. “LMB” click to set and confirm. Review the modifications pressing “Ctrl+A” to play the sequence or selecting “View » Playback Animation” from the 3D View Header menu (and again to stop). Make any adjustments to change the speed as needed by amending the position of the middle and last frames.
Design note: when moving frame markers they should snap to the grid (frame) automatically, if not press “Ctrl” whilst moving. After pressing “G” to move a marker, to cancel the action “RMB” or alternatively press “Esc“. Additionally markers can only be moved linearly left or right because they pertain to specific aspects of what’s being edited, a particular bone and its individualised positional coordinates. If the duration is adjusted make sure to update the “End Frame:” setting in “Render” Properties else playback will clip, only playing the frame range set.

Adjusting the duration of the sequence and its playback speed by moving the end keyframe to frame “40” (from “32”) and middle to “20” (from “16”), which has the effect of slowing the animation down – it takes longer to play through the increased number of frames (ensure to adjust the “End Frame:” value is updated so playback runs though the entire sequence) [“animation-duration-adjusted.blend“]
Secondary pose data / modifications
Although it is possible to leave the animation as is, because the motion represented so far is very basic it lacks personality. To address this, with the initial keyframes in place and the sequence length is adjusted to suit, secondary pose detailing can be added, i.e. the head looking forward, arms swinging etc., it’s these additional sub-actions that often bring a character to life, giving it a sense of presence so it doesn’t look too stiff or robotic – it’s relatively straightforward to produce an animation but doing so works best when consideration is given to the mass, weight and whatever sense of motion needs to be replicated, in this instance it’s not a 3D mesh being animated but a shaped ginger biscuit.
Design note: a character made from marsh mallow won’t move the same way as one made from gingerbread because of material and structural differences, which need to be considered when articulating the Armature and animating.
First the head. It’s typically that when walking the actor (person, creature etc.), unless otherwise distracted, tends to look ahead of themselves at all times even though other parts of their body may twist, turn or deform as they move. This is largely as a result of the balancing system, the head remains relative static and doesn’t unduly bob or move about to keep the body upright. As the Gingerbread characters body is already twisted to the side the head will need to be rotated back to a neutral (central) orientation. To do this “RMB” click the “head” bone and using the “Rotate” widget (click the “Transforms manipulator” button for “Rotate” in the 3D View menu Header) “LMB+drag” the ‘blue’ circular axis marker pulling the bone back so the head faces front. Release “LMB” to confirm then press “I” to insert the “LocRot” data to the timeline (or from the 3D View Header menu select “Pose » Animation » Insert Keyframe“). A new marker will appear along with a new entry under ‘summary’ representing the posed bone.
Design note: alternatively press “R” then “Z” to initialise “Rotate” locked around the vertical axis. Move the bone so it faces front then “LMB” click to confirm before then inserting “LocRot” data. For precision hold down “Ctrl” to snap, or instead of using the widget or mouse to control rotation, from (3D View) “Properties” edit the “Y:” value of “Rotation:” so it reads “0.174” or an approximate value for the head to be facing forward (the initial value will actually be “0.000” because its rotation is relative to “lwrbody” rather than itself, in other words it wasn’t rotated previously, lwrbody was).

Position of the “head” bone before being moved so the character looks ahead – it faces to the side in relation to the twist given to “lwrbody” previously (10° using the “Rotate” widget)

Using the “Rotate” widget (or pressing “R” than “Z” to rotate around the vertical axis) the head is twisted back to its original start position so the character looks forward – this gives the bone a rotational value rather than resetting back to zero, it’s adjusted ‘locally’ and relative to other bones rather than itself [“animation-secondary-head-pose1.blend“]
As with setting up the initial poses in the timeline, this new update to the head bone needs to be copied to the last frame in the timeline so both ‘start’ and ‘end’ are duplicates. To do this first copy the selected bones pose data by clicking the “Copy Pose” button (left-side of the three on the far-right of the 3D Views menu Header illustrated with a clipboard icon) – this copies the bones pose data, its position, coordinates etc., to Blenders temporary data buffer (clipboard, hence the icon). Next “LMB” click to place, or “LMB+drag” the timeline widget to the end frame of the sequence, and click the “Paste Pose” button (‘middle’ button of the aforementioned) to paste the data and update the bone, then press “I” (or “Pose » Animation » Insert Keyframe“) to again mark the “LocRot” coordinates to the timeline. A new marker will appear and as the two frames use the same pose data, Blender will again indicate this by highlighting the timeline orange.
Design note: if using the keyboard shortcuts to copy/paste make sure the mouse is over the 3D View when doing so else it may copy/paste data that pertinent to another view – editors and views are context sensitive so the same keyboard shortcuts may not perform the same function(s).

Using the ‘copy’ and ‘paste’ feature of the posing system allows data to be duplicated to other frames with relative ease, in this instance so both the start and end frame hold the same positional information for the “head” bone [“animation-secondary-head-pose2.blend“]
Similarly for the middle keyframe of the sequence, “LMB” click the timeline or drag the widget to frame “16“, then in the 3D View use the ‘blue’ axis indicator to again rotate the “head” bone, which should still be selected, so it faces front, and again press “I” to insert the new “LocRot” data. Another pose marker will appear in the timeline confirming keyframe creation. Replaying the sequence now, “Ctrl+A” or “View » Playback Animation“, will have the characters main torso swing left to right whilst its head remains relatively static, looking ahead.
Design note: when adjusting the head bone it’s preferable to make the forward looking aspect consistent across the major keyframes. In other words the rotational value applied to the first, last and middle frames should approximately the same degree of rotation to the left and right, i.e. perhaps being “Y: 0.174” and “Y:-0.174” respectively.

To make the cycle work the head bone needs to look forward on each of the major keyframes of the sequence – first, last and middle – else it will unduly swing to one side during animation so ensure the frames are consistent always face-front during the sequence [“animation-secondary-head-pose3.blend“]
For the arms and legs, the existing keyframes can be used to inform where amended pose data should be marked. As before then first “LMB” click or “LMB+drag” the timeline widget to the first frame in the sequence, then in the 3D View “RMB” select “lwrarm.L” (lower arm bone on the ‘left’ side), press “G” to initiate ‘free’ “Translate” and move the bone forwards slightly from the body so its final position is indicative of an arm at apogee of the swing (end of a motion before the return). Click “LMB” to confirm.
Design note: the above (and below) assumes the character leads with the right rather than the left leg, so the arm manipulation as explained would need to positioned in the reverse, i.e. backwards from the body, as a counterbalance to the forward position of the leg on the opposite side. When manipulating bones with IK assigned it’s often best done in “Free Translate” to take advantage of IK behaviour which allows a more natural movement rather than being locked to an axis (when using the widget), meaning the arm would deform more realistically based on the physical relationships between each bone of the IK chain.
Before inserting the keyframe for this new pose, because more than one bone moved during the manipulation (both being part of the same IK chain), use “Shift+RMB” to multi-select and include “uparm.L” before then pressing “I” to insert “LocRot” data into the timeline for both bones – two additional frame markers will appear along with two entries under “Dope Sheet Summary” on the left. With one side done the other needs to be similarly affected with a slight backwards bend from the body, which again is indicative or the arm at apogee (end of the orbit before return). Once posed “Shift+RMB” select both arm bones then press “I” again to insert “LocRot” data to the timeline. Another set of “Dope Sheet Summary” entries will appear along with their respective timeline markers.
Design note: once the arm bones are posed, there should be “Dope Sheet Summary” entries representing each along with their respective frame markers in the timeline, in this instance four for a total of six bone channels (minus the summary channel) – “lwrbody“, “head“, “uparm.L“, “uparm.R“, “lwrarm.L” and “lwrarm.R” (‘root’ bone has no pose data so is excluded).

The position of “lwrarm.L” before being manipulated to a ‘forward’ position as a visual counter the leg on the same side positioned to the rear – a representation of the basic counter-balance action mechanism of a ‘walk’ action where arms and legs swing in opposite directions

Position of the same bone after being manipulated in ‘free’ “Translate” mode, “G“, rather than using the manipulator widget, which helps each bone in the IK chain bend and fall naturally based on the physical relationship between bones

With the arm on the other side manipulated and set so it bends backwards slightly, all the bones belonging to both arms (both ‘upper’ and ‘lower’ sets) are selected (“Shift+RMB“) before their respective keyframes are marked to the timeline, “I” then “LocRot” – because more than one bone moved as a result of the manipulation each needs to have its respective keyframe marked [“animation-secondary-arms.blend“]
With the amends marked to the first frame the same pose data can be used in the last, so “LMB+drag” or “LMB” click the timeline widget into position at frame “40“(or the last frame based on any previous adjustments to the sequence ‘length’) and with the arm bone still selected press “I” to insert their respective “LocRot” data. Another set of keyframe markers and ‘summary’ entries will appear with each frame duplicate indicated by the orange highlight. This sets both start and end to use the same data so they transition smoothly during the cycle.
Design note: when manipulating the timeline widget ensure the mouse is moved back over the 3D View before pressing “I” to insert the keyframe else a different set of options will be made available (generic frame based choices associated with the Timeline as an editor rather than that of the 3D View and posing).

Marking the ‘end’ frame results in Blender highlighting individual timeline channels where frames use the same pose data [“animation-secondary-arms.blend“]
Once the ‘start’ and ‘end’ frames are keyed “LMB” click or “LMB+drag” the timeline widget to the previously established midpoint at frame “20” (assuming this was changed when adjusting the sequence duration from previous) and in similar fashion “RMB” select the ‘lower’ bone of each arm (“lwrarm.L” and “lwrarm.R“) and manipulate the min turn so the right arm is positioned slightly behind the torso and the left is slightly in front, again appearing as an opposing counter-balance to the right leg being forward, the left being back (and in principle the opposite of pose held in the first and last frames of the sequence). “LMB” click to confirm each position then make sure to use “Shift+RMB” to multi-select all bones belonging to the arms before then pressing “I” to insert “LocRot” data for each. Another set of pose markers will appear in the timeline. Replaying the sequence now, “Ctrl+A“, will show the mesh animating less stiffly than previously because the arms now have a natural bend (representing the momentum of movement into and out of apogee).
Design note: bones don’t need to be keyframed individually so it’s not specifically necessary to pose one arm, keyframe it, then pose another. In other words it’s possible, efficient even, to move a series of individual bones, changing the position of the left arm, then right arm for example, to create an overall pose before then keying the larger grouping.

To complete the sequences the arms on ‘the other side’ need to be similarly adjusted so they swing in counter-balance to the legs being ‘left/right’ as opposed to ‘right/left’ of the first and last frames, so again using the lower arm bones and IK position, set and keyframe the updates to the timeline [“animation-secondary-arms-pose3.blend“]
The characters legs can be similarly treated by selecting each ‘lower’, manipulating them so the assigned IK deforms the bone chain naturally based on relationships. So once more “LMB” click or “LMB+drag” the timeline widget to the first frame then in the 3D View “RMB” select “lwrleg.L” and “lwrleg.R” in turn and position them so the ‘leading’ leg stretches a bit further forward and the ‘tailing’ leg has a slight kink, representing outstretch and end apogee respectively. Again because more than one bone has moved use “Shift+RMB” to multi-select all the legs bones before pressing “I” to insert the “LocRot” for the group. Another set of bone channels and markers will appear in the timeline.
Design note: when positioning the bones the idea is to avoid making the leg look too stiff and straight – there’s usually a bend at the knee for both front and back leg as momentum is carried and transferred across the stride.
")
Before being adjusted the legs are oriented relative to their original positions as the body twists so they essentially just swing back and fourth, using the IK assign to the leg they can be adjusted into a more naturalistic pose [“animation-secondary-legs.blend“]
Set the last frame using the same data so “LMB” click or “LMB+drag” the timeline widget to that frame and press “I” to insert the same “LocRot” pose data. Another set of frame markers will appear (but no additional bone channels will appears as they will have already been generated in the previous step).
Design note: generally speaking if a bone hasn’t been previously posed when one is keyed to the timeline and the widget is moved it carries over to the next frame to be marked. If this doesn’t happen and bones reset move the timeline widget back to the previously inserted frame and copy the pose to the data buffer by using the “Copy” and “Paste” buttons on the far-right of the 3D View Header – position the timeline widget, select the bones (if not already done), ‘copy’ the pose to the butter, move the timeline widget to the last frame, ‘paste’ the data and then insert the frame markers to the timeline.
")
Selecting the ‘lower’ leg bones with IK assigned, move them in turn relative to their being the ‘leading’ or ‘trailing’ leg – the former should extend forward slightly, the latter kink with a backwards orientated lower leg [“animation-secondary-legs-pose2.blend“]
With the first and last frames set, “LMB” click or “LMB+drag” the timeline widget to the middle frame and similarly adjust the ‘lower’ bones of each leg so the ‘right’ foot extends slightly and the left bends towards the back (in opposition to the previous pose marked), then “Shift+RMB” all the associated bones once more and press “I” to insert their respective “LocRot” data. A new set of markers will appear and as this pose is different it will ‘break’ the automatic channel highlighting between ‘first’ and ‘last’ frames. Playing the animation once this is done should have the legs now moving far less stiffly than previously and more in keeping with the expected deformation of a ‘walk’ animation.
Design note: when manipulating the legs the kink or bend between the lower and upper bone should always be concave oriented towards the front – for humanoid characters the knee doesn’t normally bend backwards so the shape formed is always generally going to be an reversed (and flattened) “C“.

On the ‘opposite’ side, right leg leading, the same adjusts are made so the leg moves less stiffly, again using the IK to manipulate the leg into a natural pose that is then marked to the timeline [“animation-secondary-legs-pose3.blend“]
Tertiary pose data / modifications
Depending on the level of fidelity required an animation might need another, final, level of adjustment. Typically these will be ‘tertiary’ tweaks in that they are best placed once primary and secondary tier adjustments have been done and bone positions are known. In other words the type of adjustments made at this point are typically detailing’s, minor modifications or changes that bring an action to life, a slight foot lift or walk ‘bob’ for example, aspect of movement not normally added to an action/pose too early on.
Design note: the reason for their not being added at earlier stages of development is largely to do with tertiary movements tending to be, in a manner of speaking, reactionary. The foot could be posed at any point for instance, but until their overall position and final resting place is known relative to the leg, making changes too early might cause problems later where adjustments would otherwise work better as tertiary changes to a given pose. To early and it can also make the action seem awkward, which often then requires clearing previously made bone positions so they can be properly reset.
Addressing the foot lift first. Because it’s essentially an intermediary action -it happens when the foot transitions from one position to another – the respective pose typically tends to be keyed between the major frames, in this instance at frames “10” and “30“, the median frames between “1” through “20” and “21” through “40” respectively. With this in mind “LMB” click or “LMB+drag” the timeline widget to frame “10“, “RMB” select the ‘lower’ leg bone on the right (“lwrleg.R“) and press “G” to freely manipulate the bone to amore pronounced horizontal position – this will ‘kink’ the leg to an even greater extent than done previously. Then “Shift+RMB” multi-select both bones of the same leg and press “I” to insert the updated “LocRot” data. A new set of markers will appear in the timeline. Repeat the process this time “LMB” click or “LMB+drag” the timeline widget to frame “30“, similarly adjusting the leg but for “lwrleg.L” on the left side of the Armature. Select both bones and press “I” once more to insert the appropriate “LocRot” data and pose markers to the timeline.
Design note: the IK assigned to the bone can make these types of small adjustments tricky, especially when they typically only need to be made along one or two axes. To aid doing this, when using free manipulate, “G“, press any one of “X“, “Y” or “Z” to lock the manipulations to a given axis. Or use the “Rotate” widget, selecting the appropriate axis marker (the red, green and blue circles) – “LMB” click the “Rotate” button in the 3D View Header menu. When using free manipulate, it’s likely that both bones within the leg chain moved in which case multi-select each before then inserting their respective “LocRot” data to the timeline.


The foot-lift of a walk cycle animation is typically an intermediary pose, i.e. it happens on the way to another pose. Using “G” to freely manipulate each lower leg bone in turn, they should have a more pronounced horizontal position marked at frames “10” and “30“, simulating the lift and placement of the foot during the ‘walk’ action [“animation-secondary-legs-ancillary.blend“]
Once the legs have been adjusted the ‘bob’, the slight change in height as the character moves, can be added again using previously marked keyframes as locators. In practice what the ‘bob’ relates to is the slight height differential of the torso (top of the head) between the maximum stride distance and transition pose (where the stride swaps)when walking, which can account for several inches depending upon stride length. The simplest way to add a ‘bob’ is to change the height of the ‘lower body’ bone, “lwrbody” in this instance, relative to the ground at previously set keyframes.
Design note: ‘bob’ is an unusual but necessary component of certain types of movement, walking, running etc., because it goes unnoticed unless absent (it’s noticed when not present as opposed to not being noticed when it is).
Whilst still in “Pose Mode“, “RMB” select the bone corresponding to the lower torso,”lwrbody“, then “LMB” click or “LMB+drag” the timeline widget to the first, middle, and last frames respectively and press “I” to insert the bones current “LocRot” data at those points (the same height). These are the ‘low’ points, the minimum height of the bone from the ground when the character is as maximum stride distance.
Design note: although “lwrbody” has had some pose data keyed to the timeline previously, re-inserting data can be a good habit to form because, although a given bone may move, it may have done so as a response to another bone (similar to the way the ‘head’ bone was rotated as a result of the lower body bone) so may not actually have any data attributes keyframed into place – inserting them ensures the omission is not overlooked.
Next, because the animation cycles at the extremes, i.e. the primary keyframes are set at maximum stride extension first, middle and last, it means minimum stride where the legs are brought together, is between each major keyframe, in this instance frames “10” and “30“. With this in mind place the timeline widget at frame “10” and whilst “lwrbody” is still selected, “LMB+drag” the ‘blue’ handle of the “Transform” widget upwards a short distance so the bottom of the characters feet sit more-or-less on the ground plain (“X/Y” axis). Release “LMB” to confirm and then press “I” to insert the “LocRot” data. A new pose marker will appear in the timeline. Move the timeline widget to frame “30” and repeat the process, move the bone upwards slightly and then press “I” to key in the pose data.
Design note: an alternative to manipulating “lwrbody” is to press “G” and then “Z” to lock free transform to the vertical axis, similarly moving the bone upwards a short distance before then “LMB” clicking confirm and pressing “I” to insert the amended “LocRot” position as normal. Pose data from either/or frame cannot be copied because the side-to-side rotational coordinates differ between the two – for frame “10” the Armature twists anti-clockwise whereas for frame “30” it twists clockwise; if data is pasted it will overcompensate because the value is added to whatever is current (if a rotational value of “10°” is added to a bone already twisted by “10°”, the result is an overall twist of “20°” and so on).
With the positions set, some adjustment may be needed so the height differential is not too large or obvious, and/or to accommodate the base of the feet properly standing on the ground plain which, due to their shape, can be buried slightly as a simulation of weight. Once done press “Ctrl+A” to play the completed animation which will now appear more realistic as a result of these smaller adjustments.


Adjustments are made to the ‘lower body’ (“lwrbody“) bone to change its height relative to the ground, being lowered at the major keyframes and raised between, making the character appear to ‘bob’ up and down slightly as it walks in replication of the natural change as left and right legs swap [“animation-secondary-final-bob.blend“]
The final character animated with a simple walk cycle [“gingerbread-final.blend”]
Finishing up
Once the animation is complete, if other sequences are to be created, the active data will need to be ‘made real’ and assigned a “Fake User” so Blender doesn’t discard it when another Action sequence is generated and it becomes the active focus of attention. To do this, in the “Action Editor” Header and to the right of the “Action Name” field (centre of the Header shown below), “LMB” click the button illustrated with an “F“. This activates/assigns a “Fake User” to the sequence, which is then indicated by the appearance of the number “2” on the button to the left. Once in place the file can be saved with additional sequences without loss of data.
Design note: a “Fake User” means the data and sequence remains ‘active’, it’s no longer temporary, and saved to the file when other sequences are generated. When such a sequence is selected for editing or viewing the “Number of users” button to the left will display “2” (or more depending on circumstance). In other words, the sequence will have two ‘users’, the “Fake User” (permanent) and an “Active User” (temporary) – one associated with it being active for editing/viewing.

To ensure the sequence is kept when creating or working with additional sequences, the Action can be assigned a “Fake User“, making it a permanent datablock save with the file – so long as it has a ‘user’ at all times Blender will keep the data even when other Actions are active [“animation-secondary-final-made-real.blend“]
If additional sequences are needed “LMB” click the “+” button to the right of “Fake User” (button marked “F“) in the Timelines Header. A new entry will appear duplicating the previously active sequence and given a ‘unique’ name – typically the name of the sequence duplicated plus a numerical append, i.e. “.001“, “.002” etc. Depending upon the number of sequences needed these step can be repeated once each new “Action” has been given a “Fake User” as described above so its preserved. Finally to change the name to something more appropriate or recognisable “LMB” click the “Action Name” input field in the Timeline Header and type. Press “Enter” or click elsewhere on screen to confirm.
Design note: because sequences are generated through duplication they contain whatever data was present at the time of duplication, which often then needs to be discarded. To remove, mouse over the Timeline and press “A” to “Select All” (or click “View » Select All” – this may need to be done twice, once to de-select then again to re-select) and then press “Delete“. This will clear the timeline but not any pose that might still be active in the character. To do that; with the mouse over the 3D View press “A” to select everything then “Alt+G“,”Alt+R” or “Alt+S” as required to clear “Location“, “Rotation” and/or “Scale” respectively (alternatively from the Header menu of the 3D View select “Pose » Clear Transform » Location“, “.. » Rotation” and/or “.. » Scale“. The Armature will reset back to its original pose ready for re-posing.

A new sequence is created as a duplicate of the current active Action and with an auto-generated name – typically a duplicate of the original with a incremental numerical append, i.e. “ActionSequence.001″. To change this simply click the input field, type and press “Enter” to confirm, (“F” or “Fake User” is not active by default and needs activating per new sequence) [“animation-secondary-final-made-real.blend“]
Conclusion
When approaching what might at first glance appear an overwhelming and complex process, the ‘trick’, if it can be called that, is to break the project down into smaller and more manageable parts. First model the character using primitive blocks, then shape the form once the underlying structure is available. Add artwork by applying Materials and UV mapping for Texture application. Then prepare the mesh, and using it as a guide, generate an Armature that’s linked for articulation. Finally animate. Much of this process can be done on the fly (as it happens), but it should be regarded as being preferable to have at least some general idea about the projects direction. Whilst this doesn’t expressly mean having extensive concepts or other visual references to hand, it does warrant knowing what needs to be done and why because the answers to these questions tend to define the characters complexity and speaks to animation requirements.
Irrespective of this however, although “Inverse Kinematics” can assist a great deal in this regard, their use should be guided in relation to the above in addition to following the “keep it simple” rule of content production, especially because “IK” can be used to create complex set-ups, more so when used in combination with other constraints. Before starting then, plan, even if that’s just a few notes scribbled on a piece of baking parchment before the biscuits are pushed in the oven.

