How To Scatter Debris Using Particles
Terrain and related aspects of maps and levels often rely on randomly placed debris or scattered objects – grass, rocks, rubble from buildings and so on – to make the overall environment appear more authentic. Whilst manually placing this type of content offers maximum control, it is incredibly time consuming, especially over large areas. Is it possible then to randomly scatter debris automatically? Yes, using the "Particle System".
The following discusses using the "Particle System" to create a "Particle Effect" that randomly scatters debris objects around a mesh or surface. As the process uses some of Blenders more advanced features to produce the effect and functional debris field, familiarity with Blender is recommended although not specifically required.
Quick Start Summary
To scatter debris across a terrain or other model the following are needed;
- A surface over which objects are scattered.
- a collection of objects for debris, must be a "Group" ("Ctrl+G").
Select the terrain section or model then in "Particles", assign a new ‘particle effect’ with the following properties;
- Change "Type:" to "Hair".
- Give "Number:" an appropriate ‘scatter’ value.
- Enable "Group", then;
– Select "Rotation".
– Select "Scale".
– Change "Size:" to "1.000".
– Set "Dupli Group" to object "Group" (cf. step 2).
This will result in a associated ‘debris’ items scattered around the surface to which the particle effect was assigned based on the objects density.
What’s Needed For Particle Scatter
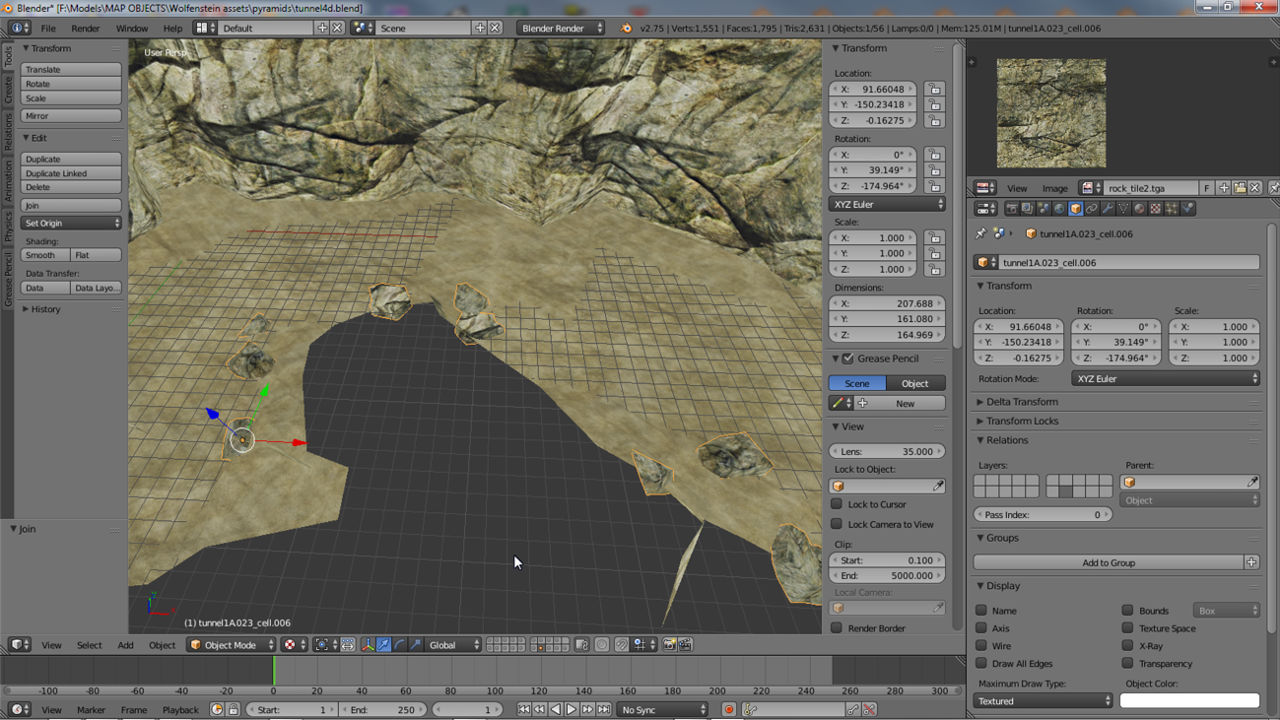
Scattering objects around a model to simulate debris essentially requires three components; 1) a ‘path’ or surface over which material is scattered, 2) a set or sets of objects that will be scattered around the path or surfaces, and 3) a particle emitter. For example, shown below is a UV mapped and textured rocky tunnel section[1]. A ‘path’ or ‘surface’ area over which debris is to be scattered is defined (shown below "Solid" rendered for clarity) that follows the edge and floor contours[2]. And several sets of rock to be used as debris, grouped roughly based on size[3]. Nothing particularly special is required of the models except; 1) the Origin of each rock is approximately centre-mass to allow for unidirectional randomised rotation by the Particle Emitter, and 2) they are collected together as "Groups" approximately based on size.
Design note: the ‘path’ is shown in "Solid" mode but is UV mapped and textured. This being the case, or not, has no effect on the particle effect used to scatter material across the surface. With regards to objects grouping based on size; this is largely to accommodate different combinations and iteration of littering – by separating the rocks in this way sub-models can be made with small, medium or large variations that can be swapped and changed as needed.

The objects needed to scatter debris, in this instance rocks, around a model; the parent mesh itself[1], a ‘path’ or surface over which objects are scattered[2] and the debris itself[3], e.g., rocks or varying size
Scatter Surface/Plain/Path
The scatter path or plain defines where scattered objects are to appear. Generally speaking it will be made from some element of the primary mesh if debris is to have a limited throw (where it appears). For example the ‘path’ shown below is an edited version of the tunnels floor section. This is done by simply selecting the section (based on Material assignment) in Edit Mode and using "Shift+D" to create a "Duplicate" that is further detached as a unique object using "P" to "Separate" based on "Selection" ("P » Separate » Selection" or from the 3D View Header menu; "Mesh » Vertices » Separate » Selection"). Once the plain is available it is further defined as required using the "Knife" tool, "K", to cut and shape it without altering the underlying structure. For scatter to work effectively there needs to be at least a single surface ‘loop’ (a ‘row’ or ‘column’ of faces).
Design note: generally speaking it’s important to ensure the scatter plain is altered only so much as to define a ‘path’ or surface along/over which debris is to be scatter; its general structure needs to be roughly coincidental with the original, in the example shown below for instance this would mean avoiding "Z" axis/vertical modifications. In addition to this the plain can be further split into sub-elements each having its own treatment depending on the degree to which interchangeability is part of the end goal (being able to swap out different debris combinations).

The scatter or debris surface determines where debris is to be scattered so can be an entire section of a parent mesh or smaller more defined section – UV mapping etc., is not necessary
Scatter Objects
The debris, or the objects that are to be scattered around need some basic preparation depending on what the objects are and how they are to be used. With respect to this the location of each Origin is important to ensure the models don’t appear to float, or are rotated unexpectedly. For rock and general rubble debris for example, each Origin can be located centre-mass so no matter the orientation used the debris material will always appear embedded or buried in the ground.
Design note: for items that might need to sit flush the position of the Origin relative to the object will differ, being located towards the base of the mesh for example.
In Object Mode with an individual or group selection made ("Shift+RMB"), left-click the "Set Origin" drop-down menu in "Tools" panel of the Tool Shelf. Select "Origin to Center of Mass" or "Origin to 3D Geometry" to reset the Origin location(s). To reset to a specific place; select each mesh in turn and make a selection in Edit Mode that approximates where the Origin should be. Snap the 3D Cursor to this using "Shift+S » Cursor to Selected". Then in the Tool Shelf click "Set Origin" selecting "Origin to 3D Cursor". Alternatively in Edit Mode simply "(De)select All" (select), "A", and manually move the mesh elements into position relative to the Origin using the Widget axes or pressing "G" to freely "Translate" the selection (left-click or release to confirm).
Design note: where the Origin needs to be set to a specific location for a group of models, it will need to be done manually for each in turn as there isn’t currently a way to do this automatically as is possible for other types of ‘reset’.
Once the respective objects Origins are position they need to be grouped together, either in a single larger group or several smaller one – this allows different ‘sets’ to be placed along or around the path or surface making it easier to generate different variations on a theme.
Design note: debris objects can all be placed in a single Group or divided into a number of different Groups depending on the desired result, e.g., creating groups based on rock size allows for various meshes to be made containing only specific rock sizes, several of which can then be to swapped and changed for variety.
In Object Mode multi-select, "Shift+RMB", a group of objects and then use "Ctrl+G" to create a new "Group" which will then include the items selected. In "Create New Group" bottom-right of the Tool Shelf edit "Name:" to something recognisable and unique, e.g., "rocksSml". Repeat as necessary for each Group needed.
Design note: if "Create New Group" is not visible, or the Group needs to be edited after-the-fact, right-click a member of the Group to be edited then access "Object" Properties. Scroll down to the "Groups" sub-section and update the associated properties as needed/available. When grouping objects together they can be aligned with respect to one-another for convenience – their relative position, as Objects, has no effect on their use. Once Objects are placed avoid making unnecessary changes in Edit Mode – the particle system essentially uses instancing similar to "Duplicate Linked" so changes made to original objects transfer to the ‘linked’ instances.

The Origins location is important relative to what the debris is; centre of mass allows for rocks appear to be buried, where as placed at the bottom of the mesh objects will sit on the ground. Reset using "Set Origin" in the Tool Shelf

The ‘debris’ objects selective grouped, in this instance based roughly on size – make a selection then use "Ctrl+G" to create a "Group", each of which should have a unique (recognisable) name
Particle Effect
To scatter grouped debris much of the work is done using the Particle System and assigning an ’emitter’ to the scatter surface. First, establish the basic properties of the particle. Select the mesh to be used as the scatter or debris plain/surface then left-click the "Particles" Properties button. Here click the large "+ New" button (alternatively click the "+" button to the right of the aperture). A set of initial property options will appear. Directly under the aperture click the "Type:" drop-down menu and change it from "Emitter" to "Hair". The options will update.
Design note: using "Emitter" set the particle up to ’emit’ whatever is associated with it rather than place or position said content somewhere as does "Hair".
Directly below in the "Emission" sub-section change "Number:" to an appropriate value e.g., "10" ("Emission: 10"). This represents the number of objects the effect ‘spawns’ into place. Change "Hair Length:" to "1.000" ("Hair Length: 1.000").
Design note: "Hair Length:" may need to be updated once another related setting is altered (see below).
In the "Render" sub-section click the "Group" button and in the properties that appear activate "Rotation" and "Scale", and change "Size:" to "1.000" ("Size: 1.000"). This sets the objects spawned to actual-size (1:1 ratio) and allows the effect to alter their respective scale and rotation (manipulated around their Origins). Finally left-click the "Dupli Group:" input field (blank by default) and select one of the previously named Groups from the list, e.g., "rocksLrg". This will immediately update the Scene to show the ‘rocks’ (in this instance) spawned across the scatter surface object, replacing the default hair particles.
Design note: as each setting is altered the hair particles will change relative to the values used, the actual debris itself, rocks in this instance, won’t appear until "Dupli Group" is set.
Generally speaking the position of debris, where it appears, is controlled by density of scatter surface, more faces mean more locations objects can appear. The density of the debris on the other hand, the amount of scatter that appears, is controlled ostensibly by the "Number:" settings discussed above. In combination the greater the control surface, and amount of debris objects used, the more scatter can be set to appear across the entire scatter surface. In other words these basic settings established the initial position and density of the debris. For greater control over the objects that do appear, their rotation, orientation etc., "Advanced" settings needs to be enabled.

With the scatter surface selected in the 3D View access "Particles" and click "+ New" to populate the panel area with a set of defaults

By default particle properties show an "Emitter", a point from which the associated object would be ’emitted’ (like water from a tap). This needs to be changed to take into account the entire surface of the scatter plain

The default settings for a ‘scatter’ particle; 1) switch "Type:" to "Hair" (a); 2) alter the "Number:" relative to the density of objects required (b) and change "Hair Length:" to "1.000" (c); 3) enable "Scale" and "Rotation" (e), set "Size:" to "1.000" (f) and then select the "Dupli Group" (g) from the available list (click the input field), e.g., "rocksLrg"
")
Shown in "Solid" display mode for clarity (set in "Object" Properties) the scatter surface and debris positioned based on its structure
Particle Effect Advanced – Emission
With advanced active additional options become available that further affect the distribution and orientation of the debris group associated with the particle effect. First, to enable. At the top of the effects properties and directly under "Type:", select the "Advanced" checkbox to activate. The particles properties will update to include some new options. Of the settings that appear most useful sit under "Emit From:". Here various options can be set to change where debris objects appear. First is "Verts" and "Face". Activating one or the other (left-click) changes the effective ‘spawn point’ of the debris so it appears relative to the vertex or face (their respective ‘normal’) of the scatter plain.
Design note: for general object/debris scatter across a surface, "Volume" can be ignored.
Below this are two more option sets. "Random" and "Even Distribution", an either/or selection can be used to further alter debris placement relative to the default settings (number of items and their initial position). And "Jittered" or "Random", similarly either/or selected, to affect the ‘granularity’ of debris placement – for "Jittered" this is controlled using the "Particles/Face:" option which increases the number of particle (debris) items that appear per scatter plain face or vertex.
Design note: setting "Particles/Faces:" to "1" for example will attempt to place one debris item on each face, "2" will place two items and so on. In conjunction with other settings this can be used to alter the pattern of overall item placement.

To adjust the debris scattered across the plain beyond the basic properties enable "Advanced". A new set of options will appear allow greater modification of the associated objects, using "Verts" instead of "Faces", deselecting "Random" and so on to change the distribution (debris shown in "Solid" mode for clarity)
Debris objects shown in "Solid" mode for clarity as "Advanced" properties are shown and how they change the distribution of the models
Particle Effect Advanced – Rotation
By default the orientation of debris objects is determined by their original parent state so they appear relative to that initial state (they are duplicate instances). This can be changed using the "Rotation" options that become available when "Advanced" is enabled. Their "Initial Orientation:" is set to "Velocity / Hair", the default state of all particle effects when created.
Design note: this is because the particle effects default state is ‘Hair’.
To properly orientate the debris in a useful manner left-click the "Velocity /Hair" menu item shown and select "Normal" from the available options. The objects will update in the 3D View to orientate themselves relative to the normal of either vertex or face, the chosen point of emission.
Design note: for more debris scattering "Normal" is used.
The three additional properties within the section now allow for the objects to be rotated with finer granularity; on the left, "Random:" rotates the debris objects arbitrarily clockwise around any axis; on the right "Random:" rotates the objects arbitrarily clockwise around a single axis (typically "Z"); with "Phase:" rotating all objects around a single axis by the same value.
Design note: if the particles debris is a group of items (e.g., six separate rock models), both ‘random’ settings rotate individual units of the group by different values, some full rotations, others partial or slight. On the other hand ‘phase’ alters all items by the same amount, e.g. rotates everything by "0.250" (approximately 45°).

With "Advanced" settings active "Rotation" properties become available that allow for more granular control over the placement of debris objects around the scatter surface mesh using the "Random"[1 & 2] and "Phase"[3] options
Particles Effect Advanced – Size
Depending on the debris objects that form the Group assigned to the particle effect, their size can also be changed. Although it’s generally recommended debris size be managed manually based on the objects physical structure, for material that is scattered relatively extensively, being able to change the same object iterated across a service dynamically is far more advantageous. With "Advanced" properties set this can be done in "Velocity" by changing the "Random:" option under "Other:". Or for more finite control in the "Physics" subsection by altering "Random Size:". Both settings change grouped objects randomly relative to the value set instead of the source objects needing to be altered.
Design note: the latter property "Random Size:" appears under the "Render" sub-section when "Advanced" is NOT active, i.e., basic particle properties.

If the size of debris objects is not determined by grouped models they can be controlled using two additional ‘ random’ settings in "Velocity" and "Physics" that randomly alter the size of debris scattered over the mesh
Convert Particle Effect
By itself, having debris scattered over a given surface is of little use beyond the effect. To change this the content needs to be ‘converted’ into a usable form. This essentially detaches the distributed objects from the effect whilst keeping their scattered position (akin to "Keep Transform"). To do this, once the particle effect is finalised and debris placed as needed, access "Modifiers" Properties (click the wrench icon). Here a "ParticleSystem" modifier panel will be available linked directly to the particle effect being created. Here left-clicking the large button titled "Convert" will ‘convert’ the particle effect objects into a set a useable models ready for further editing as needed.
Design note: if other modifier properties are in use the particle effect will appear last in the list – order doesn’t matter in this context. Clicking the "Convert" button removes it from the stack.

For the scattered objects to be useful, in "Modifiers" click the "Convert" button in the "ParticleSystem" modifier panel…

… this ‘converts’ the effect objects into usable objects (shown fully textured – converting the effect defaults objects to the overall display mode of the 3D View, in this instance switching "Solid" shading to "Texture")
Convert – Single User & Apply
Once debris from the particle effect have been converted to usable objects they then need to be made "Single User" to make each ‘unique’ and properly editable. For this simply select all the objects created from "Convert" then from the 3D View Header select "Object » Make Single User » Object & Data". This further converts any duplicates contained within the group into individualised mesh objects that can be edited as needed.
Design note: although "Convert" essentially makes the debris particles ‘real‘, due to the way the effect works a number of items may actually be linked duplicates of one another, for example the same rock duplicated several times, altered for/by the effect (e.g., rotated differentially). This consequently means editing one affects all. To avoid this objects need to be made ‘unique’, hence "Single User".

Although particle objects are converted to usable objects some may be linked duplicates – editing one will affect all copies of the same mesh used as debris

Once the objects have been being made Single Users they can be reset. Select all the objects, right-clicking one to be the active object within the group, then from the "Object" menu of the 3D View Header select "Apply » Rotation & Scale" ("Location" is implied – "Object » Apply » Rotation & Scale"). This resets each models "Dimensions:" and "Scale:" values. Once the objects are reset they are then ready for export or inclusion with other assets.
Design note: resetting objects is generally necessary if the debris items are to form part of a larger mesh or collection of objects. This might also then mean using "Alt+J" to "Join" selections together – if object orientation is not set before joining, connecting meshes will take on the properties of the parent (object being joined to).

Once the objects are converted they will need to be further converted using "Make Single User" to unique individualised objects due to the linked duplication the particle system uses

Once objects are made unique they can be ‘reset’ using "Apply » Rotation & Scale"

Final object as a single model that can be swapped out with others of differing detail
Video
Short video walkthrough in real-time showing the process explained above.
Walk-through showing the process of using the Particle System to create randomised debris

