Snowman – Animating (#7)
It’s somewhat ironic that the most troubling aspect of making an animated character is actually the simplest to do mechanically, i.e. the process of animating itself is surprisingly straightforward. The difficulties often experienced are not necessarily of the process itself but rather arise largely from an issue of motion fidelity, trying make a sequence as accurate, complete and realistic (or at the very least ‘true-to-form’) as possible. Whilst there are tools available to help in the pursuit of this goal, it is more often the case that time is the determining factor; the more complex a ‘rig’, the more time it takes to work with. In this final chapter, the basic principle behind the actual animation process will be discussed from the point of view of adding two simple sequences to the Snowman character, that of it ‘breathing’ (‘idle’) and ‘sleeping’.
Download: KatsBits – Snowman Character Source (c. 40 MB | *.blend, *.tga, *.psd, *.xcf). Zip file includes each stage of the process as indicated throughout.
Check list before animating
It is vitally important to make sure the mesh, Armature and their respective relationship to each other and their own internal structures are correctly set up before beginning any animation. Due to the nature of the process, it’s not always possible to fix problems by simply changing the position or rotation of objects or elements therein. This is especially so of content for export, making changes midway typically ‘breaks’ the resulting files.
Before progressing then, check the following are in place;
- Mesh
- Is fully UVW mapped and textured.
- Is ‘solid’ with no splits or holes.
- Properly positions at grid centre.
- Origin set to grid centre related to mesh.
- Vertex groups are assigned to the mesh.
- Vertex groups are properly named.
- Vertex groups are correctly weighted relative to the Armature.
- Armature
- Is set to grid centre relative to mesh.
- Is facing the correct direction (typically ‘Front’ in Blender).
- Has properly named bones with respect to vertex groups.
- Bone relationships and hierarchy is properly set up.
- IK’s are assigned to the correct bone/s.
- IK chain length is correctly set.
The basics of animation
Animation is sequential in nature no matter the type of object being animated. In other words, a series of static ‘poses’ are placed at ‘key’ locations, or ‘frames’ (“key” + “frame” = “keyframe“), along a length of ‘time’ (“length” + “time” = “duration“), when played back, results in the appearance of motion – a raised left-leg is one pose, lowered left-leg another, raised right-leg yet another, lowered right-leg one more and so on through the sequence to produce a ‘walk’ animation. In practice a ‘pose’ is created through the manipulation of the Armature, individual bones are positioned (‘location’ and ‘rotation’) and ‘set’ in place, the sequence then simply being a collection of these over time (usually a few seconds).
Design note: there are actually two important aspects to animation; 1) the manual process of placing keyed poses, and 2) the ‘transition’ or ‘morphing’ between each pose. This latter point is generally done automatically by Blender using a process called “Tweening“. “Tweening” is a way to change the position of an object smoothly without the need to place individual “in between” poses (hence the name, “inbe’tween‘“); Blender takes the positional data associated with one pose and makes a best guess linear transition to the next for each keyed pose in a sequence. Whilst “Tweening” is an important process to know about, it’s not something ordinarily worked with directly so won’t be discussed in this tutorial beyond this section and/or a few minor references.

The basic structure of a scene being animated showing the mesh ‘posed’ in a fixed particular position and its ‘keyframes’ markers, alongside the ‘duration‘ of the sequence all housed in the ‘timeline‘
Sequential Editing
Although playback has to be sequential in nature, editing and animation doesn’t necessary follow the same paradigm; frames (poses) can be dropped in and taken out of the timeline at any point during the process, it’s not an absolutely necessity for each to be placed in a ‘linear’ fashion one after the other – 1, 2, 3, 4, etc.. Instead a pose could be placed at frame 1, then 10, 3, 24, and so on, thus making the editing process sequential This type of editing is commonly referred to as “non-linear” and it typical of animating characters and objects generally.
Basic Timeline use & workings
The animation process itself is generally split between two View or Windows, the main 3DVIew where the character is posed, and the “Action Editor” where the keyframes and pose data is managed. It is a ‘timeline’ so the left/right length of a given sequence represents a “duration” (usually seconds or short minutes). Being an ‘editor’ much of the essential pose data and frames marked as a result is inserted, deleted, moved, duplicated or otherwise ‘managed’ in this section. It’s divided into ‘tracks’ along the vertical (up/down), each of which represents an individual bones whose associated data can be edited independently of it neighbours. And ‘time’, marked on an independently editable frame by frame basis, along the horizontal (left/right).

The Action Editor shown with an animation in the Timeline as a number of static poses – the Editor type[1], the ‘Action ID‘[2] (name of the animation sequence), the ‘Bone list‘[3] (bones ‘recorded’ in the sequence), and ‘Timeline‘[4] showing the individual ‘frames‘[5] and ‘duration‘[6] track markers
The specific reason for using the Action Editor versus any other is simply to do with the type of animation required and the way that animation is being produced – deforming a skeletal rig is generally a visual experience, the manipulation of individual bones, or chains of, and their resulting “Location“, “Rotation” and “Scale” positions, relies almost entirely on observing what the Armature itself is doing rather than on what can often seem the rather abstract ‘XYZ’ coordinate data generated by the process in the background (under the hood).
Design note: the “Action Editor” is one of four general animation editors, there is (1) a “DopeSheet“, (2) the “Action Editor“, (3) the “Shapekey Editor“, and (4) “Grease Pencil“. For most game related or low poly work the Action Editor is used, whereas the other editors can be used for other types of animation, in situations where a collection of differing object types are being animated, the “DopeSheet” might be better option for instance.

The usually ‘hidden’ coordinate data associated with individual bones. Each ‘track’ contains a specific attribute of the bone it’s associated with (various ‘XYZ’ and ‘W’ data), and although this data is represented here as a Timeline ‘duration’, it can be shown an used in different types of editor depending on how that data is to be/being used. Although not covered in this tutorial it’s important to know about
Accessing the Action Editor
The default animation editor running along the bottom of the application (below the 3DView) is the “Timeline” editor. It’s a global editor which means many different types of animation can be tracked, managed and edited there. Although this editor can be used it’s not wholly suited to Armature/Pose based sequencing so its best to swap it with a more appropriate option, the “Action Editor“. To do this simply click the “Editor Type” button to the far-left of the Timeline Header and select “DopeSheet” from the list of available options. The view will changed to the selected editor. With the “DopeSheet” visible, in its Header, click the “Editing Context” drop-down selector and click “Action Editor” (“Timeline » DopeSheet » Action Editor“). The view will change again to display the needed editor. Once done its now time to animate the character.
Design note: optionally, to make editing and managing the animation easier, RMB click the Action Editors Header and select “Flip to Top” from the “Header” menu that opens – it will ‘flip’ to the top of the editor away from the bottom of the screen, making menu and property selections easier and unobstructed by the Task bar (especially if set to pop-up when the mouse cursor is near it).

Changing the “Timeline” editor to “DopeSheet” by selecting the option from the “Editor Type” list (shortcut “Shift+F12” whilst cursor is over the Timeline view) [blend116]

In the “DopeSheet“, switch the sub-editor type by selecting “Action Editor” from the “Mode” drop-down list in the Header – the view will change slightly [blend117]

Organising the DopeSheet slightly by flipping the “Header” to the top of the view using “Flip to Top“. This is optional but may help in managing the process
Inserting KeyFrames into the timeline
As discussed briefly above, an animation sequence is simply a set of static snapshots placed as ‘key’ frames (locations) along the timeline which are then ‘tweened’ to produce motion. There are two main aspects to this process, 1) the actual pose itself, and 2) and it’s location in time. The former is managed by editing and manipulating the Armature; the latter using the Action editors timeline ‘slider’, the green upside-down ‘flag post’ indicator – where-ever this visual aid (‘widget’) is positioned, a frame can be/is inserted; moving this back and forth along the time line, individual poses (either the entire Armature or just a single bone) can be ‘keyed into place.

Make sure to be in “Pose” mode (select the Armature and switch using “Ctrl+Tab“). To insert the first “KeyFrame” by using “I” and selecting “LocRotScale” from the “Insert KeyFrame Menu“, as this is the first frame all bones should be selected and set [blend118]
Generally speaking the first step in creating a sequence is to place a ‘start‘ and ‘end‘ point, this blocks out a preliminary “duration” and provides a basic (but adjustable) framework within which to work. To do this, switch to ‘Pose’ mode and then change the orientation of the model. So RMB select the Armature in the 3DView and use “Ctrl+Tab” to switch between “Object” and “Pose” mode – the Armature will turn blue. Once done press “numPad5“, then either “numPad1” or “numPad3” to change to “Front” or “Right” Ortho view. In the “Action Editor” check the timeline widget is at frame “1“, if not LMB+drag it to that location readying it for the first keyed pose.
Design note: the timeline widget can be positioned by LMB click, dragging or by simply LMB clicking a location in the timeline to which it will snap. By default the widget is located at frame “1“. Note in addition that whilst there is a “0” frame, it’s very rarely used – most sequences actually start at frame “1” not “0”.
With the Armature in Pose mode, first select all the individual bones, “A“, then press “I” to access the “Insert Keyframe Menu” (or from the 3DView Header, “Pose » Animation » Insert Keyframe…“). A list of options will appear. Select either “LocRot“, “LocScale” or “LocRotScale” to mark the pose and frame data to the timeline relative to ‘location‘, ‘rotation‘ and/or ‘scale‘.
Design note: the choice between using “LocRot“, “LocScale” or “LocRotScale“, that is “Location + Rotation“, “Location + Scale” or “Location + Rotation + Scale“, is determined by the game engine into which the animated character or model would be placed, ‘scale’ data might not be supported for instance so a pose marked as such would be ignored resulting in an incomplete sequence. In practice this means that rather than just randomly using one or the other to set keyframes irrespective, it’s best to research what data is actually needed or experiment beforehand to ensure models don’t ‘break’ when used.
In the Action Editor this will automatically create the necessary “Action” accompanied by a series of yellow diamonds appearing at the widgets location, each one representing an individual bone and it’s position in the timeline (one marker, per track/bone, per frame). Once done the individual bones composing the Armature now have a ‘base-line’ position stored in the timeline.
Design note: An “Action” is a container. It holds the respective keyframe data for a particular animation sequence. Where a project has, or is to have, more than one sequence, each would need it’s own ‘Action’ datablock (more on this below). When inserting keyframes into the timeline, if an Action does not already exist, Blender will automatically generate one, naming it “ArmatureAction“. Alternatively, an Action can be created before inserting keyframes, in which case the datablock would be identified as “Action“.

When an Action doesn’t already exist, as is often the case with a new project, Blender auto-generates one when keyframes are inserted into the timeline. Alternatively, click “+ New” before keyframing
To set an ‘end‘ point repeat the process, this time at frame “30” in the timeline. So, LMB click or drag the widget to frame “30“, use “A” to select the entire armature again (it should still be selected from previous), press “I” and select “LocRot” once more from the “Insert Keyframe Menu” list. A second group of markers will appear in the timeline accompanied by a series of orange bands which indicates a link between the two positions – at present because both the ‘start‘ and ‘end‘ frames use exactly the same pose data, their similarity is highlighted by the presence of the coloured band, in other words, the visual aid represents a duration of time between one frame to another where no change has occurred.
Design note: when selecting the ‘Insert’ option, remember to use the same one as pervious – “LocRot”, “LocScale” or “LocRotScale”.

Move the green frame indicator (scrubber) along the timeline (30 frames in this instance) and press “I” again to insert another KeyFrame; both the first and last frame in a sequence should be the same for proper animation ‘loops’ [blend119]

On adding the new KeyFrame, the timeline will update, highlighting several tracks for a limited frame-count; this is the animations “Duration” (the amount of time it takes to play represented by a distance between two points) [blend120]
Animating the timeline
Once the ‘start‘ and ‘end‘ keyframes are in place different pose positions can be marked to the timeline. A quick and efficient way to make these additional poses is to use the “Inverse Kinematics” previously set up so that, rather than individual bones being manipulated one at a time, they can be altered as a group by making use of the ‘control’ bone the IK is applied to, in this instance the ‘head‘ bone.

Animations typically equate to movement, which means a number of differing poses need to be ‘keyframed’ so, move the frame-marker to the middle of the sequence (frame 15 in the above), RMB select the ‘head’ bone and ‘pose’ the armature, pressing “I” to ‘key’ the resting position [blend121]
To add a new pose, first switch to “Right” Ortho view using “numPad3” (“numPad5” to switch to Ortho first), then move (LMB click or LMB+drag) the timeline widget to frame “15“. Then, whilst still in Pose mode, RMB select the ‘head‘ bone then press “G” to activate “Grab/Move“, this will free the Armature, and move the bone forward a short distance. LMB click to confirm the change.
Design note: switching to Ortho ‘locks’ the axis along which changes to the Armature can be made – in “Front” Ortho for example, bones cannot be moved ‘front’ to ‘back’ in any meaningful way because the view faces that direction – bones will freely move left to right however. Similarly, in “Right” Ortho, the Armature can only be moved ‘front‘ to ‘back‘ because the mesh faces the side. Although the above instruction makes a relatively small change it’s possible to see how the Inverse Kinematics works as each member of the chain adjusts its position appropriately and relative to it’s local parent and what the ‘control’ bone is doing. This lends the chain a more natural articulation as the movement of each bone is determined by it’s position in the chain and the amount of movement that occurs throughout.
Now because the IK control acts upon a chain of bones it means several have changed their position such that, if ‘Insert’ were to be used now, only that IK control bone would have its pose data set in the timeline (because it was actively selected). Meaning, should a pose change more than one bone, each would need to be keyed to the timeline otherwise they would all reset back to their previous position. Once the Armature is posed then, either “Shift+RMB” multi-select each manipulated bone (so a ‘group’ selection results), or use “A” to “Select All” and then press the “I” key to insert the respective “LocRot” data for the selected items.
Design note: “Insert” is based on active selections with bone positions set relative to other selections. This means that, if by mistake, only a single bone of set, it’s position is done so relative to the bones above/below the chain in their original ‘reverted’ positions, i.e. pose data for all but the selected bone will be lost (and the pose reset to what it was before being manipulated).
To complete this particular pose the ‘head’ will be rotated back slightly so re-select the IK control (“A” to clear previous selections or simply RIMB the bone required, which will automatically deselect everything else) and pressing “R“, “Rotate” it backwards so it stands more-or-less upright again. LMB click to confirm this new position. Finally press “I” to “Insert” this new “LocRot“, which will now only set this specific bone to the timeline, leaving previous pose data untouched.

The three frame ‘groups’ marked in the Action Editors timeline, the ‘start’, ‘end’ – which are the same pose, and ‘middle’ – different pose; the difference can be seen by LMB clicking the frame location in the timeline
Animation playback & Interpolation
Once the pose at frame 15 is placed, the timeline then contain three ‘key’ frames at frame “1”, “15” and “30”. Although static by themselves, in combination they form the basis of a simple animation sequence that can now be viewed using ‘playback’. To do this, from the 3DView Header select “View » Playback Animation” or use “Alt+A” to ‘start‘/’stop‘ the sequential display of individual frames as the widget travels from one end of the timeline to the other when looping playback.
Design note: although the timeline contains a limited number of frames the animation system “Interpolates” the difference through “Tweening“, in effect the frames are ‘blurred’ together so one frame transitions smoothly to the next. This is why the frames that are placed into the timeline are referred to as being ‘key’ frames (‘keyframes’), they are fixed transitional reference points in the timeline between one set of ‘key’ frames and the next. The widgets location in the timeline when playback is stopped will be from where it resumes. During playback pressing the “Esc” key will stop playback but in doing so the timeline widget will reset to the last ‘known’ location it was at when playback was previously started (or resumed) using “Alt+A“.

The animation can be made more subtle by rotating the head bone back so that in combination with the previous manipulation, a ‘breathing’ sequence is formed on playback, “Alt+A” [blend122]
Animation length vs playback length
The actual length of a sequence is determined by two factors, 1) the number of frames it contains, and 2) the number of ‘frames’ Blender is set to render. It’s this latter point which determines the actual length of an animation during playback, not the number of keyed frames, meaning, playback doesn’t automatically stop at frame “30” because that’s the last frames in the sequence, Blender has to be ‘told’ to stop there. This is done in “Render” Properties.

The ‘length’ of an animation during playback is determined by “Frame Range“, a set of options available in “Render” Properties, rather than the presence of keyed frames in the timeline – playback duration can be adjusted independently of the timeline as a result
To do this click the “Render” Properties button and in the “Dimensions” sub-section, where the physical attributes of rendered output is set, find “Frame Range:“. The important parameters are “Start Frame:” and “End Frame:” , as their names suggests the former sets the beginning of playback, the latter, the end (or return point for a loop). For a ’30’ frame sequence then, this means setting values of “Start Frame: 1” and “End Frame: 29” – the reason for using “29” rather than “30” is due to frame duplication across frame “1” and “30” – as they are both the same when playback crosses that point the animation will appear to ‘pause’ or ‘stutter; only a single frame from a duplicated start/end pair is needed. With this in mind LMB click the text to activate input and type, click the arrows or LMB+drag the displayed frame number to increase/decrease the value accordingly. Once set use “Alt+A” to start//stop playback.
Design note: “Frame Range:” settings are important for two reasons; (1) sets the start and end point of a sequence, and (2) ‘start’ and ‘end’ points parameters are often used at export to determine sequence length – again something not typically set using timeline frame markers.
Adjusting animation duration
If the sequence appears to be too fast or too slow during playback it means the amount of time (distance) between either the start and end points, or individual frames, needs to be adjusted. Because this particular characteristic of an animation, its speed, is determined by these distances and the time it takes to cover them, they are key to understanding and correcting problems relating to sequence speed; by increasing or decreasing distances animations can be sped up or slowed down – shorter distances mean fewer frames and faster playback, larger distances mean more frames and slower playback.
Design note: this is notwithstanding an animations “Frame Rate:“, set as another “Render” property within the “Dimensions” sub-section – typically UK/EU use “24/5“, North America “30“, frames per second. Playback speed should never be ‘corrected’ by changing the frame rate. Instead it should be addressed directly by changing duration distances.
To adjust frame distances first press “A” to ensure everything is deselected in the Action Editor – placing keyframes in the timeline typically leaves markers actively selected. Next, using a combination of “RMB“, “Shift+RMB” or “Border Select“, “B“, select all the markers at frame “30“, press “G” to initiate “Move/Grab” and then slide the group along the timeline to frame “60“. LMB click to confirm, setting the overall animation length to 60 frames.
Design note: by default markers snap to the frame as they are moved along the timeline, holding down “Ctrl” overrides this but is not recommended as markers placed ‘off grid’ introduce ’rounding errors’ – data based on decimal points rather then whole numbers, which can be problematic for games and interactive media.

Using “Alt+A” to play the animation, it’s duration is noted as being too short. This can be adjusted using “B” to “Border Select” the group of markers at frame “30“, moving them along to frame “60” [blend124]
Making adjustments of this nature should also be done to any frame in between the start and end points to ensure Armature articulation is ‘correct’ relative to the animation itself and the action being represented in motion. The mid-point of the sequence for instance is still at it’s old location in the timeline which, as this is a simple breathing motion, results in motion that has a faster rate of movement up to that point than after it (quick inhale, slow exhale). To correct this, and equalise the speed at which the character moves, that particular frame needs to be moved to a new mid-point. To do this, press “A” to clear the previous selection then select the markers at frame “15” (RMB individual markers, “Shift+RMB” to multi-select, or use “B” to Border select). Press “G” then slide the group along the timeline to frame “35” (the new ‘midpoint’ of the sequence). LMB click to confirm. On playback now (using “Alt+A“) the animation will be slower due to the increased number of frames, and more evenly distributed due to the position of each group of frame markers in the timeline.
Design note: to ensure proper playback, in “Render” Properties the “End Frame:” value will need to be updated to account for the timeline changes – keeping in mind the frame duplication issue, setting this to “59” ensure a clean animation loop, providing approximately 2.0 seconds of motion using a “Frame Rate:” of “30“, or 2.5 seconds at “24“.

Movement is often asynchronous so moving the control keyframe group slightly to one side of the mid-point helps to create the illusion of a more natural flow of movement, a feature which is particularly indicative of ‘breathing’ [blend124]
Re-naming an Action
With the initial ‘breathing’ animation sequence completed all that remains is to rename it so it has a ‘unique’ name or ‘ID’. This is done by changing the “Unique Datablock ID Name” input box reference to something else other than the default “ArmatureAction“. So, in the Action Editor Header LMB click the “Unique Datablock ID Name” input box to highlight the value for editing then type a new name, typically something relating to the animation itself so as to distinguish it from other subsequent sequences – “idle” or “breathing” for example. Then press “Enter” or LMB click elsewhere on screen to confirm the change.
Design note: The main reason for renaming is to avoid problems where Blender auto-generates an ‘appended’ reference for each subsequent Action, “ArmatureAction.001“, “ArmatureAction.002” and so on. Other than the name there are no indicators as to what a sequences contains or is about. The ‘Action’ itself may display as “Action” in the ID input box if it was created before adding any keyframes to the timeline (see “Inserting Keyframes” above), else it will show as “ArmatureAction“.

Click the “Unique datablock ID name” input field in the Header, currently showing “ArmatureAction“, and change the name associated with the action to “idle” which then becomes the ‘name’ of this particular animation sequence [blend125 – before, blend126 – after]
Add more Action sequences
As a character it’s more than likely that additional animations are needed beyond the initial ‘idle’ sequence. This is done in much the same way as before with the exception that a new ‘Action’ datablock has to be created to house the new sequence specific data (the keyframes). When adding a new Action, it’s best to make sure the Armature is selected then, in the Action Editors Header, click the “+” button to the right of the “Unique datablock ID name” input field (currently displayed as “idle”). A new entry will appear, as a duplication of the previous Action, named “idle.001“, which can be changed as before by LMB clicking the ID input box and typing a suitable name, “sleep” in this instance. Press “Enter” or LMB click elsewhere on screen to confirm the change.
Design note: Unlike the initial Action datablock automatically generated as a result of inserting a keyframe into the timeline, new sequences will need a new ‘Action’ datablock to be created beforehand, else pose data will be keyed into whatever is currently active (possibly overwriting existing data). In addition, when generating new Actions Blender defaults to duplicating the datablock currently active (visible in the editor) to which a numbered suffix is appended, “*.001”, “*.002”, “*.003” etc., so “idle” becomes “idle.001”.

Create a new animation “Action” by click the “+” button[1] to the right of the “ID” name input field, which then duplicates the previously active Action, defaulting to the new (displayed as “idle.001“[2]) [blend127]
Once the new Action has been created either; 1) leave the frames where they are; or 2) clear the timeline by deleting everything. For the latter, simply use “A” to “Select All” and then “Del” (delete) the markers (make sure the mouse in within the Action editor else the contents of the wrong view may be removed). This will clear the track and reset the character ready for a new set of poses (when the timeline widget is move, as there are no poses available, the character will reset to it’s default position).
Design note: although the Action Editor will be cleared, the Armature may still remain in a posed position. To clear this, in the 3DView with the Armature in Pose mode, select all and press “Alt+R” then “Alt+G” to “Clear Rotation” and “Clear Location” data. The Armature will reset back to it’s default position once done.
The new Action should be assigned to the Armature automatically during creation, if not, select the Armature (in either Object or Pose mode), then from the Action Editor Header, click the “Browse Action to be linked” button to the right of the “Unique datablock ID name” input box and select “sleep” from the list (which will contain two entries when viewed – “idle” and “sleep”) – this makes sure any new keyframe data is marked to the correct Action – “sleep”.

Selecting the Action datablock to assign to the Armature before adding new posed keyframes to the timeline – click “Browse Action to be linked” and select the Action just created, “sleep” [blend 127b]
Then as was done previously, slide or LMB click the timeline widget into position at frame “1” in the Action Editor, and then in the 3DView using “G“, “Grab/Move” the IK control (‘head’ bone) forward and down so the characters chin looks to be resting on the top of its chest. LMB click to confirm and again as before, because a number of bones were moved in doing this, use “Shift+RMB” to multi-select them (or “A” select all) then “Insert” the keyframe using “I“. Doing this will over-write any pre-existing frame markers or create a new set at the widgets location in the timeline.

As before to make a new animation sequence, “Alt+Tab” into Pose mode if not already active, pose the skeleton then press “I” to keyframe the new positions; first the start frame (frames can actually be keyed in any order)… [blend128]
Copy/Paste a pose or keyframe (marker)
With frame “1” in place as the start point of the new sequence, to speed up production it can be copied and placed such that it marks an end point (both frames being identical). There are two ways this can be done; 1) by copying a pose in the 3DView; or 2) by copying frame markers in the timeline.
Design note: copy/paste is ‘selection based’, only selected items are affected.
To copy/paste a pose in the 3DView, make sure the timeline widget is at frame “1” in the Action Editor, then using a combination of RMB and/or “Shift+RMB“, select the bones to be copied (or simply use “A” to select everything). Once selected press “Ctrl+C” or, to the far-right of 3DView Header is a group of three buttons, click the left clipboard icon (with an upward pointing arrow) to ‘Copy Pose‘. This holds pose data temporarily in memory. Next, move the timeline widget to where-ever the copied pose is to be placed, frame “60” for example, and use “Ctrl+V” or click the middle button (with the downward point arrow) of the same group of three as before to paste. This will update the Armature and its bones to show the new pose in place, this is temporary however. To make it permanent use “I” to “Insert” the “LocRot” of the selection to finally set the frame markers into the timeline.
Design note: it’s important to insert the keyframe data to ‘fix’ the copy/pasted pose into place else it will be lost when next the timeline widget is moved.
")
… then copy the pose data from the ‘start’ frame, pasting it into the ‘end’ frame in the sequence key – this sets the two points to be using exactly the same data so the ‘cycle’ doesn’t hiccup or pause… [blend129]
To copy/paste frame markers in the Action Editor, using a combination of “RMB“, “Shift+RMB” or “Border Select“, “B“, select some, or all, of the markers at frame “1” and do one of the following, either; 1) use “Ctrl+C“, or far-right of the Action Editor Header, click the left of the two buttons (with upward pointing arrow) to copy the selection. Then move the timeline widget to frame “60” and “Ctrl+V” or click the right button of the same set of two buttons in the Header to paste the markers into position. Or alternatively, 2) using a combination of “RMB“, “Shift+RMB” or “Border Select“, “B“, select the keyframe markers that need to be copied at frame “1” then press “Shift+D” to “Duplicate” the data. This creates a new, ‘duplicate’ set of keyframes that move freely with the cursor along the timeline. Slide and position the markers at frame “60” then LMB click to confirm the action. In both instances – ‘copy/paste’ and ‘duplicate’ – because pose markers are being manipulated directly there is no need to “Insert” them into the timeline.
Design note: copying a pose is generally more advantageous than copying frame markers because a it can be done at any point. Whereas duplicating markers can only be done where they exist.

… then finally keyframe the ‘middle’ position to complete the sequence [blend130]
With the ‘start’ and ‘end’ keyframes in place, slide or click the timeline widget to frame “35” (approximate mid-point), then RMB select the ‘head‘ control bone in the 3DView, press “G” and manipulate the Armature so the pose has the character leaning back slightly with its head buried a bit further down into its chest. LMB click to confirm the new positions. This new pose is the ‘inhale‘ (breath in) aspect of the animation – the previous poses being ‘exhale‘ (breath out), and again, because the pose manipulated a number of bones either “Shift+RMB” multi-select, or “A” select everything and press “I” to key them to the timeline (which will then overriding any previous pose markers or creating new ones). If this sequence is then played back using “Alt+A“, the new sequence will show the character ‘sleeping’.
Design note: if the sequence durations differs in anyway from the initial Action it was duplicated from when created, the “Start Frame:” and “End Frame:” values in “Render” Properties will need to be updated appropriately so the track loops correctly.
Multiple sequences and User data
The final aspect of the process of animating is to properly set the ‘ownership’ of each sequence. Because Blender works largely from the point of view of asking “is this datablock currently in use?“. Any data that is not may be lost when the file is either saved or closed. In other words, whilst a sequence is being used it has a “User” because it’s assigned to something in order for it to be edited, it’s ‘active’. Conversely when that same data is not being used (because a new sequence is being create for example) it has no user, it’s not assigned to anything and is not active. This is a problem because Blender won’t save data if it has no “User”. To remedy this, and avoid loosing data when the file is closed, each sequence will need to have a “User” assigned.
Special Note: depending on the version if Blender 3D being used this feature may not be available and/or required. In such instances this section can be ignored.
To do this, in the 3DView RMB select the Armature or a bone (if not already selected) to highlight the current ‘Action’ datablock. In the Action Editors Header, LMB click the “Browse Action to be linked” button to the left of the “Unique datablock name” input field and select one of the sequences. To the right of the same area, click the button marked with the letter “F” to activate the “Save this datablock even if it has no users” property. A new button will appear displaying the number “2” indicating the datablock now has a ‘User’. Once this is done, repeat the process for each sequence so all data that needs to be kept is appropriately marked which then forces Blender to consider the data as being ‘used’, so upon saving it will no longer be discarded.
Design note: sequences with no Users are pre-fix with a “0” (zero) when displayed in the ‘name ID‘ list. Once assigned a ‘User‘ they appear pre-fixed with the “F” or a numerical value, “2” in this instance, that may vary depending on the number of objects the data is assigned to.

‘Flagging’ Actions so the data associated with each sequence has a “User” and as such won’t be deleted from Blender when the file is saved – Select the Action then be sure to click “F” to mark the sequence for saving. Do this for all sequences to be saved (else they are lost on exit) [blend132]
Deleting or removing keyframes
Although most of the above deals with ‘adding’ frames into the timeline there are occasions where pose data associated with an individual or group of bones needs to be deleted and/or the entire timeline needs to be cleared. For the former, deleting specific markers, either RMB select a specific marker, “Shift+RMB” to multi-select a group of markers, and/or use “B” to “Border Select” a range of markers before then using “Del” as normal to remove the selected from the timeline. For the latter, where the entire timeline needs to be cleared without necessarily deleting the Action itself, use “A” to “Select All” and again, “Del” as normal – when using this latter option ensure the mouse is within the bounds of the Action Editor else the contents of a different view may be selected and removed. This will clear all pose/bone markers and reset the Armature back to it’s original position.
Design note: typically the pose reverts once the timeline widget is move because Blender keep the current pose in temporary memory until that clear through doing the aforementioned. If this doesn’t happen select all bones and use “Ctrl+R” and “Ctrl+G” to “Clear Rotation” and “Clear Location“.

Using the usual selection tools (Border, Circle, Shift+ or RMB), pose/key frame markers can be selected and deleted by pressing the “Del” key to remove the data – this clears the pose for a specific bone or bones at that location and will either reset the pose to defaults or a position relative to markers either side of the frames location
Conclusion & Playback
With the above done the result should be two separate sequences which approximate the short clips below; one an “idle” animation, the other “sleep“. Although in this instance both are set to the same duration – primarily because the second animation used the original (first) as a basis for duplication – they can, and typically are, of different lengths depending on the ‘type’ of animation required; a ‘walk’ animation may be longer than an ‘run’ cycle for example. However, the critical and common aspect of all, is to ensure the ‘start’ and ‘end’ frames are exactly the same to ensure proper looped playback, neglecting to do this causes pauses, drops or glitches at the transition/loop point depending on the degree of difference between the two keyframed locations that can be overly noticeable in game.
A “sleep” animation shows move movement, and although relatively simple, is produced using the same basic skills are more complex sequences
In Summery
First build the mesh using a series of primitive shapes, keeping in mind that the number of faces the mesh has should be kept to a minimum (“just because you can, doesn’t mean you should“). Keep the object clean from the point of view of its structure, make sure any loop cuts, manipulations and/or reshaping isn’t going to result in clipping (where one face ‘cuts’ or ‘clips’ into another) – a degree of forethought is necessary for this. Once meshed, add materials and textures then UVW unwrap keeping in mind image asset usage – is a single asset being used, or multiple? Then make sure the mesh object is correctly positioned and ‘set’ with respect to the grid and “XYZ” orientation (“Front/Right/Top”). Finally for the mesh, assign a set of ‘named’ vertex groups.
Design note: some of the above don’t necessarily need to be done strictly in the order outlined. Ideally however, going ‘backwards’ should be avoided for the sake of expediency – adding Materials when textures are already applied to the mesh can be problematic sometimes for instance.
Next add an Armature and set up the number of bones required, don’t over or under-subscribe the number of bones however, as anything that remains unused or unassigned is a potential problem under certain circumstance. Rename the bones to correspond to vertex groups assigned the mesh and then Parent the mesh to the Armature – the order in which this is done is important. Finally for the Armature, add an Inverse Kinematics to a ‘control’ bone and be sure to use the correct number of bones for the resulting chain to work.
Design note: unassigned bone are usually ‘nulled’ on export, however, in instances where they are not, the additional bones do use up resource, even if they don’t strictly do anything to the mesh. Always set up, rig and export only what’s needed.
Finally, with the Armature and mesh correctly set up, it can be manipulated and posed, and using the Insert function, marked to the Action Editors timeline via a series of keyframes which form an animated sequence. Multiple sequences can then be generated per requirements (“idle” and “sleep” in this instance), each consisting of a set of different poses for various durations.
Design note: whilst not addressed in this tutorial, exporting the files for use in game would be then next step in the process which typically requires the mesh to be ‘prepped (prepared) and exported to the desired mesh/animation format.
Although the process is relatively straightforward is terms of the incremental steps necessary to produce a functional character model, as was noted above, certain aspects of the a build can be done out of sequence, whereas other aspects cannot. Typically the reason for this is to do with the way animation data is based explicitly on an objects (bones of an Armature) ‘location data‘; the ‘XYZ’ coordinates of individual bones and components is based on ‘Origin’ and ‘Parent’ relationships, any changes to these, whilst they may appear fine in Blender, are likely to cause issues when exported or user in a non-Blender environment. It’s vitally important then, to check the technical requirements of a given project to ensure characters fit properly into the world into which they are placed. Double-check everything as it’s being built.

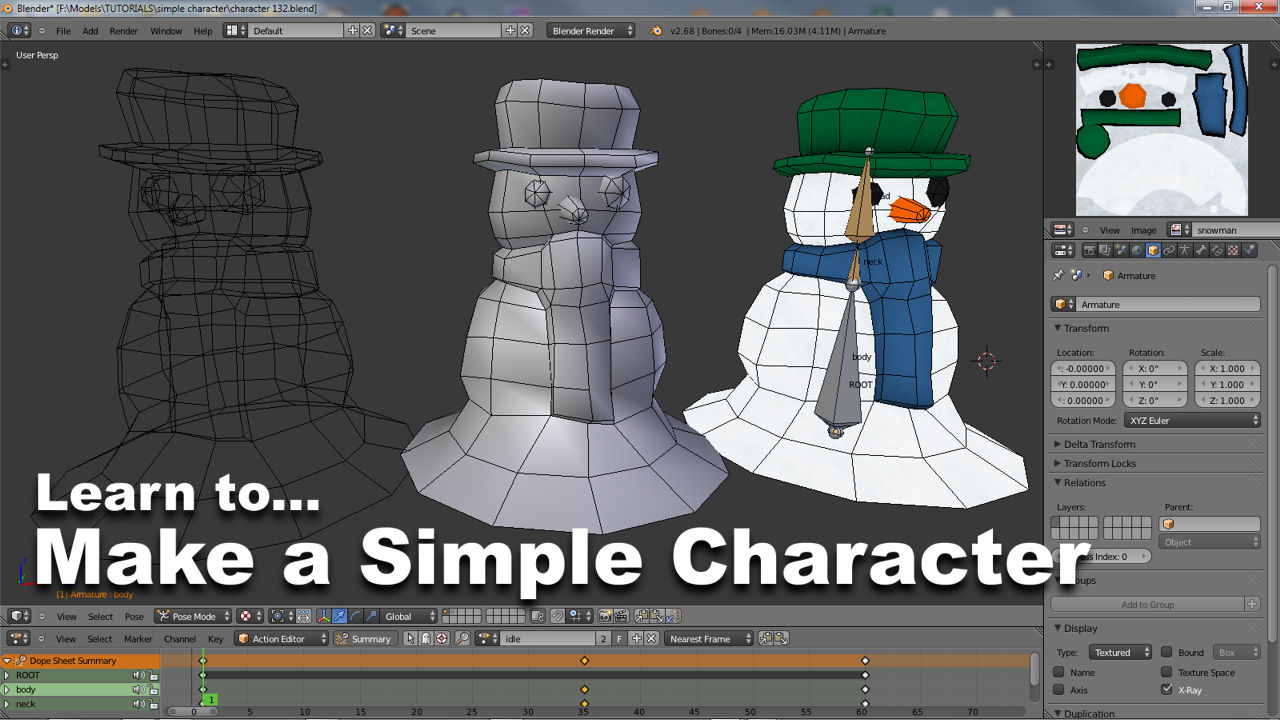
The finished Snowman character (shown with ‘Wireframe’ enabled)

