Chair – UV Unwrapping (#6)
Discussed in the previous sections of the Learning Blender 3D tutorial series were Blenders general layout and basic keyboard and mouse controls. We then put those to use going through the process of making an actual chair that then had a material assigned to it.
These steps give us a basic object ready for the next part of the process of applying texture images to the mesh so it looks like its made of something, – “wood”, “stone”, “metal”, etc.
For this we need to turn our attention to something called “UVW mapping” or “UVW unwrapping“; its an essential part of producing fully functional models that can be used within game or interactive environments, so they need to be understood, what they are and how they are used.
Download: KatsBits – Chair Source (c. 7 MB | *.blend, *.tga).
UVW maps and unwrapping
Imagine covering a table with a large piece of cloth, unfolding and shifting it around so it covers the entire surface. The ‘cloth’, or more correctly how the cloth is positioned, equates to the UVW data of a 3D object, the actual process of working out how the cloth is positioned, is the ‘unwrapping’ of a model, both being part of the overall procedure of making sure the cloth lays on the table correctly and the texture image over the mesh without gaps or exposed areas.
So, a “UVW map” is essentially a set of co-ordinates Blender and other 3D applications use to tell them how a texture image is supposed to be applied over the surfaces of a model, so the data itself is called the “map”.
The process of working out this UVW data and how a texture image should be positioned or placed on a mesh object is typically referred to as “UVW mapping“, “UVW unwrapping“, “UV mapping” or just “unwrapping“.
To recap before going on.
At this point the chair model should look similar to the image shown below, it has a single global material applied that’s composed of individual “Material“, “Texture” and “Image” slots.

Progress so far. Continuation of making a chair in Blender after adding a material, a texture and an image. Next step is to UVW unwrap it to make the textures appear correctly [see *.blend “13”]
Using the UV/Image Editor view
For reasons of being pragmatic it’s a good idea to have the UVW map visible whilst the next couple of steps of the tutorial are carried out. The most straightforward way to do this is to change the top right view, which is currently displaying the “Outliner“, to the “UV/Image Editor“, providing a constantly visible ‘preview’ of the UVW map as its being edited – this avoids the need to switch back and forth between views in the main work space, something that can be left for later in the process when more detailed editing work is necessary on the UVW map.
For now, hover the mouse over the dividing line between the “Outliner” and “Properties” views and LMB+drag it down, then click the “Editor Type:” button top left and change to the “UV/Image Editor” view (just a little over a third of the way down the list from the top).

Switching view to another ‘editor’ in Blender

UV/Image Editor [see *.blend “19”]
Adding a UVW map to a mesh
As with other aspects of using the default scene as a starting point to make the chair, the cube primitive may already have a basic UVW map applied to it which will be initially displayed in the “UV/Image Editor” if any faces are selected when entering Edit mode. Selecting all faces (“A“) will display the entire map typically as a jumble of lines right now, which is the result of cutting and shaping the mesh with this default map in place. This needs to be fixed by correcting the distribution and layout of the UVW map.
If the chair doesn’t have a UVW map then it’s an easy matter to assign one. In Edit mode select all faces of the mesh (“A“), press “U” to open the “UV Mapping” pop-up and then select “Unwrap” from the list of options, this will give the object a basic UVW map as a basis from which to work (although it will likely be ‘messy’ at this stage for the same reason mentioned above).
Design note: because UVW unwrapping is selection based, it’s important to make sure the entire mesh is selected – “A” – else sections might be missed or the UV/Image Editor will display a blank screen despite unwrap being initialised.

Partial UVW map on selected faces

Entire default UVW map displayed in the UV/Image Editor in Blender. Both a default and freshly made UVW map will look like this at this point
Assign image to UVW map
The texture image loaded into the material previous discussed can now be assigned to the mesh. Before doing so to make sure it can be seen in the 3D view, switch from “Solid” to “Textured” shading via the “Viewport Shading” pop-up menu in the Header. Or alternatively use the “Alt+Z” shortcut combination to toggle between the two modes. On doing this the mesh will go ‘white’, both in Object and Edit mode, to indicate the view rendering has changed to “Textured”.
Then, making sure all faces of the mesh are selected, in the UV/Image Editor top right click the “Browse ID Data” button to the left of the big button titled “New” (the button with the small icon of an ‘image’)[1], from the list that appears select the image listed[2], in this instance “WOODgeneric.tga“. It will then appear in both the UV/Image Editor ‘under’ the UVW map and in the 3D view assigned to the chair.

Switching to “Textured” viewport shading (bearing in mind the appearance differences mentioned in the Addendum at the end of the previous chapter) [see *.blend “19b”]

Assigning image to UVW map. 1) Click the “Browse ID Data” button. 2) Image list

Image assigned to chair UVW map in Blender [see *.blend “20”]
UV layout and edge seams
Now we come to what editing UVW maps is all about; the layout and how that’s achieved.
Although Blender has a number of options available to map the UVW coordinates of an object, the best approach is to use a systems of ‘cuts’ that determine how the map is unwrapped so it fits the mesh, making the most efficient use of the amount of room available within the confines of the width and height or the assigned texture image – the “texture space” as its more often referred to as.
These cuts, correctly referred to as “Seams“, are specially marked ‘edge elements‘, tagged so the unwrapping process knows to split the UVW map at these points, creating divisions without the need to physically section the mesh itself into corresponding segments.
To do this switch to ‘edges’ select mode using “Ctrl+Tab“. From the “Mesh Select Mode” menu, select “Edge” from the available options. Before going further however, we need to understand some important principles to do with how seams are placed.

Switching to Edge Select mode in readiness of marking UV seams in Blender
Where and why to place UV edge seams
As mentioned above, seams ‘cut’ the UVW map so it can be laid out flat and efficiently within the bounds of the available texture space. There are two primary concerns when doing this, that;
- seams are placed to make the best use of available space.
- seams are placed so splits in the layout are minimised.
With the above points in mind this typically means that unwrapping a mesh does not always use the most obvious, simplest or straightforward layout if its to be comply with these two core principles; the idea is to have as contiguous a layout as possible so elements are only split into independent units when absolutely necessary.
For example, the easiest way to map the chair would be to do a “box” or “cube” projection so everything is mapped relative to their respective orientation of “front“, “back“, “top“, “bottom“, “left” and “right“, resulting in six main individual UVW island elements. Although time and effort is saved in not having to place seams, not doing so tends to result in the UVW map having more splits and individual island elements than necessary due to the way each projection isolates itself and it’s constituent parts from it’s neighbours.

A typical quick ‘planar’ projected UVW unwrap in Blender results in texture breaks and un-optimised UVW unwrap [see *.blend “20b”]
A better approach would be to think of the UVW map in terms of how it relates to the objects construction. The tutorial chair was constructed based loosely on a real chair so it has three main mesh elements, a “back“, a “seat“, and a set of “legs“. Unwrapping this means using seams to split the map and take advantage of the way each of these elements naturally interact as a unit – seams can be hidden from view under or inside parts of the mesh as well as being hidden in plain sight along connections and joints – the end result being a layout that has larger elements and better texture usage overall. As this is the better of the two, we’ll discuss its use in UVW unwrap the chair model below, breaking it down into the mesh elements mentioned above.

An example of a well optimised UVW map layout in Blender; the objects UVW map should be split into logical elements that made sense to what the object is, that way seams can be hidden in plain sight [see *.blend “20c”]
Switching to “Wireframe” view
To make the unwrapping process less confusing and so the seams can be seen more easily as they are marked, switch to “Wireframe” view, click the “Viewport Shading” button and select “Wireframe” from the list. Or alternatively press the “Z” key to toggle between “Wireframe” and “Solid” shaded views. Now we can begin to lay out the initial seams and see what’s going on as that’s done.

Switching to Wireframe view to make marking seams easier to see and do in Blender. Select “Wireframe” from the “Viewport Shading” options or press “Z” to toggle wire/solid view [see *.blend “22”]
Selecting edges for seam marking
We’re going to be using the “Loop Select” tool during this process which means we can mark out a number of edges in one go, quickly; remember that RMB selects a single edge, holding “Shift” +RMB select multiple edges. Now hold “Alt” and RMB click an edge, depending on where you clicked you should notice that an entire set of edges are selected. This is a “loop“. Do the same again, this time hold “Alt+Shift” to add more loops to the previous selections.
Using these new options select the edges around the top of each leg where it joins the ‘seat’ area; make sure to use a combination of “Alt” and “Alt+Shift” to add individual edges where a loop selection is not possible.

Selecting a single edge loop using “Alt+RMB” in Blender

Selecting additional edge loops with “Alt+Shift+RMB” in Blender

Loops selected at the top of the chair legs [see *.blend “21b”]
Marking seams
Once all the appropriate edges are selected press “Ctrl+E” to open the “Edges” menu (shown below) and select “Mark Seam” from the available list of options to mark the them as seams, they will display in the 3D view highlighted red. This isolates the chair legs, creating a separate element in the UVW map, there will eventually be a number of these elements corresponding to the UVW sections we’re creating.

Edge menu, selecting the “Mark Seam” option in Blender

Legs UVW element isolated with marked seams
Deselect all (“A“) to make sure the next loop selection is clear of any previously marked seams and then using loop select as described above, select and mark the back of the chair as shown below so the loop wraps around the mesh where the ‘back’ joins the ‘seat – note that the ‘seat’ element has been automatically isolated by a process of elimination, by marking the ‘legs’ and the ‘back’ elements all that’s left is the seat area itself.

Selecting the edge loop around the back of the chair ready for seam marking

Setting the edge seams around the back of the chair to effectively isolate the back and create an independent UV island [see *.blend “21”]
Flat UVW maps and seam placement
At this point another basic principle of unwrapping needs to be explained, that UVW maps need to be ‘flat’. The best way to describe or picture this is to think of a cardboard box being cut, unfolded and laid out flat so each side of the box is spread to occupy its own space.
With the above in mind, at this point the seams currently placed have split the UVW into individual ‘islands’ (“back”, “seat” and “legs”). Further work is now necessary to refine each UVW section so they unwrap better, being flattened out like the imagined cardboard box mentioned above. This means marking more seams in strategic positions. First we’ll tackle the legs.
Keeping in mind that seams need to be hidden (subject to what was mentioned above about using natural breaks in a mesh), the best place to do this is down the inside back of the leg – as this isn’t an area normally visible to the viewer it’s a logical place to place the seam the will split the UVW. Additionally, we have to further split the ‘foot’ so that, thinking of the cardboard box again, it flattens out correctly as well once unwrapped. This sequence is shown below – a seam is placed down the inside back of the leg and on three sides of the foot, making sure that the ‘open’ unmarked edge is ‘free’ (the seams marked for the foot should be an extension of the inside back leg, else it’ll not unwrap correctly).

Marking seams to flatten leg UVW maps in Blender

Seams marked to allow a flat UVW layout of leg UVW [see *.blend “21c”]
Although we’re not going to unwrap the chair fully just yet, two legs have been to help explain visually why this process of seam marking the UVW map is important. Shown in the images below are the two legs, their respective UVW map sections and the results in the 3D view.
It’s immediately obvious why it’s always a good idea to take the time to properly unwrap a mesh using seams; the green highlighted ‘marked’ UVW map produces much cleaner and generally better results with recognisable texture distribution over the model, i.e. the textures orientation is put to use. The unmarked (un-seamed) red highlighted section produces the opposite, distorted visual appearance and messy distribution, making texturing much more difficult.

The difference UVW mapping makes to a model

Direction and general different between a seam marked and unmarked UVW map. 1) the seam marked leg in the UV/Image Editor and 3D view. 2) the unmarked leg and the resulting texture appearance in the 3D view [see *.blend “22”]
Seam marking the rest of the model
With the above information in mind, the rest of the mesh can be similarly seam marked so the various elements are ‘flattened’ when the next step of actually unwrapping the entire mesh is done. For the remaining legs this means marking seams similar to the following; the important seams to place correctly are the major edges on the ‘inside’ of the mesh (as shown below – the rest of the chair is hidden from view with “H“, “Alt+H” to un-hide), the underside of the feet can be marked in any way so long as a single edge is left clean and untouched – the reason for this will become clear later.

Marking the seams on the inside edges of the legs so they are hidden from view thus hiding any ‘breaks’ in the texture [see *.blend “22b”]
Continuing with the rest of the chair, the back should be seam marked so that again, the seams are placed where they will be least noticeable, ideally down the outer back edges of the mesh (shown below). This will allow the map to be flattened when unwrapped whilst at the same time keeping the split in the texture where the seams are placed out of sight when looking ‘at‘ the chair.

Marking the seams down the back of the chair so the UVW map unfolds flat in Blender [see *.blend “22c”]
The only mark-up needed for the seat is to split the underside and each corner so the unwrap flattens that section, marking along the outer corners takes advantage of natural edges present in the mesh so that although the texture will split there, it will be ‘hidden in plain sight’ because it’s doing something obvious. Note that the top edges of the seat area should remain untouched (see below).

Marking the seat seams to flatten the UVW map in Blender, isolating the underside of the seat and splitting the sides [see *.blend “22d”]
The results of these seam markings should be similar to the images below. Once this has been done. the chair is ready for its UVW’s to be unwrapped.

Final seam markings added to the chair mesh before unwrapping the UVW map in Blender [see *.blend “23”]

Seams marked to split the mesh UVW’s into elements
Unwrapping a models UVW map
The images below show the UVW map and texture assigned to the chair in their current state; because the mesh is still using the default mapping, it’s a bit messy as a result of cutting and shaping the chair during the process of construction. This needs to be corrected by carrying out a proper unwrap on the mesh, which we’ll now do.
Design note: when Blender unwraps objects it does its best to follow two simple rules; 1) keeping all the elements sized relative to each other; 2) making sure its using as much of the available texture space as possible. In doing this the application is conforming with a broader context, an aspect of UVW mapping and working with 3D models commonly referred as “texture density“, essentially using the best distribution it can for a given texture size (to read more on this, click here or alternatively here). Unwrapping the UVW map should ideally be done with this in mind.

Current state of the UVW map after seam placement but before being unwrapped in Blender

Default UVW map (applied to the original object used to build the chair) shown in the UV/Image Editor before being unwrapped in Blender [see *.blend “24”]
To unwrap the entire mesh and produce a UVW map for it, in Edit mode (“Tab“), select all faces (“A“) and then press “U” to open the “UV Unwrap” menu pop-up, select the “Unwrap” option (shown below) to create the UVW map for the chair based on what’s been discussed above, i.e. Blender will use the seams marked on the mesh to make a “best fit” calculation, determining the orientation and position of each UVW element within the bounds of the texture (bottom below) so they’re separate islands occupying their own individual areas on the map. This can be left ‘as is’ but it’s usually a good idea to make a few adjustments to the UVW elements so they better fit the texture, making the use of space more efficient. For this we need to edit and manipulate the UVW map itself.

Press “U” to open the “UV Mapping” options in Blender

UVW map unwrapped in Blender

UV/Image Editor view of the unwrapped UVW map of the chair in Blender colour highlighted relative to each island element [see *.blend “25”]
Switching to UV/Image Editor
Looking at the initial unwrap Blender produced, three problems are evident; 1) “Seat top” is rotated (highlighted red). 2) “Legs” elements are not all the same size (highlighted green). 3) The overall map could be slightly larger so it uses more of the available texture space. With the tools available in the UV/Image Editor these problems can be fixed by (not necessarily in this order) rotating the seat, scaling the leg elements so they’re the same size, and then resizing the overall map to use as much texture space as possible.

Problems with the default UVW unwrap of the chair model in Blender
To make this next step of editing the UVW map easier to do, switch from the main 3D view to the UV/Image Editor (“Shift+F10“), make sure to be in Edit mode and that the entire mesh is selected before hand as the UVW map only displays relative to selected faces.

Switching from the 3D view to the UV/Image Editor using the “View” buttons in the 3D view header in Blender [see *.blend “26”]
Selecting UVW map elements
The UV/Image Editor uses many of the basic ‘selection’ and ‘manipulation’ functions available when in mesh editing mode; “A” to de/select all, “B” to “Border Select” elements, “C” to “Circle Select” and “Shift“+ and/or “Alt“+ RMB to select or MMB to deselect. Using “G” to “Grab” objects, “R” to “Rotate” and “S” to “Scale“, although we didn’t need to use the latter two when making the chair mesh. These will allow us to edit and manipulate the UVW map for better optimisation.

“B” to “Border Select” in the UV/Image Editor for Blender

“C” to “Circle Select” UVW faces/vertices in the UVW Editor in Blender
Editing UVW maps
Use any combination of selection tools and select the UVW map section for the top of the chair (shown below) and then press “R” to “Rotate” the UVW map section and rotate it so that it’s perpendicular to the edge of the texture, it should approximate the version on the left shown below. Once rotated LMB click to ‘set’ the new angle (to snap to the grid whilst rotating use “Ctrl“). That’s all the seat needs doing to it at this point. Next are the legs.

Using “R” to rotate UVW maps in Blender [see *.blend “26b”]
Clear the previous selections, “A“, then select the slightly smaller leg element show below. Press “S” and move the mouse to “Scale” the UVW section so it’s approximately the same size as the other leg elements. LMB click to set the action. Whilst the element remains selected press the “G” key and “Move” is to one side so it’s clear of any other UVW map sections; this just makes it easier to re-select later on. Next the overall map needs to be resized so its using as much texture space as possible.

Using “S” to “Scale” a UVW map section in Blender [see *.blend “27”]
When resizing an entire UVW map it’s best to use the largest part of it as a point of reference so you know how much room is available for scaling relative to the texture. For example, the largest part of the chairs UVW map is the section that corresponds to the back (outlined in yellow below). When scaled, although the overall map may exceed the texture boundary, the back won’t, it’ll only be changed so far as it fits within the space available, other elements then being re-positioned around it (more on this below).
Select the entire UVW map (press “A” twice or use border select). Press “S” and move the mouse to rescale the UVW map, LMB click to set the new size – if it helps use “G” to move the map and position it centrally over the texture map so it’s easier to see the size difference as the UVW map is changed – hold “Ctrl” to snap movement to the grid, or “Ctrl+Shift” to snap using smaller increments whilst scaling. The end result should be similar to the image on the right hand side below which shows the back of the chair fitting just within the bounds of the texture, elements falling outside the bounds will need to be reorganised.

Re-scaling UVW map to use more texture space [see *.blend “28”]
Reorganising a UVW map
Reorganising the UVW map just means making sure that all the elements are positioned inside the texture space, that position being determined by how the mesh is to be textured, either as a “unique” object, or as a “repeat” (often called “tiled”) object.
Right now, the UVW map is “unique” to the chair, each element occupies its own ‘unique’ space within the texture/UV boundary. This is advantageous for making an object completely unique so that each area had its own colour or pattern, or for when baking shadows or ambient occlusion (shading caused by ambient light). However, it does mean that the entire UVW map has to be organised to allow for uniqueness, which may mean having to reduce the overall size of the map so everything can fit in the allotted space (see below left).
The alternative is to “repeat” elements, using the same area of a texture on several sections of a model. This usually results in UVW maps being slightly larger overall, which gives better texture density, but it sacrifices the ‘uniqueness’ previously mentioned; the legs of the tutorial chair being a case in point (below right). An ‘aggressive’ form of this would have the chair split down the middle, duplicated and mirrored; the UVW map for the remaining half also being duplicated, a ‘repeat’ element.

Organising UVW maps relative to “unique” (shown on the left) or “tiled” (shown on the right) elements [see *.blend “28b” & “28c”]
Although we’ll be using a ‘unique’ layout for the chair (shown below), it’s worth pointing out here that a ‘repeat’ UVW map can be made in just the same way as a ‘unique’ map in terms of how the various selection and manipulation tools mentioned previously are used. Additionally, the “Mirror” tool flips selected elements along the “X Axis” or “Y Axis“; editing the chair leg UVW’s so the map ends up with the legs all occupying the same texture space would require two sections to be flipped before being placed one on top of the other. To use the tool press “Ctrl+M” in the UV/Image Editor, then press either “X” or “Y” to flip that axis.

Using the UVW Mirror tool to flip elements along “X” or “Y” axis in Blender
So, use the select, move, rotate and scale tools as previous and reorganise the element of the UVW map so the back runs down one side and the remaining texture space is used for the legs, seat top and seat underside; the layout should end up similar to the shown below – make sure to try and keep all the elements sized relative to each other when doing this, if one section needs to be resized, select the entire map and then resize, this ensures that texture density is the same on each segment.

Final layout of the chair UVW map in Blender [see *.blend “29”]
UVW map orientation and textures
An additional aspect of UVW unwrapping is how the orientation of the map relates to the texture. The layout settled upon above was used because the UVW follows the visible ‘grain’ present on the wood texture – this may or may not mean less work for the artist depending on the texture being used, but it’s always a good idea to minimise the amount of work that needs to be done, taking advantage of what’s there. So whilst it’s not an absolute requirement, if the UVW’s are laid out to capitalise on the textures appearance, all the better.
For example, the images below show what the texture looks like on the actual model. The first shows the final layout; notice the wood grain of the texture is orientated along or with the model. The second image below is what happens when the UVW map or texture uses a different orientation, the grain goes counter to or works against the model, this potentially means the artist having more work to do working with that UVW map orientation.
Once this is done, the chair model is completed with a good clean UVW map.

Texture direction flows in the same direction as the UVW map orientation

Texture direction flows against UVW orientation [see *.blend “30”]
Conclusion
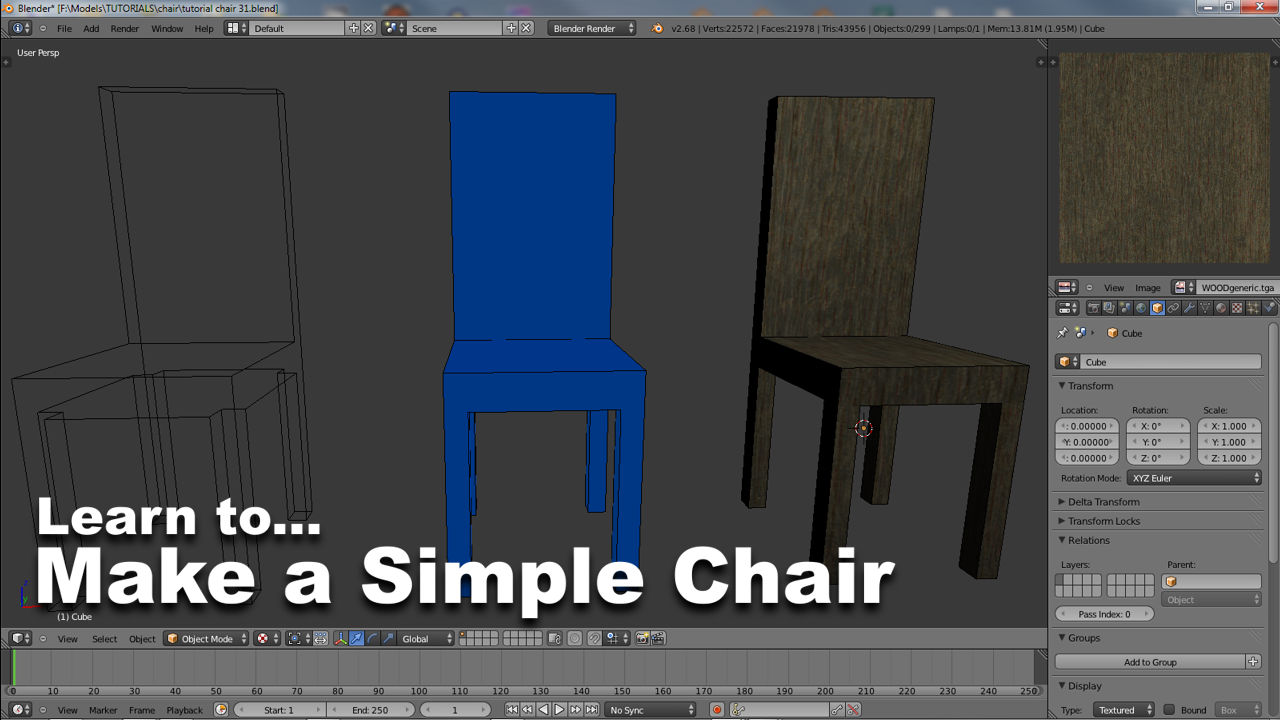
With all this work done, making the mesh, adding the materials and finally UVW unwrapping the model, the end result is a simple object with a ‘wood’ texture applied built using a number of core principles and tool available in Blender.

The final chair model after all this work in Blender [see *.blend “31”]

