Two Sided Meshes/Two-Sided Materials in Blender
A common issue that crops up modelling with Blender 3D or developing content for games, is how to make a mesh double-sided whilst using different materials on the each face. Although the solution is relatively straightforward, it has to be implemented relation to the renderer being used; rendering two sided faces increases the amount of data being processed regardless as to the process used. Bear that in mind when reading the following tutorial and/or implementing this ‘trick’ in a game.
Important: Backface Culling and “Texture Face” settings are not the same as 3D View Transparency.
Download: Double-Sided Mesh Example (c. 300 KB | *.blend, *.tga).
Single sided faces & meshes
If we start with the basic question of;
The basic answer is;
Generally speaking all faces are rendered single sided by default as it’s the quickest and most efficient way to give shape and form to, and in, a real-time environment by processing the coordinate data associated with the individual polygons from which objects are composed. Due to the fact that items are rendered to screen this way, standing inside a mesh looking out, the user or player is able to see the external world because nothing is blocking their view of it. This is the default condition of a mesh.
Double or two sided faces & meshes
If, on the other hand, the mesh needs to have an ‘inside’ this means ‘forcing’ double or two-sided polygons. This is done through duplicating and inverting (relative to the orientation of the original face the duplication came from) a face so its normal point inwards, the end result being two identical faces, back-to-back. Because standard double-sided polygons are created this way, the duplicate will also carry the same ‘face data’ as the original – the same materials, UVW’s, textures, etc are copied onto the inverted face when duplicated, resulting in both being identical (except for the orientation).
Design note: this is one reason why polygons have face normals; they are the mechanism through which the orientation a given face is determined (which direction it faces and it’s general position).
Double sided meshes with different materials
Now whilst it is technically possible to render a standard two-faced mesh with different materials on either side, it can only generally be done through some relatively complex calculations that have to differentiate and then determine how materials and surface properties are assigned to any duplicate faces in such a way as to mean they become independent elements from the original. This all requires precious resources and processing time to render to screen, in essence;
mesh surfaces » duplicate » invert » mat lookup » duplicate » make unique » assign » render
However, because it’s generally a good idea to do things as ‘cheaply’ as possible, the best way to actually achieve a two-sided mesh with different material assignments is to use two separate meshes like this;
• mesh 1 surfaces: » matset1 » render
• mesh 2 surfaces: » matset2 » render
Essentially everything is pre-calculated, polygon positions, material assignments and surface data is already present in the mesh so all that’s being done (relatively speaking) is the ‘reading’ and ‘rending’ of that data.
How to set up double-sided meshes
Before progressing it helps to activate “Wire” mode – in Blender this option is located in “Object” properties, under the “Display” sub-section (for Blender 2.49 click “Wire” in “Object” (“F7“) buttons). The following assumes the mesh has been UVW mapped and textured, if it’s not then activate “Face Normals“ so it’s easier to see which direction a polygon is facing (because the mesh may or may not be displayed as the ‘white’ of untextured surfaces).
The default “Viewport Shading” mode in Blender is “Solid“. In this mode meshes (faces and polygons) appear double sided because it’s relatively straightforward for the application to render a materials simple flat colours to both sides of a face (shown below).

Although the mesh and faces are UVW mapped and textured, in “Solid” view the mesh is draw double-sided due to using basic material colour values
However, when the scene is toggled to “Textured” mode (“Alt+Z“), the mesh effectively vanishes from view because there’s nothing being rendered from the ‘inside’ of the mesh; this incidentally means the mesh can’t be selected because Blender thinks there’s nothing there to select – this is the reason for activating “Wire” mode above; with the wireframe visible, it also means the mesh is subsequently visible as a selectable object (shown below).

Switching the “Textured” view reveals the mesh, by default, as being single-sided only; this requires the least amount of resources to render to screen
Select the object and make a ‘unique duplicate‘ using “Shift+D” or “Object » Duplicate“, this will create a copy of the original mesh that’s not directly linked to it (changes to this new mesh won’t effect the original, and visa-versa).

Shift+D duplicated original mesh, which also copies material, texture and UVW map data from the original to the duplicate
Switch to “Edit” mode (“Tab“) and select the entire mesh (“A“). In the toolbar on the left find the “Normals” sub-section and click “Flip Direction” or “Ctrl+F » Flip Normals“. The mesh will invert, the faces then pointing inwards as shown below so that there are now two versions of the same mesh structure, with different material assignments, for both the ‘outer‘ and ‘inner‘ surfaces of the object.

Flip or invert the face normals so they point ‘inwards’. 1) “Flip Direction” button in the “ToolShelf” inverts selected faces. 2) activate “Normals” for “Face” to see direction if mesh isn’t UVW mapped/textured. 3) inverted polygons

View showing both the original and duplicate mesh with their respective faces pointed outwards (original) and inwards (duplicate)

Because the duplicate mesh is a separate object in it’s own right, Vertex Colours can be painted onto the mesh without affecting to the other side – which can’t normally be avoided when relying on ‘standard’ two-sided materials

Similarly, assigning a separate material to the duplicate mesh, which has no affect on the original mesh because they’re both completely independent objects
Two-sided Meshes with different Materials
The basic principle behind two-sided Objects with different Materials either side is ostensibly the same as the above with one exception; both the original and duplicated mesh need to have completely separate and independent Material assignments – this can be done by creating two Materials initially and then assigning them to each mesh as they are made and duplicated, or, duplicating the mesh and then making the Material carried over to that a unique “User” that can be edited and adjusted as needed.
Design note: Materials can be assigned to Objects before or after duplication depending upon workflow preference; there is generally no advantage either way.

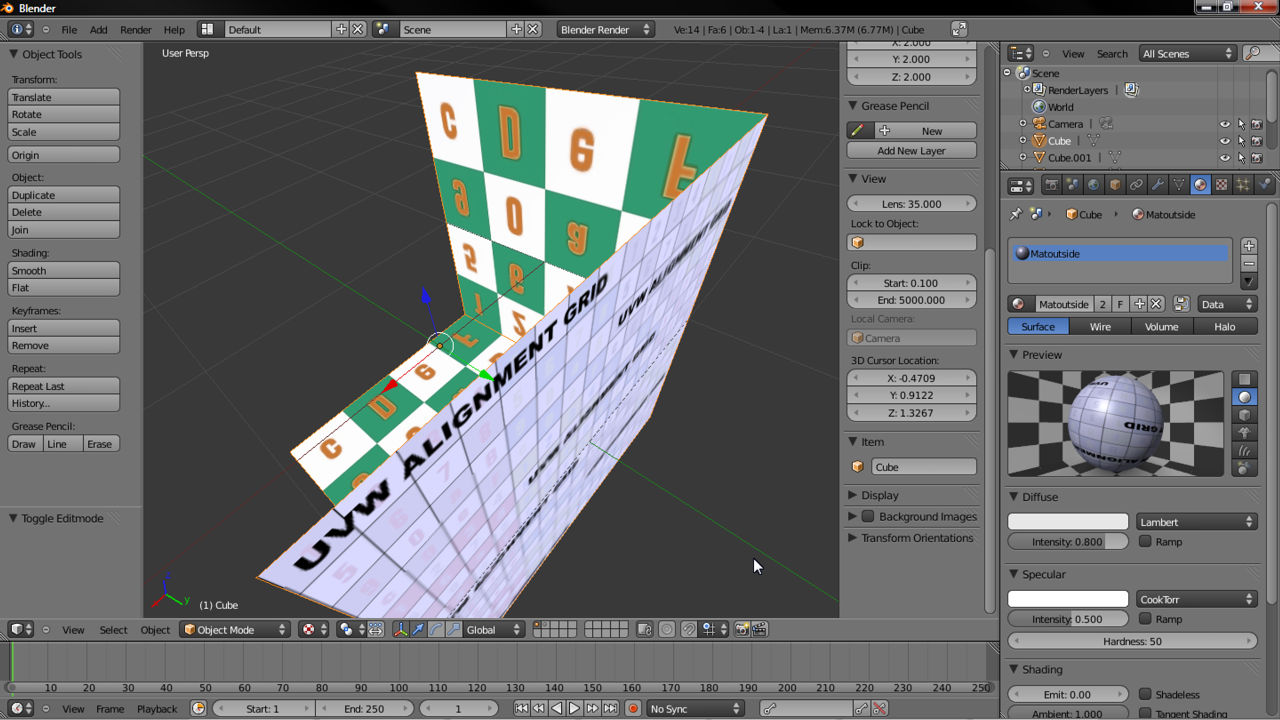
A two-sided Object showing different Materials (and Texture Image) assigned inside and outside giving the impression of a more complex double-sided mesh
With a Material assigned for instance, upon Object duplication a new “User” will be added so the number of “Users” displayed in “Material” Properties associated with that Material will increase – in this instance from “2” to “3” (because there are already two Objects in the Scene referencing the same Material). To make this new addition ‘unique’ select the duplicated mesh and then (LMB) click the “Display number of users…” button directly under the Material list section (marked by the presence of a number, in this instance “3”). It will immediately change to an “F” and the Material ID (it’s ‘name’) will be appended “*.001” – “Material.001” – making the dataBlock unique; change this ID/name as needed.

Originally there were two “Users” of the checker Material which has increased with duplication of the mesh. There are now three distinct mesh Objects referencing the same Material
In “Texture” Properties edit/add a new Image to the Material and assigning it to the Objects UV map (if already exists) using the UV/Image Editor. Then finally as above, in Edit mode select everything and from the ToolShelf click “Flip Direction” under the “Normals:” subsection in “Shading/UV’s” properties.
Design note: Blender 2.7 and above introduces “Tabs” to the main ToolShelf so tools and their respective properties and options may change location relative to previous versions of the application.

An initial Material is assigned to the mesh prior to duplication – this can be done after-the-fact but may be slightly more fiddly to manage on complex objects or meshes

The second Material is made ‘unique’ and a completely separate image is assigned to the Texture slot meaning the overall Object now has two independent Materials (and associated elements) assigned to either side that can be modified and edited separately
The end result of this duplication and ‘unique-ifcation’ of Material assignments will be an Object comprising two distinct surface sets – ‘inside’ and ‘outside’ – positioned back-to-back with different textures assigned to either side that can be manipulated and changed independently of each other.

Final Object comprising a separate set of faces on the inside and outside with different Material assignments that can be edited or modified independently of each other
Blender Game & Two sided meshes
Introduced to Blender 2.60a the way double-sided meshes are rendered in “Blender Game” mode (which simulates the dynamic environment of Blenders Game Engine) has changed; rather than culling individual surfaces as previously required, it can now be done to entire Objects. Whilst this does not necessarily alter the way surfaces and Materials are dealt with generally, the update is something that needs to be kept in mind because, as mentioned in the Conclusion above, for game rendering purposes it’s best surfaces be rendered from one side only (the direction the surface normal is pointing) to save resources. Where a double-sided mesh is then required in this type of environment, the above approach can be employed.
Design note: as mentioned above, when Blender renders surfaces they are drawn double-sided by default, in other words the outward facing surface (determined by the direction a particular surface normal is pointing), is duplicated and flipped or mirrored inwards to give the impression of a two-sided surface.

Enabling “Blender Game” render engine mode in Blender 2.60a where the material system was updated. Generally speaking all subsequent and current versions of Blender use the changed Material processing system and the way double-sided meshes are handled

Enabling “Backface Culling” to disable Blender automatic processing of surface so they draw to screen single-sided rather than two-sided – the default for any game related content should be to us single-sided rendering because it uses less resources to render surfaces

Previously when working with individual surfaces in Blender the “Texture Face” properties would appear under “Object Data“. With the change introduced to Blender 2.60a, this is no longer the case – surface rendering is now ‘Object’ not specifically ‘Surface’ based

In Blender 2.59 the “Two-sided” option appeared under “Object Data” properties. This has been moved (as described above). Any items or Objects created in versions previous to Blender 2.60a will still import/open into Blender with backface culling, however management of those properties and options relate to Materials instead
Conclusion
For this process to be effective, it’s best to ensure that materials applied to objects are not using any form of general or global double sided setting or surface flag; this applies as much to using Blender 3D and 3D applications in general as it does to game engines because it’s more efficient to only render surfaces that need to be treated as double-sided, standard materials should be single-sided by default to which two-sided is then applied as required on a case-by-case basis. The process described above is also a handy ‘cheap’ way to produce double-sided objects using technology that doesn’t have that capability – simple items such as windows, sprites and so on can be made on condition they are not to be ‘spammed’ over a wide area – grass sprites over a terrain for example – as that can be extremely resource heavy to render.

