FBX & Making Custom Poses for IMVU
Making stand-alone pose products for IMVU is relatively straightforward because, other than an avatar master file, nothing else is needed to export a workable *.fbx file. With that said, generating animations with a reasonable degree of fidelity can be challenging, not because of any particular complexities associated with the process but rather because the results need to be relatively faithful to reality.
Download: KatsBits – NomNom Pose Example (c. 1.1 MB | *.blend, *.fbx).
With this in mind the following tutorial discusses the basics process of producing custom, stand-alone, avatar poses for IMVU (applicable to both female and male avatars). A rudimentary understanding of Blender is recommended.
The following material does not discuss making the game model/mesh seen in IMVU, i.e. ‘chair’, ‘lamp’, ‘bed’ or other visual element Users actually see in game/client. To learn how to mesh and make model in Blender click here.
Introduction
As briefly mentioned above, avatar actions, stand-alone poses not associated with other products, do not rely on additional content to be made, everything that’s needed is contained within the avatar pose file. Here a representation of the female or male avatar is presented (in separate files for clarity) such that they can be manipulated and posed like an action figure, the limbs being controlled by an underlying skeleton whose joints can be bent and articulated so that, along a chain of bones that are linked together, a leg can be shown to ‘kick’ or arm ‘high-five’.
Design note: poses don’t add or remove material to/from the avatars meshes or skeleton but instead simply register the position of (Armature) bones. It’s this information that’s subsequently exported out to FBX and used in IMVU as the triggered action (static or animated. cf. "adding an action").
Opening the IMVU Avatar Pose File into Blender ("File » Open » [browse, select and open]" or drag-and-drop the file into Blender from Windows/File Explorer) the first thing to note is the avatars default pose, arms outstretched to form what is typically referred to as a "T-Pose", the figures stance resembles the letter "T". This is the ‘base’ pose for both female and male avatars from which all poses are made.
Design note: why a "T"?. The "T" stance is useful as a starting point because the mesh is generally positioned at its most relaxed, there are few kinks or distortions, especially under the arms, at the elbows or knees, pinch-points where the mesh can collapse when over-manipulated. In other words, poses start from a relaxed position that accommodates mesh stretch and collapse more-or-less in all directions.
IMPORTANT: the skeletons (Armature) bones as correctly orientated relative to IMVU, they should not be altered in any way that would otherwise appear to ‘fix’ this beyond being manipulated to create avatar poses. Doing otherwise will break the resulting action once imported (bones will be incorrectly aligned).
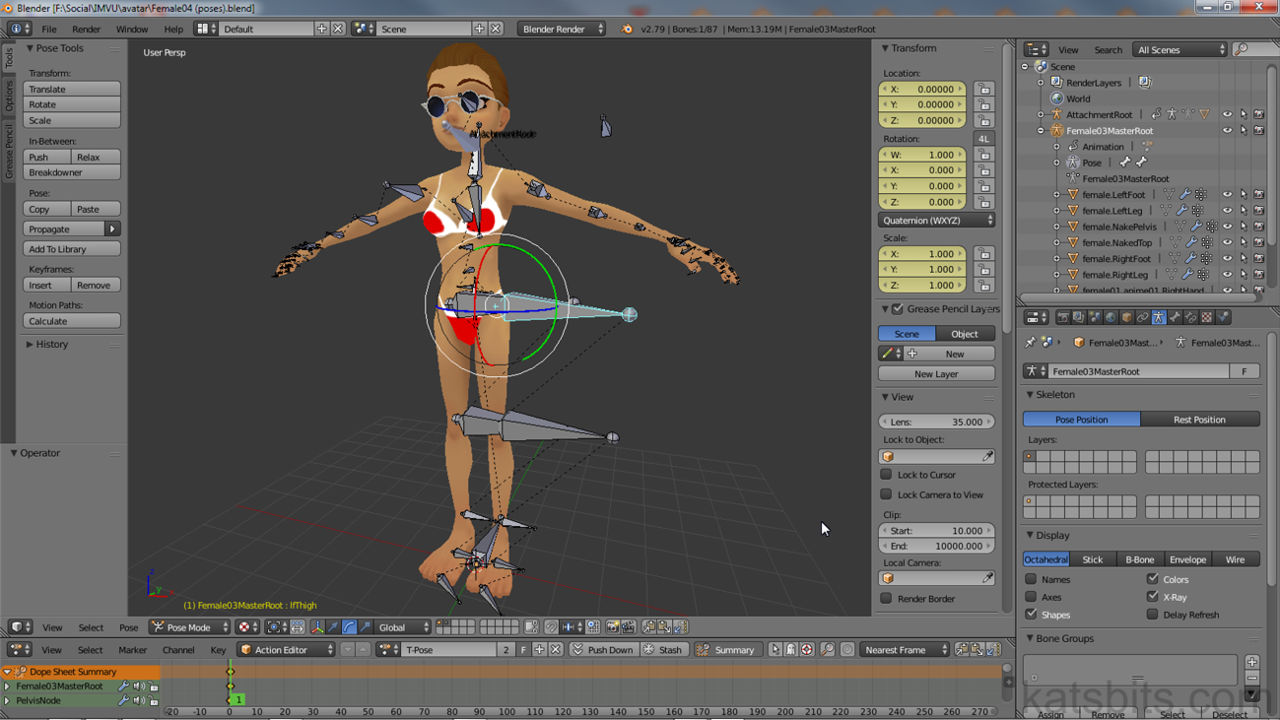
Once open the Avatar Pose file displays the avatar in "Texture" mode with the underlying skeleton set to "X-Ray" (see-through) mode for visibility. The skeleton, an "Armature" in Blender, is in "Pose Mode"[1] and a single bone pre-selected[3], highlighted with a pale-blue outline and showing a set of coloured circles representing the manipulation axes[4] of "Rotate"[2] widget. The "Action Editor" timeline[7] has an "Action"[6] (sequence) already established, with a set of keyframes pre-marked[5] at frame "1" in the timeline (indicated by the green timeline widget/slider), holding the positional data related to the current pose, the default "T-Pose".
Design note: the different colours shown when something is selected indicates item selection and the editing context, in "Pose Mode" for example bones display with a pale-blue outline, whereas in "Object Mode" the outline is orange (individuals bone can only be selected in "Pose Mode" or "Edit Mode" ["Ctrl+Tab"]).
In this state the avatar pose file is ready for use to make new pose (‘static’ action) or pose sequence (animated action).
Design note: if the pose file is not in the state described in the main text above, right-click the "Armature" skeleton then check "Pose Mode" is active; left-click the "Interaction mode" selector[2] and select "Pose Mode" from the list. In the "Transform manipulators" buttons[3] left-click the menu and select "Rotate", this sets up the avatar ready for posing. If the "Action Editor" is not visible; left-click the "Current editor type…" button[1] far-left of the of whatever view is below the 3D View (typically the "Timeline" editor) and select "Dope Sheet" before then setting the "Editing Context" to "Action Editor"[4].

If the pose file looks similar to the first image immediately above it will need to be set up before it can be used – change the default "Timeline"[1] running along the bottom to "Dope Sheet" then select "Action Editor"[4] from there. Switch the "Interaction mode" to "Pose Mode"[2] and set the "Transform manipulators" widget to "Rotate"[3] left-clicking the appropriate button


The IMVU avatars (female and male, female shown above) are essentially a collection of meshes that are controlled by an underlying skeleton, called an "Armature" in Blender – highlights with an orange outline when selected in "Object Mode"

Posing the avatar is done in "Pose Mode"[1] where individual bones are selected[3] and manipulated using the "Rotate" transform widget[2 & 4], the positions of which are then marked as "Keyframes"[5] in an "Action" sequence[6] in the "Action Editor" timeline[7] ready for export to fbx and IMVU
Using the Avatar Pose file
The avatar pose file is set up to automatically insert keyframes whenever a bone is moved or manipulated so there is no specific need for their being manually marked (see "Inserting Keyframes" below), all that’s needed is some bone and timeline manipulation. To this end, with the avatar file open first make sure the timeline widget/slider is (pre-set) at frame "1" (left-click or drag if not), then right-click ("RMB") the bone associated with the pose about to be made, for example creating a ‘nomnom’ pose, the upper arm ("lfBicep") is selected. Ensure the "Rotate" widget is set as the active manipulator (left-click the "Rotate" button in the "Transform manipulators:" section of the 3D View header), and the "Transformation orientation:" is set to to either "Local" or "Normal" so articulation occurs relative to the selection rather than the Scene.
Design note: normally the "Translate" widget is active (indicated by the axes of the widget being topped with cones to form arrows), allowing selections to be made and manipulated linearly along a plain relative to the screen, i.e., side-to-side, top-to-bottom etc., with the "Transform orientation" set to "Global", which causes selections to be manipulated relative to the Scene, not the selection or object.
Once the widget and orientation is set, to manipulate, begin by left-click dragging ("LMB-drag") the coloured loop handles of the widget to change the bone, and any other bones linked along the chain, around the click-selected axes. Release left-click to confirm, which also automatically inserts or updates the associated keyframe in the "Action Editor" timeline, overriding any previously held data at frame "1" (pre-set in the timeline).
Design note: due to the way the Rotate widget may be displayed the orientation loops can appear in close proximity to one another, necessitating some degree of selection and manipulation precision when to click-selecting and dragging them around.
The widget is displayed relative to its “Transformation orientation", which can mean some precision is needed to left-click drag the loops when they appear in close proximity to one another as the Scene is manipulated
Once this initial bone has been positioned work along the chain, right-click selecting bones in turn that form part of the pose, and manipulate them into position, the ‘nomnom’ pose for example that gives the impression the avatar is stuffing a cupcake or doughnut into their mouth, the upper arm ("lfBicep") and lower arm ("lfElbow") should be rotated so the hand ends up at in front of the characters mouth – rotating several bones to achieve this essentially spreads the load in the same way real skeletons function, no single bone is responsible for such broad movements, each bends and articulates a little, accumulating along the chain as a larger gesture.
Design note: for avatar articulation and posing, bones generally don’t behave independent of one another because they’re linked in one way or another. This connection between individual bones forms the basis of the skeletal hierarchical, a structure that has "Female03MasterRoot" at the very top of the relationship ‘tree’, that defines how the avatar moves and behaves relative to the manipulations carried out to create a pose.
Bones are linked together to form a hierarchical relationship (they do not need to be physically connected, only ‘linked’ to form a relationship), which generally means when one is moved or manipulated the action also tends to include additional bones or elements linked along the chain of bones that form an arm or leg for example
Bones are linked so that in manipulating one bone, for example the upper arm, the lower arm and hand + will move with it


Once the Armature has been posed by moving individual bones they will either be automatically inserted into the Action Editors timeline, or will need to be marked manually.

Bones ideally should be rotated and not scaled or moved off their origin/from their original position, so ensure the "Rotate" manipulator is active

Once "Rotate" is active switch the "Transformation Orientation", the manipulation ‘bias’, to "Normal" or "Local" to make it easier to modify selections around a point that’s relative to the individual bone

To make a ‘nomnom’ pose the arm is first bent at the shoulder using the ‘upper-arm’ bone, rotating it down and forward, taking care not to cause too much mesh deformation under the shoulder (arm-pit)

Once the upper arm is positioned the lower-arm can be rotated to bring the hand up to the mouth, using the axes loops to also ‘roll’ the bone to orientate the hand to have a flatter profile relative to the face
Poses are made through the articulation of individual bones that control various elements of the avatar mesh (via the underlying skeleton) – care needs to be taken to avoid the mesh collapsing from over-manipulation
Inserting Keyframes
When manipulating bones using the avatar starter file their positional coordinates are automatically marked as a new, or update if already in place, keyframe to the Action Editor timeline because "Automatic keyframe insertion for Objects and Bones" (‘auto-insert’) is active in the "Timeline" editor. If auto-insert is not enabled keyframes need to be marked every time a bone is posed to ensure positional manipulation data is not lost.
Design note: to enable or disable "Automatic keyframe insertion for Objects and Bones" (‘auto-insert’), in the "Timeline" editor left-click the red "Automatic keyframe insertion for Objects and Bones" button.
Although the starter file is set up to automatically insert keyframes, the features use is optional and can be disabled (or enabled if the situation is in the reverse) from the "Timeline" editor (not to be confused with the ‘timeline’ region of the ‘animation’ or ‘sequence’ editors)


To do this, ensure the Action Editor timeline widget is at the correct frame for the pose being made (frame "1" initially) ,then once a given bone has been modified, from the "Pose" menu in the 3D View Header, select "Animation » Insert Keyframe", then "LocRot" in the "Insert Keyframe Menu" list that appears. Alternatively press "I" and select "LocRot" from the same "Insert Keyframe Menu" list. Repeat every time a bone is manipulated or changed.
Design note: to reduce the number of times keyframes are inserted for individual bones, a series of bones can be posed and afterwards marked to the timeline as Blender will temporarily keep positional data in memory until its inserted, or a change in the timeline occurs – moving the timeline widget/scrubber resets any manipulated bones to their respective positions prior to being changed – note there isn’t a shortcut to creating poses, only their capture as keyframes ("I") to the Action Editor’s timeline.

If "Automatic Keyframe Insertion…" is disabled, poses can be manually marked/captured from the "Pose" menu selecting "Animation » Insert Keyframe"…

… which opens the "Insert Keyframe Menu" where "LocRot" (‘location’ and ‘rotation’, ‘scale’ is unused) data can be captured to the timeline…

… which appear as a set of keyframe markers, one for each bone selected (keyframing is selection based, selected bones are marked whether they have been modified or not)
Pose Duplication
Once the pose is marked (‘keyframed’) to the Action Editor at frame "1", the next step is to duplicate it to another frame and then, for ‘static’ poses (where the avatar appears frozen), to also insert a ‘reset’ pose to mark the end of the sequence.
Design note: at present for the FBX export » import process to work the importer needs to understand the context of a given pose; if the file contains no change between frames IMVU interprets the data as being relative to a ‘bind pose’, the position bones are in by default before anything else might be done to them (via an action). To address this, the pose, even static poses, need to be altered in some way so IMVU understands the captured data describes a valid sequences that’s supposed to be there even if it appears to do nothing to the avatar – as explained below, a simple way this might be done is to mark an extra frame to the timeline using "Alt+R", "Alt+G" and "Alt+S" to clear and reset bone positions.
To copy a pose it needs to be selected. This is done whilst still in Pose Mode with all the available bones selected, both those posed and manipulated and those left untouched. First to select. From the "Select" menu in the 3D View Header left-click "(De)select All" (or press "A"). This selects all the available bones indicated by their highlighting (outlined) a pale-blue.
Design note: bones already selected will initially ‘deselect’ (cleared/removed) when using the "(De)select All" menu option. Repeat the action, "Select » (De)select All", to then properly select everything ready for duplication.
Once everything is selected, from the "Pose" menu again in the 3D View Header, left-click "Copy Pose". In the Action Editor’s timeline left-click or (left-click) drag the slider/widget to frame "10" and from the "Pose" menu select click "Paste Pose", this drops the initial pose into the new frame. To ensure this is properly keyframed to the timeline, from the "Pose" menu once more, select "Animation » Insert Keyframes » LocRot". A set of markers will appear in the timeline confirming placement. The initial pose now runs through ten frames without change (frames 1 – 10).
Design note: if ‘auto-insert’ is enabled copy/pasting a pose should automatically place a set of new markers at the appropriate frame in the Action Editor timeline. If this does not happen follow the same steps to insert the pose/changes manually; once the pose has been pasted, from the "Pose" menu select "Animation » Insert Keyframes » LocRot".
With the duplicate frame/pose in place left-click a little further along the Action Editor timeline, at frame "20" for example, then from the "Pose" menu select "Clear Transform » All". The avatar will reset, each bone reverting back to its original default position. Finally again from "Pose" select "Animation » Insert Keyframes » LocRot" to mark this new pose to the timeline. Scrubbing the widget/slider back and forth now shows the avatar transform from one pose to the other ready for export.

The initial pose is marked (keyframed) to the Action Editor timeline which can now be used to copy/paste the same pose to another frame…
 and 'copy' them...")
… Once all the skeletons bones are selected ("Select » (De)select All") they can be duplicated via the copy and paste functions to the new frame ("10")

The initial pose duplicated and marked at frame "10" after being copy/pasted into place – the same pose is now shown for ten frames (no change will occur when scrubbing the slider/widget back and fourth in the timeline, important for ‘static’ avatar poses when using fbx)

Move the timeline widget/slider to frame "20" then from the "Pose" menu reset the pose to the default by selecting "Clear Transform » All"…

… this removes any pose or positional data and reverts bones back to their default or original positions (resetting also inserts a set of keyframes if auto-insert is enabled else the resulting pose needs to be manually marker)
Video showing the transition between the actual pose and reset needed for successful export and import of the resulting FBX file to IMVU
Export Pose To FBX
Once the pose sequence is establish it can be exported to FBX. As the file is essentially just a pose nothing specifically needs to be selected as might be done for other types of item. With this in mind toggled "Pose Mode" into "Object Mode" using the "Sets the object interaction mode" selector in the 3D Views Header – the Armature will outline pale-orange. Then from the "File" menu left-click "Export » FBX (.fbx)" ("File » Export » FBX (.fbx)").
Design note: when initiating the export procedure, the Armature being selected as a consequence of posing has no effect on export as the FBX file will be set up to export the Scenes entire contents. Before exporting it’s a good idea to save the file – "File » Save" or "File » Save As…".
In the "File Browser" that appears, change the name of the file and its save location then lower-left amend the "Export FBX" export settings. Here under "Main" ensure "Selected Objects" is disabled[1]; in "Geometries" that "Apply Modifiers" is disabled[2]; in "Armatures" that "Add Leaf Bones" is disabled[3]; and optionally in "Animations" that "NLA Strips" and "Force Start/End Keying" are disabled[4], then click the "Export FBX" button top-right to complete the process. The Scene will be parsed and an FBX file saved to the selected location.
Design note: when exporting the "Scale:" value can be altered depending on how scaling is being handled. For more details of this read "IMVU FBX import Scaling".
 from \"Pose Mode\" to \"Object Mode\"")
Before exporting the pose to FBX, using the "Sets the object interaction mode" selector, switch from "Pose Mode" to "Object Mode" – this ensure the pose data is exported properly as information assigned to the Armature (skeleton) itself

Once in "Object Mode", from the "File" menu select "Export » FBX (.fbx)" to begin the export process

In the "File Browser" that appears, lower-left is the "Export FBX" section where various options need to be enabled/disabled to ensure export – for poses in particular "Selected Objects" should be disabled under "Main"[1] to the Action holding all the pose data is exported correctly
Import Pose FBX To IMVU
Now that an FBX file is available it can be brought into IMVU using the "fbx import" feature. With IMVU open and in "Create" mode click the "Derive New Product" button. When the "Derive a new 3D product" pop-up appears type "10945930" ("10,945,930") into the "Specify Product ID" field below the template defaults available. The "Empty Mood" product will load. Click "Go" to open the derivation into an editor, "Editor [n]".
Design note: for poses, although it’s possible to derive directly from the avatars, i.e., "80" (female) and "191" (male), it’s highly recommended the "Empty Mood" be used as its blank to avoid issues and conflicts with the default actions and animations. Wherever possible derive from "10945930", the "Empty Mood" product.
Once the project has loaded, in the properties and settings area click the "fbx import" tab to access the feature, then on the "+ Load FBX" button to start the import process. A standard file browser will appear. Browse to and select the previously exported fbx file and click "Open", as a pose is being imported the "Select Skeleton Root" dialogue will appear. Select the skeleton associated with the pose, typically "Female03MasterRoot" (used for both female and male avatar), and click the "Configure FBX" button. The fbx file will be parsed and loaded into the fbx import tool.
Design note: the importer is essentially converting the fbx data into their respective Cal3D counterparts so the time taken to actually import the file will vary depending on its size (file size) and complexity (action length and intricacy).
Here deselect all meshes and all materials by clearing individual check-boxes per entry, or clicking the "Select None" buttons in each "Meshes" and "Materials" section, leaving only the data associated with the pose selected in "Animations/Actions ("T-Pose" in this instance).
Design note: the name displayed in "Animations/Actions" in the IMVU importer is taken from the "Action" in Blender, i.e., "T-Pose" that stores the keyframe markers and pose data. To change, the sequence can be renamed in Blender by left-clicking the "Browse Action to be linked" input field in the Action Editor Header and typing a new name. Press "Enter" to confirm.
The name displayed in the fbx importer is taken from the Actions ‘id’ in Blender. To change, the reference needs to be modified in Blender then re-exported to fbx

Finally in the "Apply scale:" input box, change the value from "1.0" to "0.01" depending on how fbx scaling is being handled, click the "Import" button directly below, then "Import Changes" in the "Import Status" dialogue that appears, completing the import process.
Design note: when exporting from Blender, the "Scale:" value attributed to the file can be altered depending on how scaling is being handled. For more information on this read "IMVU FBX import Scaling".

When setting up a ‘pose’ product that’s not associated with any other items, furniture pose for example, select the "Empty Mood" derivable, item "10945930", rather than the female ("80") or male ("191") avatars, to avoid conflicts with the default actions and animations

Once the Empty Mood product loads into the project Editor click the "fbx import" tab to access and then on the "+ Load FBX" button to start the import process…

… a standard file browser will appear. Browse to and select the previously Blender exported fbx file and click "Open" to bring the data into IMVU…

… which in-turn opens the "Select Skeleton Root" dialogue (specific to avatar related product only). Set the appropriate skeleton, typically "Female03MasterRoot" (same for both female and male avatars), and click "Configure FBX" to continue…

… loading the parsed data into the importer which lists all the components included at export. Deselect everything except the pose (listed under "Animations/Actions"), and change the "Apply scale" value to "0.01", before clicking "Import"…

… then on "Import Changes" in the "Import Status" dialogue that appears, completing the process. The "Apply Changes" button will turn yellow indicating import has finished, the data now available
Making An Avatar Action
Once the pose data has been imported its available for use. To add it to the derived mood item click the "actions" tab and then on the "+ Add" button top-left of the section. The panel will populate with a set of properties, settings and options.
Design note: for avatar actions, items that are not associated with any other products like furniture, rooms etc., make sure to derive from product "#10,945,930" ("10945930"), "Empty Mood", instead of "80" and "191" female and male avatar files.
In the upper section, "Action Parameters" change "Type:" to "Avatar" selecting that option from the drop-down list and set "After Playing:" to "Pick same Ensemble". To define how many times the ensemble plays, type a numerical value into the "# ensembles played" input field, for example "0" to repeat infinitely or "10" to loop ten times. And to establish how the action is to be started, in the "Trigger:" input field type an alphanumeric ‘word’ that acts either as a user initiated activating trigger (user types the word or phrase), or type "stance.Idle" to automatically start the pose the moment the item is put on by the wearer.
Design note: the trigger can be an actual word, a set of words, numbers, or combination thereof, the general idea being a create a ‘trigger’ that when typed by the items wearer will activate the pose. Some thought does need to be given to making sure the reference is relatively unique to the item to avoid accidentally triggering other items that happen to use the same trigger, for example "lol" might trigger other products because of its common usage, so "[‘creator abbreviation‘ word]", i.e., "jk nomnom" would be better. Using "stance.Idle" on the other hand will automatically trigger the pose as soon as the item is used ("stance.Sitting" and "stance.Standing" can also be used as automatic triggers).
In the "Skeletal Animation" subsection below, click the XAF drop-down and select the now available XAF animation that was converted from the imported FBX, in this example "Female03MasterRoot%7CT-Pose.xaf" ("%7C" is machine code for "/", so the full path would be "Female03MasterRoot/T-Pose.xaf"). Set "Composition:" to "Replace". Then in the "Skeletal Frame Controls" section that govern the behaviour of the actual animation, set the number of times the sequence itself is to play in "# loops" – "0" repeats infinitely, or "10" to loop ten times; and the "Loop start" point, e.g. "2" and "end", e.g. "9", setting the playable range (the number of frames used for the action once triggered), reflecting those established in Blender.
Design note: both ‘start’ and ‘end’ values should correspond to the animation as described in Blender. In other words, the pose being from frames "1" to "10", setting a loop start and end point of "2" and "9" means the as-triggered sequence uses frames that fall within the overall range when played in IMVU.
Once the actions properties are set up, to lock them in place and make them usable, click the main "Apply Changes" button above then test by typing the trigger word/phrase or clicking the "Play" button. If the action behaves as expected save the project and upload to complete the project.

The derived ‘mood’ product is stripped of any settings or properties so an action needs to be created. Click the "actions" tab then the "+ Add" button to populate the panel…

… then in the "Action Parameters" section, provide a "Trigger:", typically a word that has to be typed; set "Type" to "Avatar"; "#ensembles played" to "0" (which loops the action infinitely) and "After Playing:" to "Pick same Ensemble"…

… then in the "Skeletal Animation" section select the now available (converted) XAF file from the XAF drop-down; set "Composition:" to "Replace"; then set "# loops" to "0" (plays the selection infinitely) and "Loop start:" and "end:" to values reflective of the sequence to be played…

… finally click the main "Apply Changes" button, test by typing the trigger word or clicking the "Play" button, then upload
Video
Overview showing the FBX export and import process using IMVU’s fbx import tool.
[Duration c5 mins] process of exporting poses to FBX from Blender that are then imported into IMVU using the "fbx import" tool

