Import SketchUp Building Models into Blender 2.49
SketchUp is a useful 3D tool for making content for games but as models typically cannot be used directly this often means importing them into Blender or other 3D application for further work, clean-up and export. This tutorial will walk-through the process of exporting a model from SketchUp and importing it into Blender 2.49.
As the tutorial discusses the process from the point of view of having a pre-existing object ready to export from SketchUp a basic understanding of how to use both SketchUp and Blender 3D is necessary.
Design note: SketchUp from Version 6 has the ability to export content to the format discussed in the below. SketchUp from Version 8 and above has the ability to export directly to Collada *.dae, in which case jump to reading the advanced section on using SketchUp models in Blender 2.49 +/-.
A full install of the Python API may also be required – follow the tutorial below first, if it doesn’t work download and install Python then try again; the SketchUp to Blender conversion process may require files that are only available with a full installation of Python. The ability to see and use ‘zip’ files is also required; Windows XP and Vista have native support for simple zip management, else install WinZip or other ‘zip’ program capable of archiving files and data (7zip, winRAR, etc.).

Check version number
Scene Prepping in SketchUp
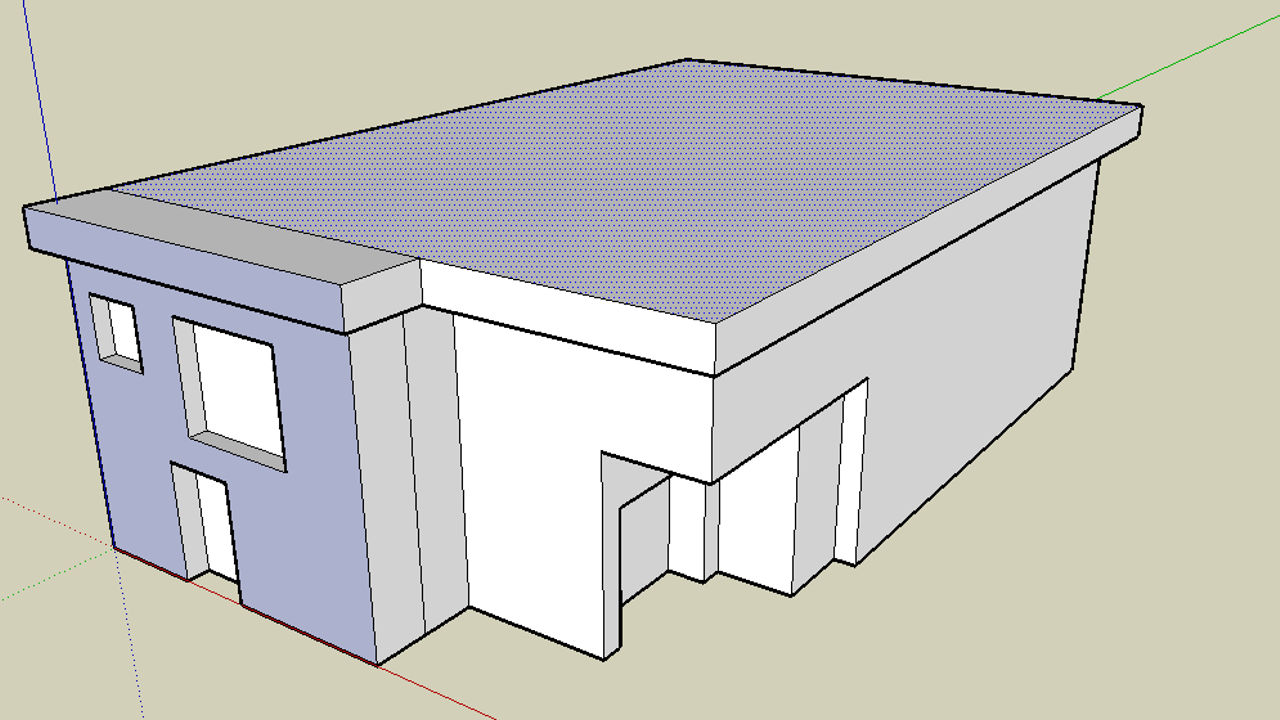
SketchUp exports scenes so any models you can see in the view-point will be exported out of the application. Make sure the scene is ‘clean’ and/or only contains what needs to be exported; it may be necessary to delete objects and/or re-save files so they contain just what’s needed (this tutorial does not cover how to use SketchUp in that capacity). Although models can be textured in SketchUp, be aware that material/texture data may not import correctly into Blender as a result of this process and/or may need to be rebuilt in Blender. So, at the very least a mesh object needs to be in the scene.

Basic model to be exported from SketchUp for later import into Blender 3D
Export models from SketchUp
With the model built nothing else is required at this point except to simply export the scene and contained models from the "File" menu; "File » Export » 3D Model…"; the mesh is automatically ‘tessellated’ – converted from the quadratic polygons SketchUp uses to ‘game ready’ triangular polygons.

Exporting the mesh to SketchUp’s "3D Model" formats
In the "Export Model" window that opens, do the following;
- In the "Save in" box at the top of the window, browse to a location where the file is to be saved (create extra folders where necessary in the main file and folder area).
- In the "File Name" box, type the name the file is to be called.
- In the "Export Type" box select "Google Earth 4 (*.kmz)" from the "Export Type" field. This is important and must be done otherwise the conversion process won’t work.
- Once the above is done, click the "Export" button to export the scene from SketchUp to Google Earth’s *.kmz format.
 as the format to export the 3D model to")
Choosing Google Earth 4 (*.kmz) as the format to export the 3D model to
Once the file is exported a screen will appear titled "Collada Export Results", this simply lists some parameters and data relative to the exported 3D file.

SketchUp showing the ‘Collada’ format data that was exported by the process
Chang SketchUp *.kmz to a *.zip Archive
If everything above was done correctly, at this point there should be a *.kmz saved to a location on the computers hard drive. This file now needs to be ‘prepped’ for use. To do this do the following;
- Open Windows Explorer – usually located; Start » All Programs » Accessories » Windows Explorer.

Use Windows Explorer or other ‘file browser’ to find the file exported out from SketchUp
-
Find the file, select and then rename it so it has the *.ZIP file extension, i.e. retype the name as "[file name].zip" (where "[file name]" is the name you want the file to be called) – right click select "Rename" from the pop-up menu. Or, click once, then once again to edit highlighted text.
Design note: depending on the operating system being used by the computer used for content creation, various ‘permission’ warnings may appear on doing this which can safely be ignored (click "OK" each time). On changing the file type, the icon used to display the file in Windows Explorer should change to a ‘zip’ icon (see below).

The *.kmz file saved to the hard drive
![Right click on the file and "Rename" it [file name].zip](https://www.katsbits.com/images/tutorials/sketchup_export_blender_import/sketchup_explorer_kmz_rename.jpg "Right click on the file and \"Rename\" it [file name].zip")
Right click on the file and "Rename" it [file name].zip

Renaming the kmz file creates a ‘ZIP’ file which can now be used
Extract *.zip File Contents
Inspect the resulting zip file.
If all has gone well, the kmz file, now renamed as a ‘zip’, can be opened and inspected in WinZip, other ‘zip’ archive application or Windows Explorer. Inside it should contain the following or similar (shown below);
- \doc.kml
- \textures.txt
- \models\[file name].dae

The renamed kmz file open in WinZip showing the contents of the now ‘zip’ file
The contents can then either be extracted directly from the WinZip (other archive application etc.), from Windows Explorer using Explorer’s ability to do this itself, or using the ‘plug-in’ features usually added when WinZip or other archive programs are installed. So for example, extracting the files using the WinZip Explorer plug-in, select the file, right click and choose the following;
- "WinZip » Extract to folder [filepath\foldername\]" if WinZip is installed
Or using Windows Vista or XP’s own ability to open compressed archive files by doing one of the following;
- "Extract All…»" if using Windows Vista
- "Open With» Compressed (zipped) Folder" if using Windows XP

Extracting the contents of the zip file using WinZip’s Explorer ‘plug-in’
Doing this should then produce a new folder called "models" and a set of files – "doc.kml" and "textures.txt" – in the location where the contents of the zip file were extracted.

Files and folders extracted from SketchUp’s *.kmz file
Double click on the "models" folder to reveal the *.dae ‘collada’ file that’s needed for this process.

The final *.dae ‘Collada’ file needed for import in to Blender 3D
Import SketchUp *.dae into Blender 3D
Because the *.dae Collada format is a known and relatively common cross-platform file, it can be imported directly into Blender using the included Collada 1.4 import script. To do this go to the File menu and select the following menu choice; "File » Import » COLLADA 1.4 (dae)".

Importing the Collada *.dae file into Blender 3D
The import script interface will initialise showing something similar to the image below. In the "Import file" text box is a file path, click the button to the right of that box and browse to the location where the *.dae file was extracted, which should still be inside the "\models\" folder.

Collada *.dae import interface in Blender
Once the file is found, select it and click the "Import dae" button top right

Browse to the files location and click "Import dae"
This will open the file into the dae/Collada import script interface, once there, click the "Import and Close" button at the bottom of the screen, a message, "Import Successful", will appear after the script has run and imported the mesh. On clicking that pop up message the screen will close to reveal the imported dae mesh in the 3D view-port.
Design note: the mesh may appear in the 3D view-port at a very large size depending on the dimensions of the original version (more on this below).

Import of the dae/collada model was successful

The dae model shown in the 3D view-port after successful import into Blender 3D
With the mesh now in Blender, additional work can be done…

