Baking Terrain Ambient Occlusion – Legacy (2.49+/-)
Using Blender’s in-built “Texture Bake” rendering sub-system it’s relatively straightforward to render or ‘bake’ various types of image ‘map’ associated with a particular Object – “Textures“, “Normals“, “Shadow“, or in this particular instance, “Ambient Occlusion” (AO). Despite being relatively simple to bake texture maps however, there are a number of notable considerations to bear in mind when using Texture Bake that ideally need to be done for the process to work correctly and yield the best results possible.
The following tutorial was originally written for Blender 2.46 but applies equally to any version up to Blender 2.49 because they use the same basic sub-system, tools and options to bake texture maps (for texture baking in Blender 2.5 and up to the very latest version of Blender, click here); the only major deviation from previous versions of Blender, 2.45 or below, for texture baking is that UVW maps are managed in “Edit Mode” (“Tab“) instead of “Face Edit Mode” (“F“).
For additional details beyond the basic ‘how to’ refer to the the “Advanced Options” section.
Apply a Material to the Terrain Mesh
Before being able to perform any texture baking the mesh to be baked needs at least one Material assignment which must have at least one texture slot – this can be an actual bitmap or Blender generated data block – because the data generated by the bake process needs a ‘substrate’ onto which it can be written, without either a Material or Texture slot Blender will display an error to the effect that there is “no image data to write to”. Before baking then, ensure a Material with an occupied Texture slot is assigned to the mesh.
To do this RMB select the mesh, then in ‘Shading‘ Properties, “F5“, either create a new material – click the double-headed arrow “Links & Pipeline” properties to “Add New” – or just edit the default Material that might already be assigned to the Object. Whilst still in “Shading” properties check “Map Input” and make sure “UV” is selected – this ensure the bake process renders the image properly relative to the UVW map assigned to the Object. Once done click “Texture buttons“, “F6″, to add a “Texture” slot to the Material; in the “Texture” properties panel either click the double-headed arrow to click “Add New” or edit the default entry present (should be named “Tex” if present). Browse to the image, select and add it, it will then appear in the texture slot preview window (shown bottom left of the image below).
Design note: to add a Blender generated image block to the Material instead of a bitmap, briefly switch to the “UV/Image Editor”, “Shift+F10“, and from the Header click “Image” then “New” from the available options. A pop-up will appear. Edit the details as needed and click “UV Test Grid” before clicking “OK“. Once done the new generated image can be added to the Materials Texture slot selected as any other image reference from the “Image” properties drop-down menu. Switch the view back to 3D View (if that’s the view previously visible) pressing “Shift+F5“.

The raw mesh ready to be set-up for AO baking. A materials is applied with a texture slot
Displaying texture applied to the mesh
Once the Material has been set up and assigned to the mesh the associated image needs to be applied. In Edit Mode, select the entire mesh, “A“, and then switch to the “UV/Image Editor“, “Shift+F10“, selecting the actual image (bitmap or generated) from the “Browse existing…” drop-down list – assuming work has yet to be done on the actual UVW map itself, upon assignment to the mesh it will display as a jumble of triangles (if the mesh has been previously tessellated), faces or combination of the two. This is the “Reset” or default state of the Objects UVW and needs to be updated before texture baking can occur (otherwise bake cannot be properly determined, which then has a detrimental effect on the result). Once assigned press “Shift+F5” to return to the 3D View or select the view from the “Display Type” list far-left of the Header.
Design note: if the texture is not visible, with the mouse cursor over the 3D View, press “Alt+Z” to switch “Draw type:” from “Solid” to “Textured” (switches the way the scene is rendered so assigned textures can be seen whilst the mesh or UVW maps are being edited).

In “Textured” view the UVW map for the mesh is generated – UVW mapping is now done in EDIT mode
UVW unwrapping the terrain mesh
Baking an Ambient Occlusion map, and texture baking in general, relies upon there being a ‘good’ UVW map assigned to the mesh, in other words, it is necessary the mesh UV’s are contained within the bounds of the assigned texture, and that the UV layout itself has as little distortion as possible. For Blender 2.46 » 2.49 unwrapping the UVW’s is initially done in “Edit Mode“, not “Face Edit Mode” as was done previously (2.45 or below).
To unwrap the mesh, RMB select the object and then press “Tab” to toggle in to Edit Mode. Once there press “A” to “Select All” (this may need to be done twice, once to clear any prior selections and then again to re-select all). With everything selected press “U” to access the “UV Calculation” options menu and click “Unwrap” from the list to re-generate the UVW map. Upon doing this the mesh will update in the 3D View displaying the new mapping across the mesh. It’s at this point, after the UVW map has been regenerated, that it’s important to make sure the UVW’s sit fully within the mapped texture bounds so switch to the “UV/Image Editor“, “Shift+F10“, and inspect and/or edit the map where necessary to make sure this is so.
Design note: terrain and other shapes predominantly composed of ‘organic’ structures tend not to use all the available space on the texture map and, whilst it is possible to reshape the UVW’s in the UV/Image Editor, it is generally not recommended due to the distortion, and texture density issues, it can cause.

The UVW map is re-generated and inspected/edited to make sure it sits fully within the bounds of the mapped texture (“Texture Bounds” or “Texture Space“)
Baking Ambient Occlusion using default settings
Once the mesh has been prepared with a Material, texture and UVW map assignment it can be baked. The general purpose of baking the Ambient Occlusion of a mesh is to obtain a ‘cheap’ (from a resources point of view) way to represent an objects inherent level of structural ‘occlusion’, ‘shading’ rather than ‘shadows’. The result is typically a grey-scale image with white corresponding to the highest possible value (surfaces fully exposed to ambient light), and black the least (fully ‘occluded’, obstructed or shaded from same ambient light).
To bake an Ambient Occlusion map, click the “Shading” button (“F5“) and then on the “World buttons” button to access the appropriate panel and associated properties. Next find, and click to access, the “Amb Occ” panel. Once open click the “Ambient Occlusion” button in that panel to activate Ambient Occlusion’s associated properties. Leave everything ‘as is‘. Make sure the mesh is selected (keep the mouse in the 3D View) and then press “Ctrl+Alt+B” to open the “Bake Selected Meshes” menu. When that opens simply select “Ambient Occlusion” from the list to start the texture baking process.
Design note: if a Bake is tried before a Material, Texture or UVW have been assigned to the mesh the option and its properties may not be available.

Baking using the default settings can be done – “Ctrl+Alt+B” to option select and initiate the texture baking process, rendering the terrain meshes Ambient Occlusion data
The texture baking process will then render and incrementally update the texture assigned the mesh, the generated checker place-holder in this instance, with the grey-scale Ambient Occlusion bake of the terrain mesh. Depending on the complexity and density of the mesh, this will take varying amounts of time but the result should be similar to the image shown below.
Design note: notice the mount of ‘black’ and thus currently unused space is available on the texture map that might otherwise be used for different sections of a larger terrain, or one split into sections.

Which results in a gray scale image with highlights and shadows based on the depth and height of the mesh
Colour tinting Ambient Occlusion bakes
Although standard Ambient Occlusion bakes are grey-scale images they can be colour tinted. To to this requires changing the “diffuse energy” Blender uses to calculate the Scenes background illumination. Blender has three types; “Plain“, “Sky Color” and “Sky Texture“. To active, whilst still in “World buttons” (available under “Shading” properties, “F5“), in the “World” properties panel click one of the three buttons similarly marked “Plain“, “Sky Color” and “Sky Texture” (only one can be active at any one time), and then press “Ctrl+Alt+B” to see what the initial texture bake for each looks like – it should be noticeable that “Sky Color” tends to use both the “Ho” (“Horizon“) and “Ze” (“Zenith“) red, green and blue (RGB) colour values, whereas “Sky Texture” uses “Ho” exclusively. To influence the Ambient Occlusion bake then, simply change the values attributed to each “HoR“, “HoG“, “HoB” and “ZeR“, “ZeG“, “ZeB” property then re-bake the map, “Ctrl+Alt+B” – shown below the Ambient Occlusion bake is tinted blue because the “Ho” tonal values are biased towards that colour.
Design note: changing the colour of an Ambient Occlusion bake has no effect on the amount of time taken to render the image.

Switching over to “Sky Color” allows the resulting Ambient Occlusion map to be tinted. All other settings are left at defaults
Samples & Ambient Occlusion map quality
Better quality results than those achieved using the default settings are possible by increasing the “Samples” value setting; pre Blender 2.46 a maximum of “Samples: 16” is available, Blender 2.47 and above, “Samples: 32“. Leave everything as is from the previous AO render and in the “Samples:” field either click on the left of right arrows, “<” or “>” , or LMB click the mouse in the “Samples:” and click-hold-drag the left or right to increase or decrease the value and number samples used in the Ambient Occlusion. Once set use “Ctrl+Alt+B” to restart the texture baking process again. The result of increasing the samples is a much better quality image in terms of the amount of ‘noise’ it otherwise produces.
Design note: higher values produce better quality results although achieving them takes a significant amount of time and resources and the final result may not show any discernible improvements. Generally increasing the number of samples is a compromise between expediency versus quality.
Rendering a ‘quality’ AO bake means increasing the number of “Samples” – “12” give acceptable results but samples do go up to 32. The more samples the long the time required to bake the AO map
Saving the baked ambient occlusion map
Once the Ambient Occlusion map has been baked to the level of fidelity that’s required it needs to be saved, the preference for which is to use a ‘loss-less’ or ‘uncompressed’ image format such as BMP, Raw TGA, TIFF etc.; where-ever possible avoid using JPG because images are saved with compression artefacts, no matter the compression strength or weakness, that may adversely affect the final texture or product.
Design note: JPG saves image data using lossy compression which usually manifests as a slightly pixilated or blocky appearance; whilst this might not be an issue for some types of maps, it should be avoided for Normal Maps in particular because of the way colour is used to describe structure.
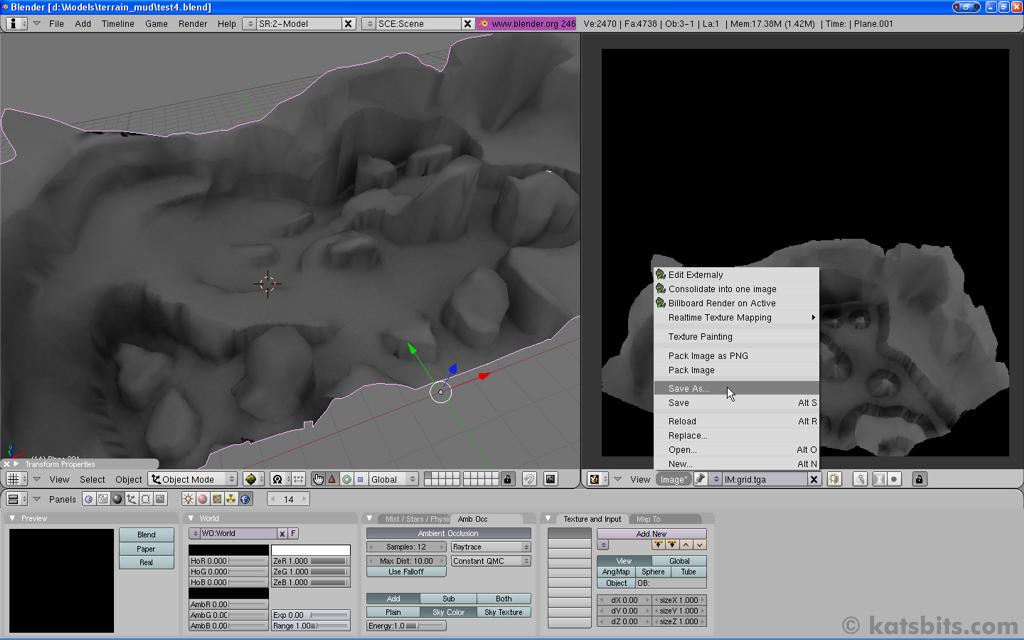
To save the image, from the “UV/Image Editor” Header click “Image*” and select “Save As…” from the list. A “File Browser” view will appear. From here browse (navigate) to where the image is to be saved, rename the file where necessary. Next in the File Browser Header click the “Save Image” drop-down and select an appropriate format as discussed above and then finally click the “Save Image” button top-right. Blender will write the data to disk and return to the previous screen with the newly saved image associated with the previously assigned Material; it becomes the “Image” slot of the Material.
Design note: when data is baked using Texture Bake or other generative process, the “Image” menu option in the UV/Image Editor has an “*” character appended to it, “Image*“, indicating the presence of this temporary data and its needing to be saved. Once that is done the menu heading reverts back to “Image” without the extra character.

Saving the ambient occlusion map to “RAW” tga. It’s best to use an uncompressed or loss-less format for the resulting image when saving
Conclusion
Texture baking in general is a useful tool to have at the artist disposal because of it’s ability to generate different types of image map that can be used to further develop final art work; Ambient Occlusion for example can be combined with a standard texture that might otherwise tile, creating in the process an image unique to the object from which the Ambient Occlusion bake was taken. There are caveats however, in that baking textures tends to mean ‘unique’ assets which work for small objects and items but become problematic assigned to larger ones such as terrain, resulting in low resolutions and pixelation. This means it’s use may need to be compensated for through the employ of game-engine rendering techniques that mitigate these issues.

