Saving DDS Textures Using ATI’s The Compressonator
One of the more puzzling aspects of creating content for Doom 3 powered games (Doom 3, Quake 4 et-al) is DDS; what they are, what they do and more importantly, how to create them. This tutorial will walk through the process of creating DDS textures using ATI’s own tool for the job – The Compressonator – which was used by id software for Doom 3’s content. Thankfully it doesn’t speak with a very bad Swedish accent, nor have any political aspirations!
Design note: DDS textures, Oblivion and other games
If you’re creating new textures for none id software games such as Elder Scroll : Oblivion, then make sure to check exactly which DDS (DXT) ‘filter’ has been used; they’re not all the same so using the wrong filter will result in an error of some kind; either the textures won’t display or they’ll display incorrectly. It’s not always easy to find this out so you may need to do a bit of investigation depending on which tools you’re using.
If not editing id software tech then you should be ok to use the latest ATI tools (contrary to the important note below).
Important
The UberCompression filter needed by this tutorial to get correctly functioning RxGB compressed normal maps (with or without alpha channels (masks)) for Doom 3 powered games has been removed from the general application interface. At time of writing it’s not known if the ability to compress via the command line method is still viable. To create ‘correctly’ compressed DDS files download the Compressonator v1.21 from the link provided below. Please note: this is the officially released version of the tool and not some hacked and redistributed file. It is provided in a zip file ‘as is‘..
Note : There’s a potential problem some may have when installing the Doom 3 compatible version of the Compressonator onto a fresh Windows (cleaned) install. Apparently ATI didn’t include a couple of commonly used DLL files in the *.msi self extracting installer as they were most likely relying on the missing files to have been installed by other programs. It does mean however, the program errors out because it can’t find them.
There is a temporary ‘fix’ for this (reported but not doubled checked) which requires the installation of the new version of the Compressonator, which does appear to include the missing DLL files. However, once that is installed it (and the DLL files placed) it may need to be uninstalled as it potentially causes conflicts with the older version. A recent test with both applications installed didn’t reveal any problems so this may not effect everyone if indeed anyone.
What are DDS Exactly?
DDS is an acronym for ‘Direct Draw Surface’ and as you might guess from the reference to ‘Direct Draw’, it’s part of Microsoft’s graphics ‘API’ (Application Program Interface) for their Windows operating system environment; Direct X to you and me!. What it’s for, or rather, what it does, is allow content creators the ability to compress images using a number of different algorithms depending on the needs of the content originators; Doom 3 powered games for instance use 3 different algorithms for the assets used in game; DXT1, DXT3 and DXT5. This tutorial will cover DXT5 and the compression of a localmap (normalmap).
The Compressonators Interface
The General interface of ATI’s Compressonator is unfussy and uncluttered which belies the power hiding under the hood; a word of warning before going any further, this program crashes a little too easily if you choose the wrong algorithm, so at least you’ll know you’ve done something wrong when/if that happens!.
As you can see below, the interface for the app is pretty unfussy with the usual text menus and button items. The two grayed out text fields become active when an image is loaded, both offering a selection of different algorithms to do ‘things’ depending on what you’re doing and what’s been selected. An image opened into the Compressonator displays in the main dark gray window.

The Compressonator defaults to a simple blank User Interface as shown above, all supported image types are loaded into this window – jpg, bmp, tga, etc..
Loading an Image into the Compressonator
It’s pretty much the same as for every other application; using File > Open browse to the location of the image you want to compress and convert to DDS, in this case we want to load in a localmap. Selected below is the TGA image we want to compress.
Design note: The TGA should be uncompressed itself, if you have an option to use RLE or other algorithm in your photo editing app when saving TGA files, don’t use it as it may have adverse effects on the results (even though it’s supposed to be a ‘loss-less’ algorithm).
It’s also worth pointing out that although you can use JPEG images it’s probably not a good idea to if they’ve undergone heavy jpeg compression already as that may adversely effect the resulting DDS as well, essentially you want your original image to be a ‘clean’ and artifact free as possible.
 for an image to load")
Looking in your development directory (kat_q4dm1 in this instance) or production folder for an appropriate image to load into Compressonator
Compressonator & ‘Mipmap’ Generation
Once we’ve loaded in an image we can get to work.
The first thing to do is ‘Generate Mips‘; these are LOD versions of the texture saved within the image itself allowing different Levels Of Detail to appear in game depending on how far away from the texture you are; it essentially reduces the size and complexity of the image in instances where using the full sized image isn’t necessary and resource hungry (loading in a full 512×512 texture for something in the distance uses far more resources than it actually needs).
Pressing the ‘Generate Mips‘ button (highlighted green below) opens up a dialogue box shows a drop down list with a number of ‘levels’ to which mipmapping can be applied; the lowest being 1×1; that’s basically the smallest LOD version used by the texture once it gets in to game.
Leave this dialogue on the default settings and click the ‘Generate‘ button (highlighted red below). The program may pause for a second or two whilst it carries out the work.
Once done you’ll see the title bar of the image change; currently it informs us that the image has "(Mip 1 of 1 …)"; once done that will change to "(Mip 1 of [x] …)", ‘[x]‘ being a value other than ‘1’. There’s no other visual confirmation of this part of the process so you need to watch the image title bar.
Design note: You can inspect the mips once they’re generated by clicking on the two button to the left of the yellow question mark button (see below); they allow the viewing of each mip level ‘up’ or ‘down’.

Generating the Mips level for the image
Correct DDS Compression Filter – UberCompressor
Once we’re done with generating the Mips we can move on to compressing the image. This is where you have to watch what you’re doing because although there are a number of algorithms that can theoretically be used, choosing the wrong one tends to crash the program without generating any data.
For (normal) localmap compression we need to use the tools ‘UberCompressor‘ (highlighted orange below) settings.
Select ‘UberCompressor‘ from the drop down list – it may list ‘ATI 3Dc Compression‘ by default – and then press the ‘Compress‘ button. A popup dialogue box will appear listing a number of items; radial selection buttons on the left and a couple of text fields on the right.
The compression we need is "DXT5 RXGB" (highlighted green below), if it’s not already selected, click in the radial button to select. On the right make sure that the ‘Channel Weighting’ text field settings are as shown below;
- Red \ X – 0
- Green \ Y – 0.5
- Blue \ Z – 0.5
If they’re not, change them; select, delete and retype using the settings above. Also here you want to make sure ‘Adaptive’ filter is unselected, for some reason DDS textures that use this don’t work properly in game so it’s best to turn that off.
Once that’s all been done the image can be compressed by clicking on the ‘Compress‘ button.

Selecting "UberCompressor" DDS compression filter

Selecting the correct setting for compressing localmaps; DXT5
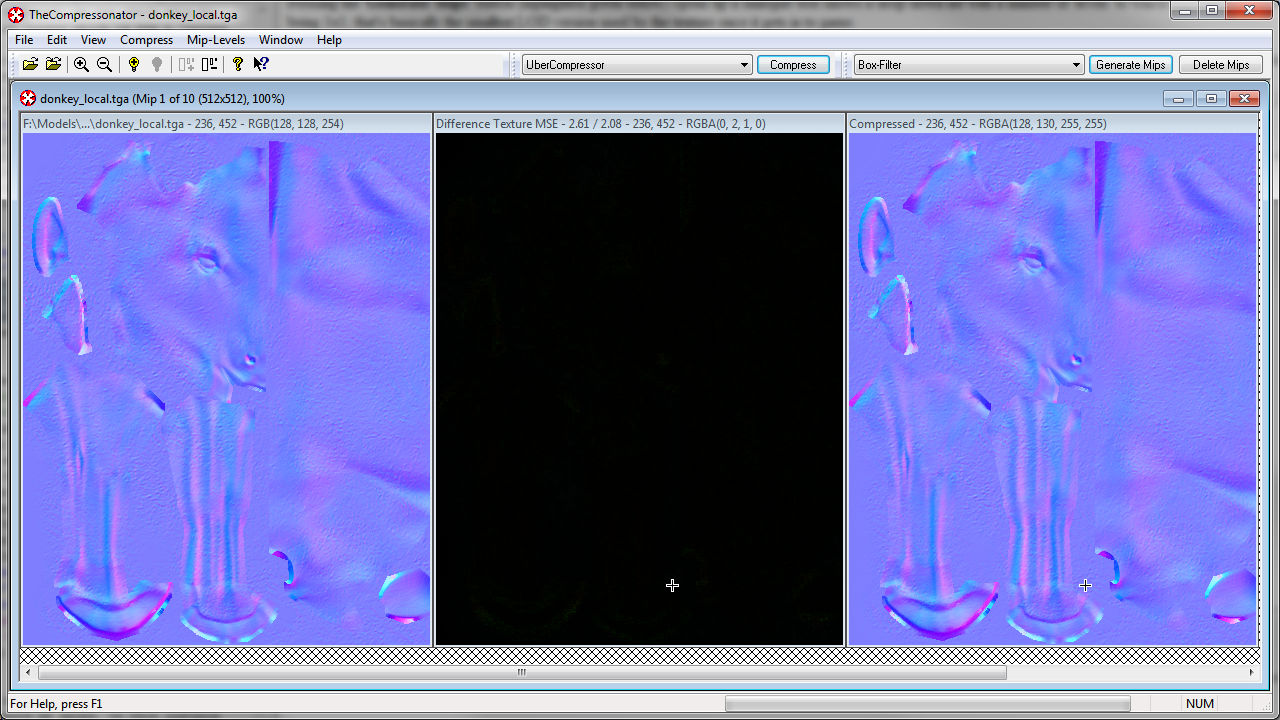
What You See After DDS Compression
The compressonator may take a few seconds to ‘convert’ the texture but once it’s done it’ll display three images alongside each other;
- Original version
- The compressed version
- The difference between the two
Although visually it may not look as if much has happened, we can check this by using the mouse cursor which is now a ‘colour picker’ tool. If we watch the title bar of each image the series of numbers that appear on each will change relative to the cursor informing us of any colour difference, and hence compression, that’s gone on.
Design note: Obviously you don’t really want to be seeing too much visually noticeable difference between the compressed and uncompressed versions of the image as you’d also see that different in game.

The results of compression
Saving the DDS Texture
Once the image has been processed, it’s just a simply step to saving it to the correct format. What we actually want to do here is save the compressed image (although there is an option to save any of the three generated images shown above – ‘original’, ‘difference’ and ‘compressed’).
To do that, select File » Save Compressed;

Saving the results
Browse to a location on your hard drive where the image should be saved, in this instance that’s a development folder called ‘kat_q4dm1’, which is sitting in ../model/mapobjects/. You may find that you need to add the extension ".dds" to the name given to the file (selection highlighted below) just to make sure it saves the image as a DDS and not a file without an extension – which can be hard to track down in Windows sometimes.

Naming and save location
Saving Normal Maps With Alpha Channels (masks)
Thankfully you don’t need to use any other filters for this as the RxGB filter appears to save the alpha channel to the DDS on compression. Unfortunately at the moment the Compressonator doesn’t seem to display the channel so you won’t know if it’s actually done anything until you get the DDS set into game; any errors will display as a black material (any type of ‘texture’ error tend to ‘break’ the material).
Once the file is saved that’s it, a DDS version of the original TGA has been created and saved to your development folder.
How Can I View My DDS Normal Map?
If it’s a DXT5 compressed localmap, as we’ve been creating above, then generally speaking you’ll only be able to view these textures within Doom 3 powered games or in an ATI tool/previewer; this particular algorithm is only supported by ATI at the moment which means if you’ve installed the DDS and TGA viewer plug-ins for Windows Explorer (see ‘Resources’ above) you’ll find that localmaps don’t show up as thumbnails.
Converting Other Image Types to DDS
Converting the diffuse, specular and heightmaps uses the same process but a different filter. The same is also true of images with alpha-channel masks.
To save images other than localmaps we need to use the DirectX Texture Compression algorithm; so once the Mipmap have been generated for the image (as per above) select the compression filter from the drop down and click the ‘Compress’ button. The dialogue that opens shows a list of different filters which need to be used as follows;
- DXT1 – no alpha – diffuse, specular, height
- DXT3 – alpha – diffuse, specular, height
DXT1 is highlighted (green) below because the image being processed is a diffuse texture without and alpha-channel mask (just visible underneath the filter dialogue). Make sure the correct filter is applied to the texture otherwise it’ll show up in game ‘black’.

Compressing other images
Once the image is compressed just save as per above; find a location on your hard drive, name the file, add the ".dds" extension and save.
How Do I View These DDS Images?
Textures saved as DXT1 or DXT3 will display correctly as image thumbnails in Windows Explorer if the DDSview plug-in is installed. Most photo or image editing applications that are photoshop plug-in compliant will also allow the display, editing and saving of DDS files (plug-in dependant).
Problems Compressing DDS Images
The main problem encountered is ‘black’ materials in game. If everything had previously been working with TGA only textures then it means one of your DDS images has been saved with an incorrect filter (or is ‘broken’ somehow); the localmap is usually the culprit, so double check everything.
As a general rule of thumb – for textures other than localmaps, if you can see the image used for the thumbnail in Windows Explorer then the DDS will generally be ‘okay’. It’s always worth re-compressing to make sure you’ve not previously missed something first time round.

