RtCW target_smoke Steam Effect
Using "target_smoke" to create ‘steam’. Although there are a couple of entities we could use to create this effect they don’t quite do what we want in this case; a plain old jet of steam, each entity having it’s own particular properties giving different results in game.
Download: Steam effect source file (c. 200 KB | *.map, *.bsp)
The best one to use for this effect is the target_smoke entity as it’s settings can be changed quite easily to get different results – see entity properties inspector below [keyboard ‘N’].
Brushwork Setup
The most straight forward way of creating a jet of steam is to place a couple of entities around some brushwork and have the effect ‘active’ (starts in the ‘on’ state) when the game loads.
It also means there are no fancy entity connections / trigger calls which keeps things nice and simple (also in theory means the effect works in both SP & MP).

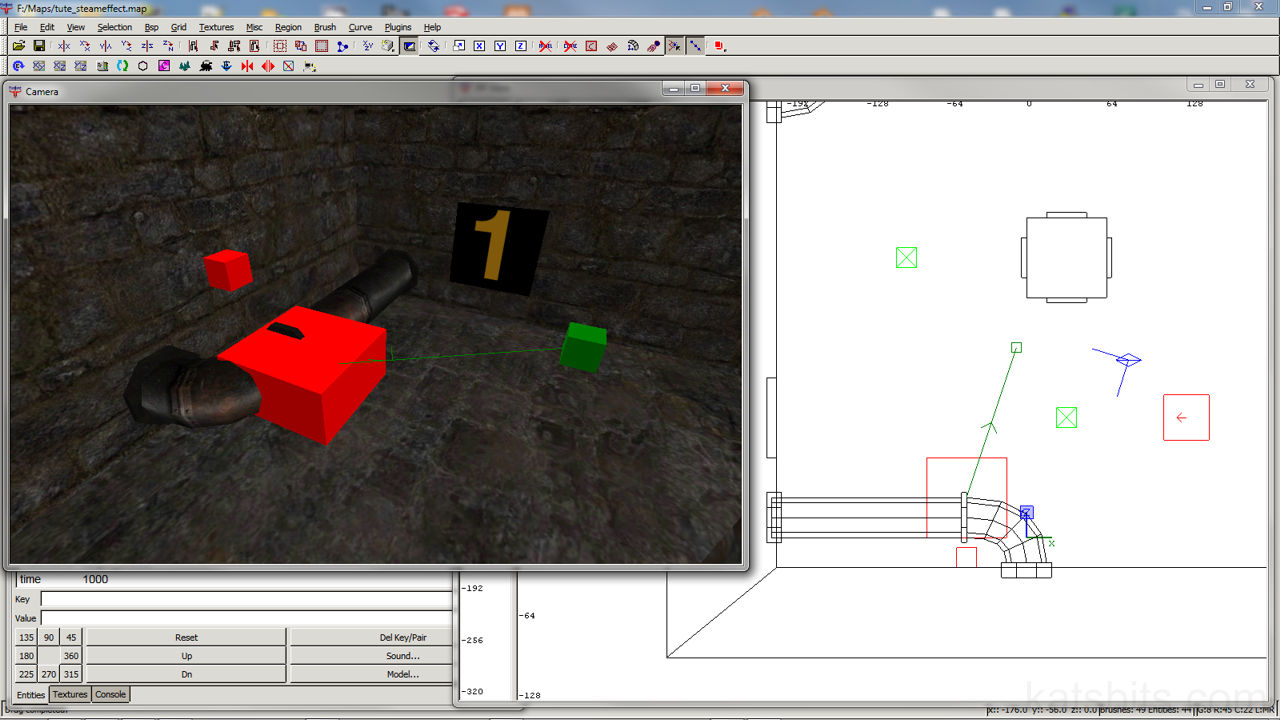
Entity inspector setup for steam effects
In the image below some pipes have been placed into position, note the pipe support just before the bend, in this case the pipes have been made from both brushes and patch mesh cylinders. It’s important to note that any brushwork in something like this is ‘detail‘ flagged (patch meshes are ‘detail’ flagged by default) [select a brush > right-click > make detail], if it isn’t the entity will get corrupted and the effect won’t work (this is because the brush will cut into the entity).

Example brushwork around which the entities will be set up to create the steam jet effect
Entity Setup
The image below shows the entity setup for the jet of steam. A target_speaker, target_smoke and an info_notnull.
- target_speaker the noise the steam is to make, positioned relative to the effect.
- target_smoke is the steam jet itself. The settings can be changed so the smoke plum has a very small start size.
- info_notnull the target for the smoke – it gives us the angle / direction which the smoke will jet – this can be set using the angle keys in the property inspective but this isn’t quite as versatile as using a targeted entity.
A couple of things to remember;
- The target for the smoke must be an info_notnull – it won’t work otherwise.
- If you have the notnull below the smoke you need to have the ‘gravity‘ flag checked in the property inspector (see image top) otherwise the smoke won’t pitch down.
- Remember to place the smoke so it’s centre of origin (dead centre) is where the jet of steam will come from, it’s easier to visualise this using the x,y,z views. Try not to hide or bury it in brushwork though as the brushwork that’s doing that will block the smoke effect and nothing will appear to be happening.

Entity placement relative to brushwork

Entity placement relative to brushwork – entity centre should not be buried in any brush volumes so positioning needs to allow for this
Steam Effect In-Game
The entity set up described above (an in the sample *.map file) produces a very ‘slow’ steam jet, just one or two puffs of smoke per second. You can see the angle the smoke follows is similar to the one described by the entity setup (shown above) incidentally the steam looks a bit funny because we’ve managed to capture a single ‘frame’ which tends to isolate the individual ‘sprites’ the constitute the smoke itself..!

Effect in game
Using "trigger_hurt" to ‘Burn’ Player
A nifty trick; place a trigger_hurt brush covering the approximate area of the steam jet and it creates a ‘hotspot’; players get hurt by the hot jet of steam.
Trigger setup for this – check ‘silent‘ (de-activates the frying sound) and ‘slow‘ (means hurt value is per second not per server frame which makes it happen faster) and give the trigger a low ‘dmg‘ (damage) value.

Using trigger_hurt to create the effect of damage from steam – brush volume placement covers angle of projection between target_smoke and info_notnull
Conclusion
This first process is the least problematic, for some reason the entity starts to get a little bit temperamental when you alter it’s start state (it’s trigger ‘alerted’ rather than ‘on’ all the time) which is compounded the more you try to do or entities you try to use. For more complex usage it’s best to script an event like this rather than have it active physically in a map.
The key to this setup is the ‘delay‘ flag on the target_smoke as this effects how much smoke is actually emitted; the lower the number (the default value is 100) the shorter the spawn time on each of the little sprites used to physically make the smoke clouds, so setting it at 20 gives you a pretty dense jet, 500 on the other hand gives a very ‘thin’ one with few clouds (see the example map for this). Keep in mind as well the distance between the target_smoke entity and the info_notnull will also greatly effect the speed of the ejecting smoke, it’ll start to thin out the greater the distance.
As well as brushes corrupting the target_smoke other entities can do this as well so watch the placement of other items around it.
[1: Steam Setup | 2: Multiple Jets]

