Making Opacity Maps Or Editing Transparent Objects In IMVU
Opacity maps are simple to set up in IMVU’s Create Mode by simply adding an appropriate image to the second of two texture slots. Sometimes however this does not work so a bit of hand editing may be required to make sure opacity works properly.
Below is a ‘raw’ XRF file as output when exporting content via the various CAL 3D exporters. If an eventual IMVU product only needed a solid (‘flat’) texture be applied to a mesh then this is that would be needed in order for that flat texture to display on the mesh in the Previewer and Client. But, note the highlighted red text below, if the product needed some degree of transparency applied to it then those highlighted lines need to be changed.
IMVU Opacity Maps & Transparency – Editing .XRF Material
Files
Raw .xrf material file as exported by Blender 2.36’s CAL3D exporter, this is all you need to apply images to a mesh in order to ‘re-skin’ it.
<?xml version="1.0"?>
<HEADER MAGIC="XRF" VERSION="910"/>
<MATERIAL NUMMAPS="1">
<AMBIENT>255 255 255 255</AMBIENT>
<DIFFUSE>255 255 255 255</DIFFUSE>
<SPECULAR>255 255 255 255</SPECULAR>
<SHININESS>1.0</SHININESS>
<MAP>//cobbleMix_shadow.jpg</MAP>
</MATERIAL>
Design notes : the important part to edit just simply re-skin or re-texture a derivable mesh is <map>, this needs to be the directory path to the assets which should ideally be sat in the projects working folder. NUMMAPS="1" refers to the number of images being pulled into the material, in this case just the one
MAP[file/path.jpg] refers to the file path or location of where the actual physical media is stored on your hard drive.
The amends that need to be done, shown below, make direct reference to the two textures that are needed for the opacity process to work correctly in IMVU;
- A ‘diffuse’ or flat texture, which is what you see.
- An ‘opacity map’, which is used to generate the opacity applied to the diffuse texture image.
Design note: ‘opacity maps’ are grayscale images with two extremes of ‘black’ and ‘white’ – white indicates ‘opaque’ (it can’t be seen through) and black indicates fully transparent (it’s completely see-through) – with all tones of gray in-between indicating varying degrees of transparency.
Note the ‘file path’ shown below to the image assets (garden_sheet2.jpg), it indicates that the files are in the same directory as the rest of the project files; where ever possible all the working files should be in imvutools » previewer » examples.
Corrected version for opacity maps
<?xml version="1.0"?>
<HEADER MAGIC="XRF" VERSION="910"/>
<MATERIAL NUMMAPS="2">
<AMBIENT>255 255 255 255</AMBIENT>
<DIFFUSE>255 255 255 255</DIFFUSE>
<SPECULAR>255 255 255 255</SPECULAR>
<SHININESS>1.0</SHININESS>
<MAP TYPE="Diffuse Color">garden_sheet2.jpg</MAP>
<MAP TYPE="Opacity">garden_sheet2MASK.jpg</MAP>
</MATERIAL>
Design notes : make sure the highlighted lines above are correct and that the assets actually exist in the folder the file paths in this texture XRF are pointing to. NUMMAPS="2" refers to the number of images being pulled into the material
MAP TYPE="Diffuse Color/Opacity" refers to the file path or location of where the actual physical media is stored on your hard drive.
In the previewer, simply add the newly edited XRF file and then browse to where the texture assets are, once applied the 3D preview window should update with transparency applied relative to the textures used.
Opacity Maps, ‘Real World’ Examples
Design note: how you create the mask will vary depending on what photo editing software you have access and what it is you’re actually trying to mask; generally speaking the simplest way is to make a copy of the leaves themselves, (‘flatten’ them where necessary) and flood-fill with ‘white’. Once that’s done, fill the background layer ‘black’, flatten the whole image and save to jpg.
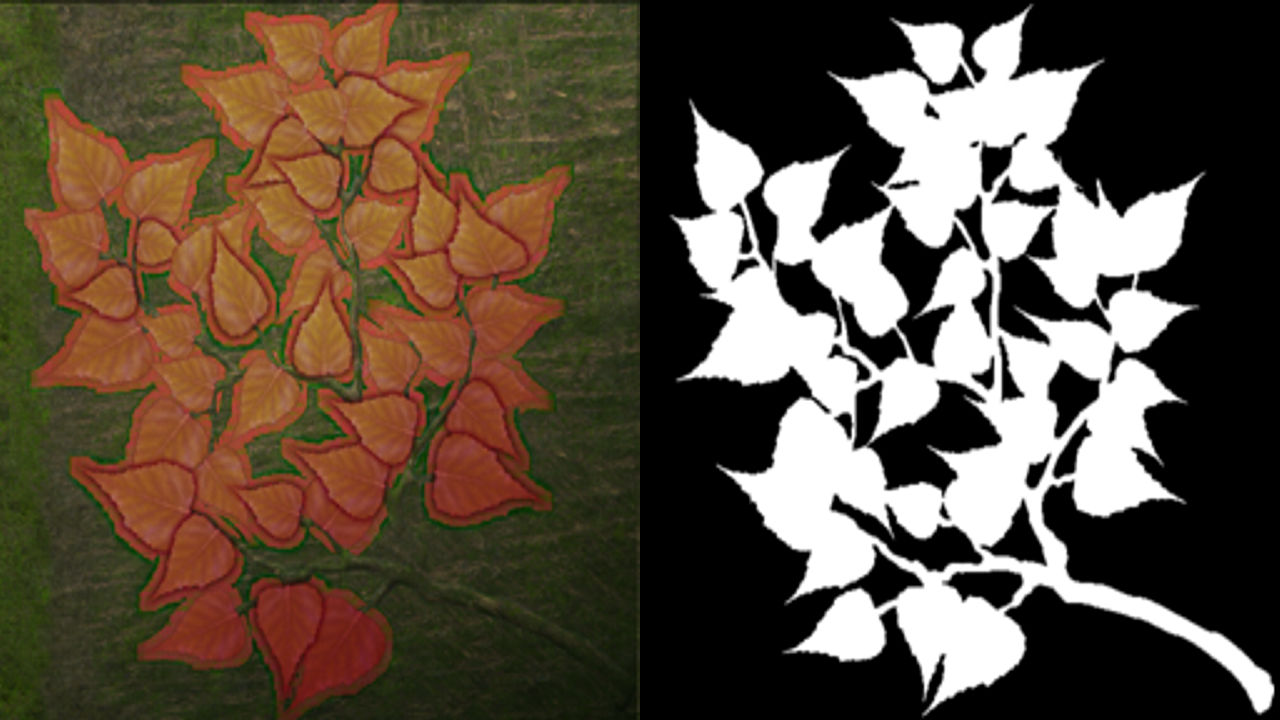
The first image below shows the most basic of opacity maps – a simple ‘mask’. What you see is the basic principle involved in how opacity masks work in IMVU; white is opaque (can’t be seen through) and black is fully transparent (can bee seen through and no trace of that part of the image will show up). So for a set of leaves for a tree where only the leaf mass is needed a corresponding ‘mask’ needs to be created to match what should be visible in IMVU and what shouldn’t.

A straightforward ‘mask’ type set of opacity images

Resulting opacity mask in action on a tree – buy
this item?
The second image, shown below, illustrates the more complex nature of what can be done with opacity maps and the various levels and tones of gray that can be achieved between the extremes of ‘black’ and ‘white’.
As this is water it only needs to be semitransparent, that means using a mid-toned gray which results in the final water, as displayed in IMVU, as partly see through but not completely transparent. Adding the whiter ‘caustics’ pattern (the white random pattern that light refraction creates on what would be the waters surface) means areas of decreased transparency (less see-through) that follow the pattern made by the texture.

Using levels of grayscale tone to achieve varying degrees of transparency

Resulting opacity map with levels of grayscale

