Map – Materials & Textures (#4)
In previous chapters we learnt the basics of making .map based levels in Blender, from setting up the grid and the importance of using blocks as a building material, to making the map and using various simple techniques to quickly build a structure. Next we need to look at textures and materials, how they are used and applied.
Download: KatsBits – Map Source (c. 10 MB | *.blend, *.map, *.obj, *.mtl, *.jpg,).
Resources
– Blender Entity Helper Kit
– Blender 2.49 .map making
– Quake III Manual
– GtkRadiant download
Texture paths and project setup
Generally speaking the textures we use when making .map based levels in Blender are, or should be considered as being, “placeholders” and temporary in nature irrespective of their source location, i.e. textures from a retail game being modded, custom assets created for the development of an independent project, or just some temporary ‘checkers’ – this is notwithstanding their being in a format Blender can use; tga, jpg etc. The reason for this is due to the way the .map export process strips out file path information in order to create the appropriate ‘shader’ references in the .map file. For example, if we used a texture called “techwall.tga” sitting in the following location;
D:\game assets\textures\tech\techwall.tga
Although in Blender we can load an image into a Material slot using either “Relative” or “Full” path data, on export all that gets used is the following;
techwall
This is also irrespective as to where the Blender file itself is being saved, in other words, we can work directly within the “maps” folder like so;
D:\Quake III Arena\baseq3\maps\
Or from within an arbitrary ‘working directory‘ like so;
D:\map projects\
In either case referencing the textures we need using either/or combinations of the above file paths will still result in the same outcome on export, just the file name (title) being used as the shader reference. In practice this means the choice we make concerning the location of the project as we work on it is determined by convenience rather than any specifically technical reason. In affect, so long as we can access the assets needed, we can work from, and save to, any location or directory without adversely effecting the eventual outcome of the .map.
Materials, Textures & UVW maps
To export a properly textured level, all mesh based objects used in the construction of the map itself need to have a “Material” and “UVW” map assignment. Not only does this dictate how the level is textured in terms of what-goes-where, it also determines the amount of work that might be necessary after-the-fact in a level editor. In addition, and as far as the export process itself is concerned, we only need apply images to the UVW mapped surfaces we actually need, letting the script automatically “caulk” or “null” the remainder.
We have one of two options available to us when doing this; we can either apply the same texture image (and material) to everything, or use several to indicate different surfaces types (‘floor’, ‘ceiling’ and so on). Whether we choose one or the other will depend on how large and/or complex the level is and how much extra work we want to do during the latter stages of production when placeholder image are swapped out in the editor.
Design note: meshes can be exported without textures but this defaults to the application of “caulk” or “null” to everything without necessarily correctly distributing the assignments (putting them in the right place). In addition, although we only texture surfaces we need, “Material” assignments should generally be applied per-object rather than per-surface.

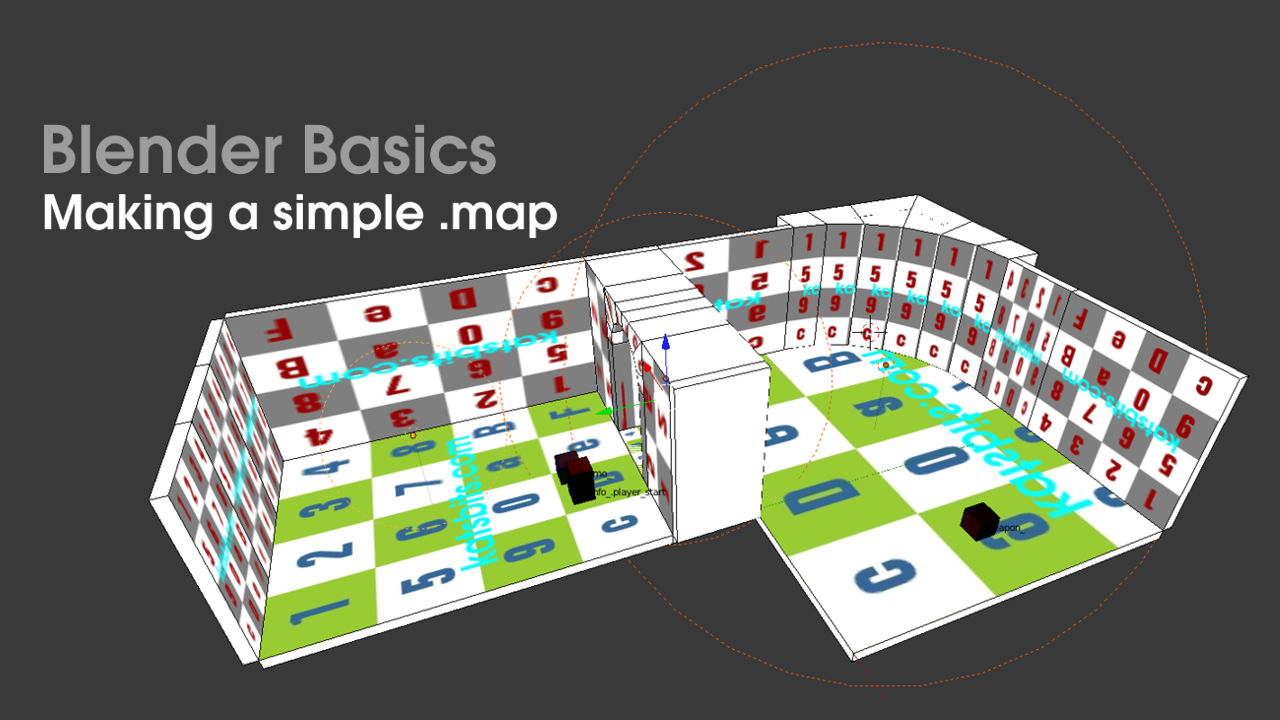
The basic two room level ready to be textured (ceiling sections are hidden so insides of the map can be seen) [see *.blend “31”]
Making basic Materials
The first job then is to make a set of “Materials“. In Blender these are typically composed of three “stages” or “slots“; a “Material” slot, a “Texture” slot and an “Image” slot. All three are needed to ensure objects export with the correct image assignments and shader paths written to the .map file.
First make the “Material“. Select an object and click the “Materials” button in the “Properties” section (right-hand side). If the selected object doesn’t have an material already assigned click “+ New” to add one. A set of parameters and options will appear alongside a spherical “Preview” window. We don’t need to do anything else here except perhaps change the “Diffuse” colour to help distinguish individual materials where more than one is being used – this is optional.
Second, make the “Texture“. In the “Properties” section again, click the “Texture” button to show the available options. As before, if a slot does not exist click the “+ New” button to create one. Another set of parameters and options will appear. Find “Type:“, which is currently defaulting to “Clouds“, and click the drop-down menu, select “Image or Movie” from the list. This adds another sub-set of options, “Image“, that can be accessed and edited as per below.
Third, set the “Image“. Scroll down to the “Image” sub-section, click “Open” and in the “File Browser” find and select the bitmap image to load into Blender. Once the image is loaded a preview of it will appear in the “Preview” pane signifying the overall ‘Material’ has been set up with the basic properties we need. We can also then rename the image “ID” (the input field above the image “Source:” datablock) to something suitable to help distinguish the texture by name, again where more than one is being used – this is optional. Finally scroll down to the “Mapping:” sub-section and click the “Coordinates:” drop-down menu, select “UV” from the list. On completion, and depending on how many materials are set up, this adds an ‘image’ (one per material) to a list of available sources we can then apply to an object.

Set up the Material so it has a Texture slot[1] with a bitmap image assigned to that slot, this is needed for exporting ‘textured’ brushes – note the “Image” datablock “ID” can be changed because it’s a ‘data reference’ whereas the “Source:” name can’t because it refers to the actual file[2]. Change it to something recognisable if using more than one Material, i.e. rename “test1.jpg” to “”walls” and so on
Repeat this process for each object by assigning Materials per ‘surface’ type if using more than a single material, i.e. one material assigned to all “wall” elements, one for all “floor” elements and one for all “ceiling” elements, etc. – remember, materials are assign to ‘objects’ not individual surfaces/polygons. Or alternatively assign the same Material to everything.
Design note: for more detailed information on making Materials read the making a simple chair and making a simple sword Blender Basics tutorials.

Apply at least one material to all meshes. 1) The material being assigned to each object. 2) Creating a new slot by selecting an available material. 3) Curved section, currently using different material, will be assigned same material as other objects in the scene… [see *.blend “32”]

… or use several, applying selections based on what each surface is supposed to be representative of, i.e. a “floor”, “walls”, “ceiling” etc. Each object needs one material irrespective [see *.blend “33”]
UVW unwrapping meshes
The next step, once Materials have been assigned, is to “UVW unwrap” the level. There are essentially two ways this can be done; we unwrap and texture the individual objects, or join them all together, unwrapping and texturing based on material assignments/selections (assuming more than one material is in use). Both approaches have their caveats, however, as it’s likely we will be editing the level at some point in the future, we need to make sure this can be done with the greatest of ease. This being the case we’ll unwrap and texture the objects individually.
Design note: remember, we’re only assigning images to the actual surfaces we need.
First for ease of use, we should change Blenders viewports around a little. In the “Outliner” view top-right (currently displaying a list of items and elements in the scene), click the “Editor Type:” button and select “UV/Image Editor” from the list – this allows us to see what textures we’re assigning to the UVW’s we are about to unwrap. Once done we can start the process.

Click the “Editor Type” and change the “Outliner” view to the “UV/Image Editor”
Select an object and enter Edit mode, using “Ctrl+Tab” switch to “Face” select mode and either select all (“A“) or through a combination of RMB, “Shift+RMB” or “Alt+RMB“, select individual, groups or loops of faces. Press “U” to open the “UV Mapping” menu and click “Unwrap“[1] (“Mesh » UV Unwrap » Unwrap“) – note that we’re not trying to unwrap with any precision as would normally be done, all we’re doing is simply adding a UVW channel to the mesh without paying any particular attention as to how well that is done.
Next, with the selection still active, from the “UV/Image Editor” view click the “Browse Image to be Linked” button and select an image from the list[2] to be applied to the mesh – if it can’t be seen press “Alt+Z” (twice, depending on what view mode is active) to switch “Viewport Shading” to “Textured” mode. Remember, only assign an image to surfaces that are actually needed. Repeat this process for each mesh object in the scene that’s part of the level itself; select, unwrap and assign an image.
Design note: what’s important here isn’t a Materials assignment but rather the bitmap image associated with the Material. As the map format looks for texture (shaders) assigned per-surface and not per-object, so long as the correct image is assigned to the UVW map, which Material that belongs to is of lesser concern – the purpose of setting up Materials is as a conduit to load in texture images.

We only need to UVW unwrap[1] and assign textures to[2] the faces that are actually needed, everything else is automatically exported with “caulk” or “null” applied[3] (the white faces shown) so don’t require images to be set in place.
The finished result should be a level composed of a series of separate objects that have specific textures applied only to those surfaces as are needed, everything else will appear ‘white’ and untextured, which will be exported as ‘caulk’ or ‘null’ surfaces automatically.

Texturing different ‘types’ of surface so that once the model is exported it is textured appropriately relative to texture assignment – in this example that would be three ‘shaders’, “floor”, “walls” and “ceiling” (note ceiling sections hidden from view so inside of level can be seen) [see *.blend “34”]
Levels don’t need to be as precisely textured as models because the format tends to be less forgiving of the more ‘abstract’ alignments possible with the latter, typically on export textures are realigned relative to each face being treated as an individual surface. With texturing done we can move on to entity placement, prepping and export of the level.

