Elder Scroll: Oblivion Unusual Quests, Locations & Items
What you’ll find on this page is information about some of the more unusual locations and quests you’ll come across when traveling around Elder Scrolls : Oblivion, various Oblivion game play hints and tips are provided below as well as a few ‘cheats’ to help you out in those sticky moments. Please note; this page may take a while to load as it contains a number of images.
Suspended from the Mage’s Guild
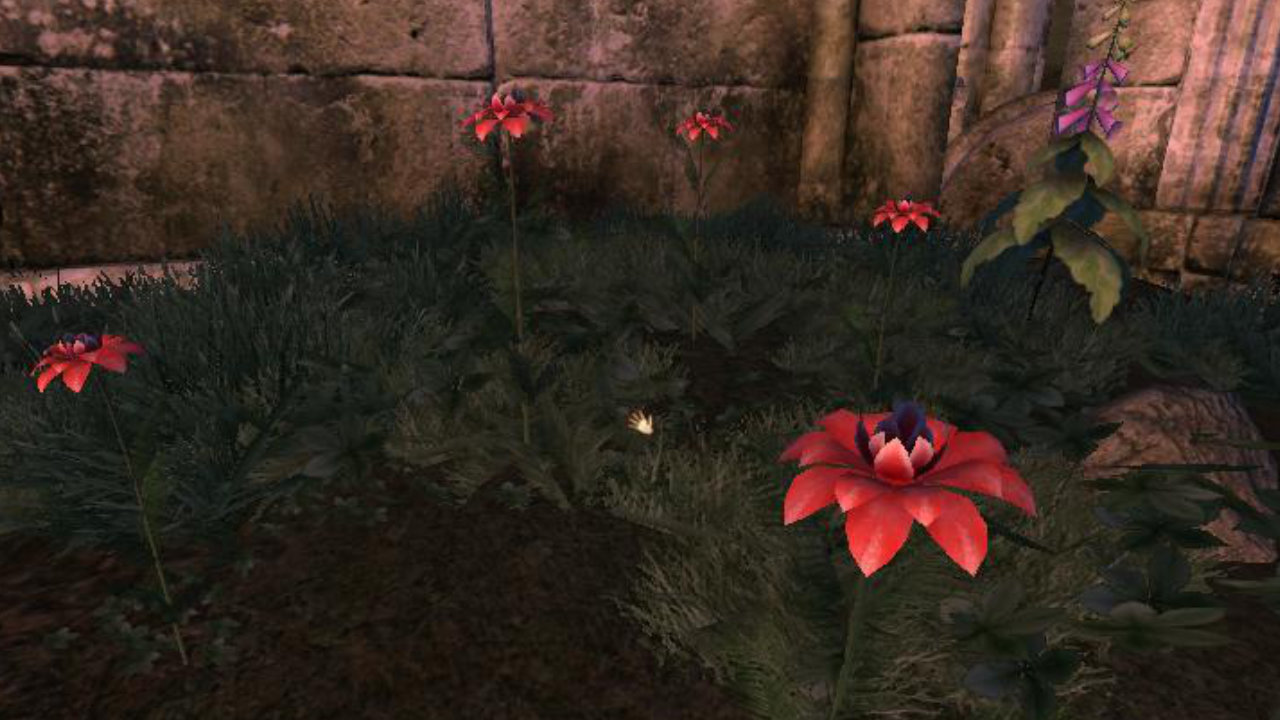
If you get suspended from the Mage’s Guild for whatever reason (and believe me don’t touch anything!) you’ll be asked to find and bring back two not so easy to find flowers in some quantity – twenty (20) Dragon’s Tongue and twenty (20) Redwort.
The problem is, you’re not told what they look like, nor indeed the type of places the plants go (hills, marshes, lakeside etc.), or areas where you can find them; and they aren’t easy to find because both are generally located only in specific areas of Cyrodiil and to the causal eye they are the same colours as some other ‘lesser’ plants that can be found round about the land of Oblivion.
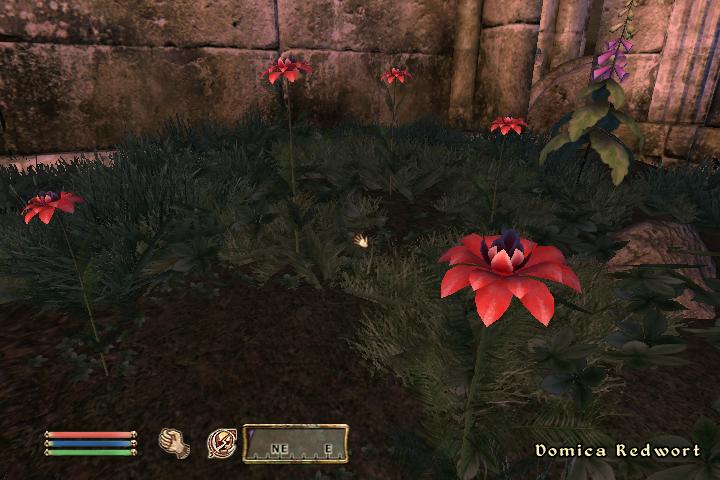
Their ‘natural’ growing environment is in the West Wealds, South of the Cyrodiil land mass; they can be found a bit further up North but thin out in distribution being nigh on impossible to find beyond the Imperial City regions. The plants do tend to grow in clumps and if you’re lucky you might be able to find one or two hard to find areas where there are relatively large numbers of either Domica Redwort or Dragon’s Tongue plant growing (see map location below). Very rarely do they both grow together.
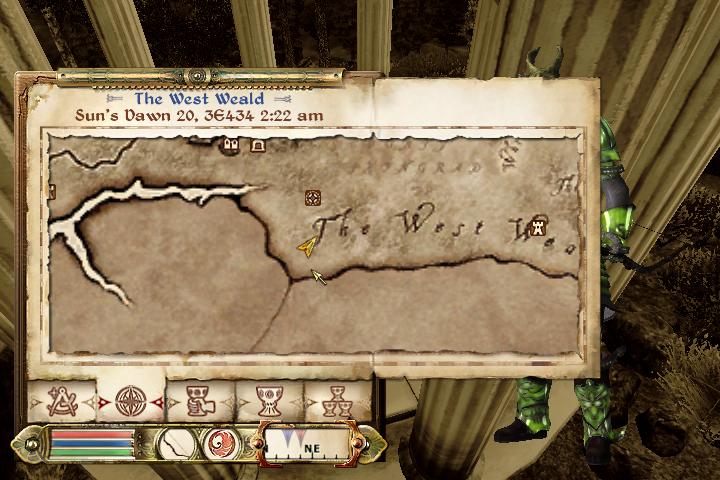
The West Weald
Mage’s Guild suspension task : Redwort plant

Mage’s Guild suspension task : Dragon’s Tongue plant
Some locations Redwort & Dragon’s Tongue can be found
You will need to thoroughly search the areas listed below as the plants aren’t as numerous as others and can be easily mistaken for different varieties of ‘Flax’. It’s worth just picking these up even if you’re not in the Mage’s Guild, they are usable in potions but should you join the Guild and get kicked out you’ll have them to hand rather than having to actually go look for them.
- Nisin Cave (Due East of Skingrad).
- Redwork Abbey, near Morahame in the Nibenay Vallery.
- Humpback stone bridge over the panther river – along edge of road.
- Greyland hut – Leyawiin.
- Silorn (NE of Ayleid ruin along hillside) – Skingrad.
- Wayshrine of Arkey (S of Silorn [unmarked]) – SE of Skingrad.
- Wayshrine of Akatosh (E of Silorn [unmarked]) – SE of Skingrad.
- Collerbone Camp (NE of Silorn) – EES of Skingrad.
- East of Fort Blackboot (Ayleid Well).
- Marsh-Punk Camp – Panther River region.
- Bloodrun Cave – Panther River region.
- Fort Redwater – Panther River up stream, N & E fork.

Redwort & Dragons tongue location hotspots

Location of a big stash of Dragon’s Tongue plants South-South-East of Bravil near Bawn. If you’re lucky you might find over 20 or 30 plants in the area
If you don’t fancy searching for them – it takes a fair while to find enough of both plants – then you can use the following cheat to add them via the in game console to your inventory;
player.additem 00025039 20
player.additem 0002503A 20
See this topic on the official forums for more information.
Nirnroot Quest
Another hide and seek quest, this time you at least know what one looks like otherwise you wouldn’t necessarily know about the quest; picking one of these initiates the quest.
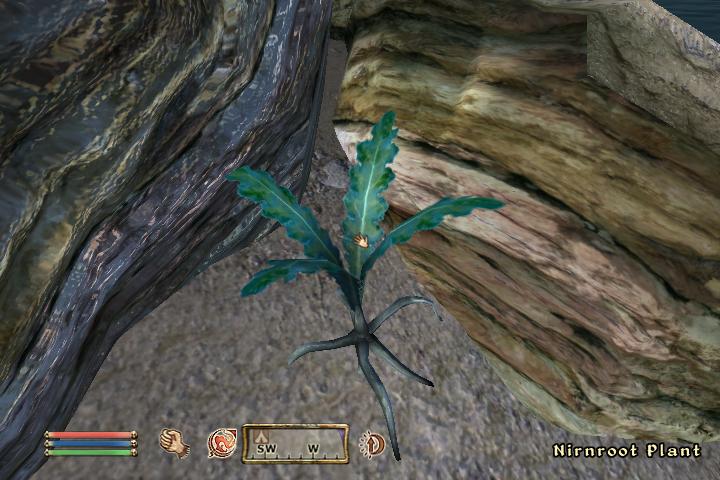
Nirnroot plant
The plant grows near water but in sheltered places; you’ll find it most likely with it’s back against a rock or wall rather than standing out in the open. To do the complete quest you need to find a lot of these plants and as with the Mage’s Guild suspension quest, they don’t grow in clumps but instead in isolation which means a lot of searching.
As with the Mage’s Guild suspension quest above, it’s worth just picking these up as you find them as you’re more likely to come across them when you’re not specifically looking for them!
The plant ‘sings’ by the way, unless you’ve got headphones on or a good set of speakers you might not hear the metallic ringing sound it makes when you get near them.
- Charcoal Cave pond & waterfall.
- Shadrock village pond.
- ‘Leafrot Cave’ Panther river inland North tip.
- Nenalata.
- Morahame.
- ‘Mouth of the Panther’ river, near shipwreak.
- Fort Teleman.
- Banks of pond near Oblivion gate – Blackwood.
- Water front – Tidewater cave – Topal Bay.
- Both island South of Blackwood and shore mainland side.
- Pond bank, North-Eest Leyawiin Town.
- Leyawiin – North East gate, pond banks.
- Veyond, behind North-East corner of ruins on water shore line, Blackwood.
- Fort Doublecross, Blackwood, along water shore SW of ruins.
- Fort Doublecross, NE corner behind entrance wall (outer side).
- Amelion Tomb, Leyawiin.
- North Wall shore line – Leyawiin.
- White Stallion Lodge, wooden docks – Leyawiin.
- West side of the shore line before the bridge to Blackwood islands.
- Fort Roebeck – river bank N of ruin.
- Fort Roebeck – inside.
- Fort Irony (sand banks of lake).
- Bawn (sand banks submerged ruin).
- ‘Lighthouse’ S of Fort Irony – Bravil.
- Side of wooden bridge – Cheydinhal.
- Bloodrun Cave – Panther River (shore line).
Alawen, Master marksman trainer
This is a bit of an unusual ‘quest’ in that you may come across this character a number of times before you actually need to use her services. She’s the only ‘master’ trainer for Marksmen and will only train you once you have reached ‘Expert’ level or above with an appropriate weapon (usually a Bow). If you find her before that no mention of training is made when you talk to the character, and she’ll usually be at Troll Candle Camp (which is a little overgrown so you may miss it), or she can be found chasing after Dear.
In order to actually use her services you must be in the possession of an Elven Bow, she refuses to train you otherwise. And here in lies the ‘tricky’ part about this quest; if you don’t have one on you and hop back to somewhere you’ve got one stashed, on your return you more than likely will find her dead (you’ll receive a message to the effect of that). So, always carry one with you once you get into the ‘Expert’ level for Marksman if you want to become a master by training.
Rumare Slaughterfish Scales quest
You’ll most likely come across this quest early on in the game if you wander around the villages dotted about the outskirts of the Imperial City. The quest consists of you catching "some fish" for Aelwin Merowald, an old sailor in the village of Weye (just before you cross over the bridge to get to the entrance of the Imperial City).
If you look at the map after you’ve accepted the quest you’ll see a green position marker arrow present not too far from where you’re given the quest; that marker indicates the location of the first fish you have to find and kill. Once you’ve dispatched the first fish, looking at the map again will reveal the marker has moved to indicate the next fish on the menu and so on until you have caught, killed and de-scaled all the required number of fish.
Be warned, accept the quest so it’s on your job sheet but don’t try to do it too early in the game.
The reason is that these Rumare Slaughterfish are not the same as your common garden variety Slaughterfish; to put it another way, the Rumare fish are probably one of the toughest ‘enemies’ to fight in the early stages of the game when you’re sub level 10 or there about’s, and that includes enemies like Skeleton Guardians and Goblin Den lords.
As well as being tough, they’re in water, so a marksman’s bow and arrow are all but ineffective unless you’re pretty much on top of the beast when in the drink; casting spells obviously don’t work under/in water either so you can’t use those. The only really effective weapon seems to be a ‘blade’ (possibly blunt and axes work just as well) in close quarters, so make sure you have at least a few notches under the belt with one of those.
This is one of those quests that highlights how unbalanced the game can sometimes be in favour of weapon based combat, spells aren’t nearly as effective on the lower skill levels than a good old fashion blade.
Tactics : One thing you might be able to do to give you a fighting chance of some kind is to get into the water, draw them into a fight and then retreat to the shoreline. They’ll follow as close as they can and reveal their backs above the water; if you’re a bowman and have already shot a few arrows into their backs you can use those as better position markers because they stick up above the waters surface further than the creatures own back allowing you to get a fix on where the Ramare Slaughterfish are.
Watch out for the tail as it packs quite a punch when it’s whipped at you, keep one eye on your health.
Unicorn? What Unicorn? Where is it then?
You’ll most likely find the Unicorn in one of two ways, either you’ll stumble upon it (most likely), or you’ll find it as part of the Hircine (Hunter) deadric shrine quest (see below).

Harcane Grove – the Unicorn
In either case, if you want to specifically find the Unicorn with or without doing the Hircine Shrine quest then you need to find the ‘Inn of Ill Omen‘ (it’s a destination for the initial test quest for the Dark Brotherhood) along the road from Bravil to the Imperial City. Once you’ve found the Inn you need to head off in a North Easterly direction from the Inn until you find ‘Mingo Cave‘, or just head East from the Inn and find ‘Harcane Grove’ where the Unicorn actually is – the chances are that you may find the Unicorn before you find the cave, if not, use the cave as a ‘marker’ and search the area.

Harcane Grove – Guardian of the Grove, there are 3 of those Minotaur Lords
There are a couple (3, see above) of heavy weight Minotaur’s (Minotaur of the Grove) in the area so watch out for these guys. IMPORTANT: if you want to interact with the animal and claim it as your own, approach the Unicorn itself with weapons sheathed (un mounted) otherwise it’ll attack you; do not, repeat, do not approach the unicorn with any form of weapon in your hand or in ‘attack’ posture – if that happens you’ll pretty much have to kill it because it behaves the same way as other ‘beasts’ do in not accepting a ‘yield’ from you (block whilst hitting Space bar to interact with character).

Harcane Grove – the fabled ‘Unicorn‘
Hircine’s Shrine quest
Hircine’s Shrine quest is associated with the Unicorn (see above); should you undertake the task he sets you, you will need to kill the beast. Try and avoid this shrine if you’d like the Unicorn as a ride-able mount like other horses in Oblivion.

Followers to Hircine at the hunters shrine

World map location of Hircine’s Shrine and subsequent Unicorn Hunt quest
Power Stones/Rune Stone
Power stones are ancient daedric ‘shrines’ that you can find dotted around the landscape; there are two types; a ‘red’ and ‘blue’ marked stone. The ‘blue’ stones will give you various immediate power ups, usually in the form of bound daedric weapons, daggers, armour, etc. The ‘red’ stones can only be activated at night (when the stars are out) and once done they will permanently add a ‘spell’ to your list of skills that can be used once every 24 hours (similar to star sign abilities). Both the red and blue power stones can only be activated once per 24 hours.
- Sidri-Ashak – (WWN of…) Anvil.
- Lord Stone – nr (WWN of..) Last Chance Camp.
- Steed Stone – nr (N of..) Nagastani Ruin.
- Jode Stone – nr. (EES of..) Troll Candle Camp, (E) Anvil.
- Jone Stone – nr. (SW of..) Elenglynn Ruin, (due N of) Skingrad.
- Fort Redman.
- Shezarr Stone – Telepe.
- Warrior Stone – Silorn.
- Aetherius Stone – nr. (S of..) Bleak Flats cave, (NNW) Skingrad.
Agnar the Unwavering & the Uderfrykte Matron
There’s a point in the game where the name ‘Agnar the Unwavering‘ is spoken; the problem is, no mention is made of where he is or if he can be found; it turns out he can but in a very remote area of the Valus Mountains (see map shot below).
Be careful around this area though as there is a ‘giant’ troll called the Uderfrykte Matron guarding his corpse/patrolling the immediate vicinity around his body; presumably she killed him and is watching over her trophy. She is a tough enemy so don’t expect to win this one (with ease) unless you’re at least a level 10 or above. Loot her body to find some odd items (associated quest needs to be checked).
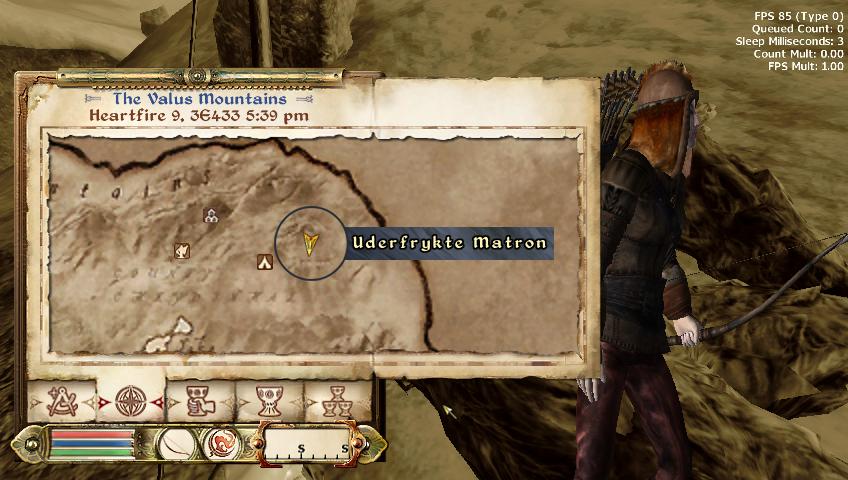
Go in search of the Uderfrykte Matron and be prepared for
a beating!
Arkved’s Tower
If you come across this one whilst wandering around (most likely how you will come across it), then it may cause a bit of confusion as you can’t get inside the tower as you can with others; although the tower is marked on the map there are no doors anywhere to be found to allow access to the inner areas. The reason for this is that it’s the destination for Vaermina’s shrine quest; the Daedric Goddess has had her ‘Orb’ stolen by Arkved and want’s you to get it back. The only way into the tower is via this quest. There are a few minor items lying around the tower so it’s worth investigating if you happen across the ruin before doing the quest.
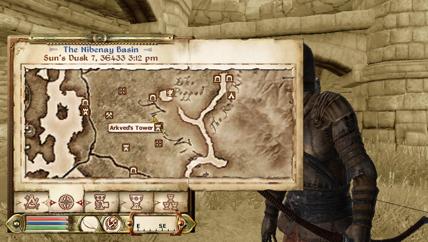
Arkveds Tower, a place with no entrance except via a Daedric Shrine quest
Ayleid Statues

Ayleid Statues, a rare and unusual find in the ruins dotted around Oblivion
Ayleid Status are one of the more unusual items you may come across during your explorations; they don’t seem to have much purpose other than as items to collect and sell – no quests appear to involve them – you can’t ‘do’ anything with them as they don’t appear to be magical either. The following is a list of locations where they can be found;
- Fanacas
- Ninendava

Ayleid Statues – locations of
Veyond Cave & the Argonian Warriors
Although you may have heard about this place "it’s where there’s loads of Argonians", this is a location of note rather than as an unusual ‘quest’ destination. It’s unusual for two reasons; it’s home to a large group of very tough (male and female) Argonian Warriors, alongside their chieftain and a couple of Shaman; and it’s home to it’s fair share of magic items – mainly clothing based.
The trouble is however, most of the caves and subsequent battles are dark and under water with no breathing wholes of any kind, so make sure you have the appropriate potions or spells for underwater breathing before attempting this cave complex – it’s best to leave this quest until you have found, bought or made a constant effect water breathing item – the rewards are hard fought but worth it. NOTE: keep in mind that magic items and enemy toughness are relative to your characters skill set so expect easy/medium/difficult fights and item cache to differ as your skill increases.

Veyond Cave and the Argonian Warriors

