Copyright © 2023 KatsBits™. All Rights Reserved. No part of this or associated properties shall be reproduced without prior consent.
Copyright Policy. Copyright Contact.
Making a *.map based Level in Blender: learning the basics (pt1)
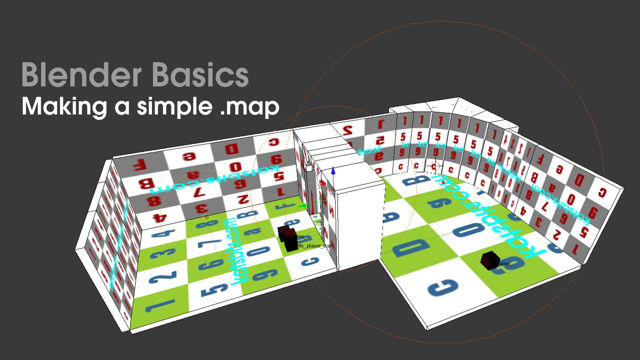
Generally speaking when we want to make a .map based game level we'd traditionally use a level editor like GtkRadiant, QuArK or other tool to make the content we need. Doing this with even the most relative degree of ease often relies on learning to use what are widely regarded as being complex and unintuitive applications, even for the simplest of projects or designs.
Contents
Resources
However, this need not be the case because, with the availability of the "Quake MAP (.map)" exporter for Blender 3D, we can now use meshes and other objects to construct levels and export scenes to the text-based "*.map" format. The resulting files can then be opened or loaded directly into the aforementioned Radiant, QuArK et-al for the placement of game specific entities and finishing off (some level editors may require the .map file to be converted before use).
In the following tutorial we'll learn how to make a simple 'indoor' type game level as well as discuss some of the basic principles behind the process along the way. A basic knowledge of Blender 3D and one of the variously available level editors, Radiant, GtkRadiant or QuArK, is assumed. This tutorial requires a version of Blender which includes the "Quake MAP export" script.
Three ways to make a map ^
There are essentially three construction techniques we can use to make maps in Blender. They are 'blocks', 'planes' and 'faces' (and/or any combination therein). Because we're making a specific type of 'level' and not simply making a 'model' that will be used as a level (the difference isn't a semantic play on words or definition), we need to do so using tools, objects and techniques that are directly analogous to the way a level editor works, in this instance using "blocks" and "volumes".
For the sake of understanding what we're doing, but without getting overly technical, blocks and volumes are used because the underlying technology behind the .map format defines areas and objects though an "additive process" which creates substance by placing material in the World Space as opposed to a "subtractive process" which removes it. It's important to understand the distinction between the two approaches to level design and that of standard asset modelling as there are fundamental differences in both technique, and the concerns we need to be mindful of, when making a model versus making a map.
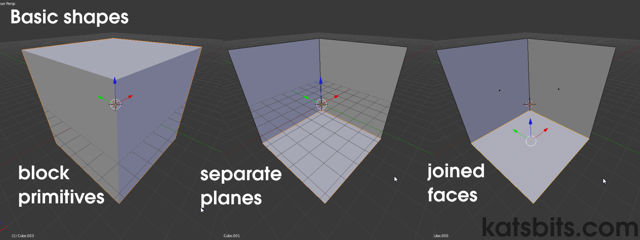
The three basic types of structures that can be used to make maps in Blender; solid "block primitives", individual "planes" and "joined" surfaces. Each produces a particular type of brush volume when exported
To emphasise this core point we can see in the image below the same room built using the three differing construction techniques and what this would likely mean in practice; a collection of blocks (left), a series of separate planes or panels (top-right), and a single sided joined mesh (bottom-right). Each has it's 'Pros and Cons' but as discussed above only 'blocks' are directly analogous to the brush volumes used by level editors. So from here-on-in that's what we'll be using.
Design note: ideally planes and faces are best avoided because they produce levels made from a "thin skin" - thin-panel brush volumes that collectively have a disproportionately high volume (number) of unique surfaces that have to be 'culled' (removed) during compile. This can be extremely problematic on large or complex projects so should be avoided.
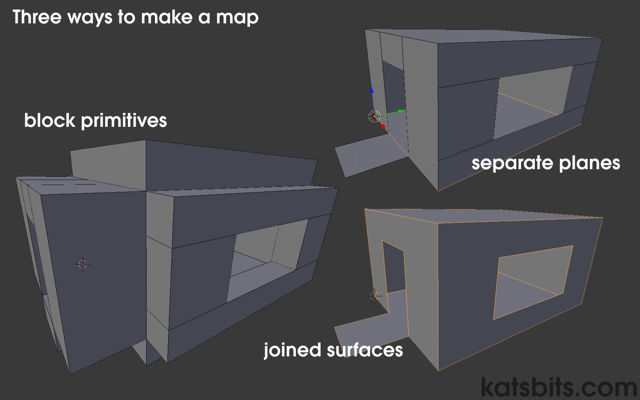
Showing how each of the three main techniques to make a map relate to an actual (albeit simple) room - blocks (can be used as either a joined or multiple object mesh), planes (multiple meshes) and joined surfaces (single mesh), the preference is to use 'blocks'
Setting up Blenders grid for map editing ^
Before we begin we need to make sure Blenders grid matches the level editors, this ensures that whatever we make in Blender exactly matches the same type of object or construction were it to be made in the level editor (GtkRadiant in this instance), critical when making content in an 'outside' application like Blender. In addition, setting the grid correctly also means objects and items can be properly "snapped to the grid" - the .map format doesn't handle off-grid or irregular ("non-axial") brushwork alignments too well, especially if there is a lot of it, so objects are automatically grid snapped when drawn out in the editor.
We need to make sure then, the grid is set so one Blender unit is exactly equal to one level editor unit, i.e. we need to be working at actual size, a ratio of "1:1". To set the grid in Blender press "N" to open the "View Properties" toolshelf panel. Scroll down to the "Display" subsection (click the arrow to the left of the subsection heading to expand the options if necessary) then change "Scale:" and "Subdivisions:" to "8.000" and "8" respectively. These are the two main settings we need to changed. We can also optionally change "Lines:" to "100" (or more if required for larger levels), expanding the grid so it's visible when editing at this scale in perspective mode.
Design note: the grid appears slightly 'off' when viewed in "Perspective" mode due to an issue with Blender. This does not effect grid snapping, object sizing or any other 'measurement' related functions in general or in any of the "Orthogonal" views. This is a display issue only.
With the above settings in place Blender is now replicating Radiants default grid size of "Grid8" (shortcut in Radiant is "4") where each 'minor' sub-division is an 8 unit cube (grid 'major' is 64 units).
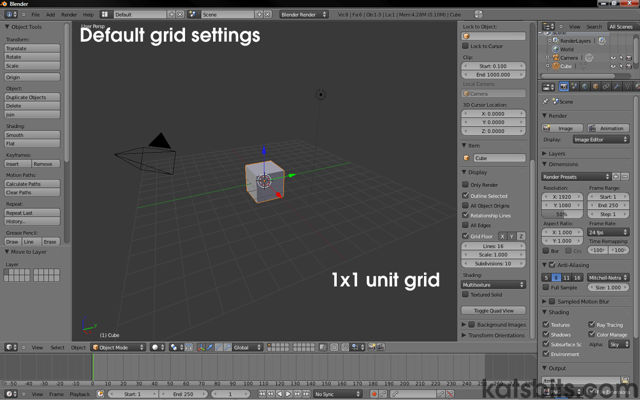
Blenders default grid is 1x1 unit. This is too small a scale value when wanting to use the application to make maps that are to be used in a .map based level editor/game
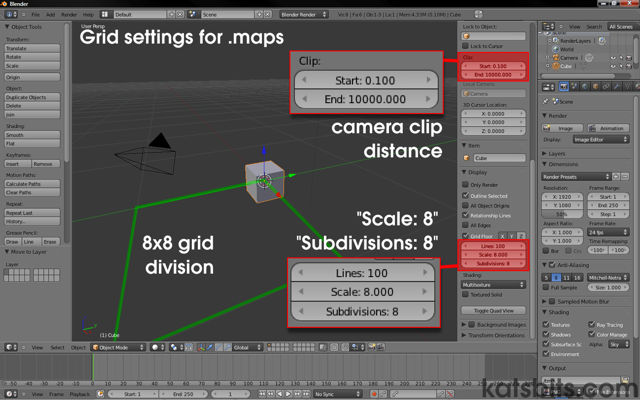
Changing grid settings in Blender to better match the editing environment typical of most .map level editors like Radiant, QuArK, et-al [see *.blend "0"]
Basic block sizes ^
With the grid set in Blender we can now turn to the building material we'll actually be using, blocks. As established previously the engine technology behind .map based design doesn't handle arbitrary, irregular or "non-axial" brushwork too well. In order to avoid or at least limit the problems this causes the blocks we use need to be of a relatively 'regular' shape and/or size that follow, in approximate fashion, the "power of two" rule. The reason for this is to ensure good texture density on surfaces that also match across the different types of asset games typically use; in principle we should be able to match two similarly sized objects together, one model and one brush volume, without there necessarily being any difference between them texturally.
There are some general guidelines to help with object sizing; for architectural surfaces, walls, floors, etc., meshes should not be too thin, anything under "16 units" is getting into the realms of being potentially problematic so it's best to stay on, around or above that as a minimum - steps and stairs are the only general feature that can be made from smaller volumes, the standard being "8x8 units", height x depth. Anything smaller should be modeled as a static mesh because brush accuracy decreases with size. With these simple requirements established, what we actual do when making a .map based level is 'block out' the design through the juxtaposition of solid shapes rather than manipulating a single mesh.
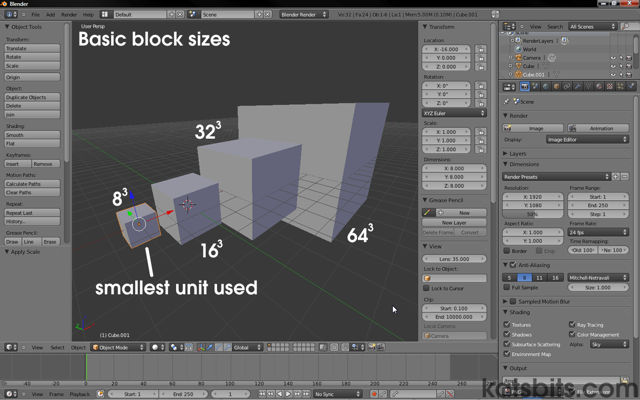
The basic block sizes that are typically used when making meshes in Blender that are to be exported out to the .map format; the smallest for general construction shouldn't be thinner than 16 units. The only exception are steps and stairs which are generally 8 units high (standard being 8 high, 8 deep) [see *.blend "00"]
What we've done so far is establish that in Blender we need to make levels from regular primitive shapes which can be easily converted into brush volumes on export. The grid and it's settings are important to make sure we're making the map at scale and from shapes that are not irregular in character. Next, we'll move on to making a simple level using Blender.
[1: basics | 2: making | 3: curves | 4: textures | 5: entities | 6: level editor | 7: extras]
